Partner integrations
-
Kwant.ai / Checkr Integration User Guide
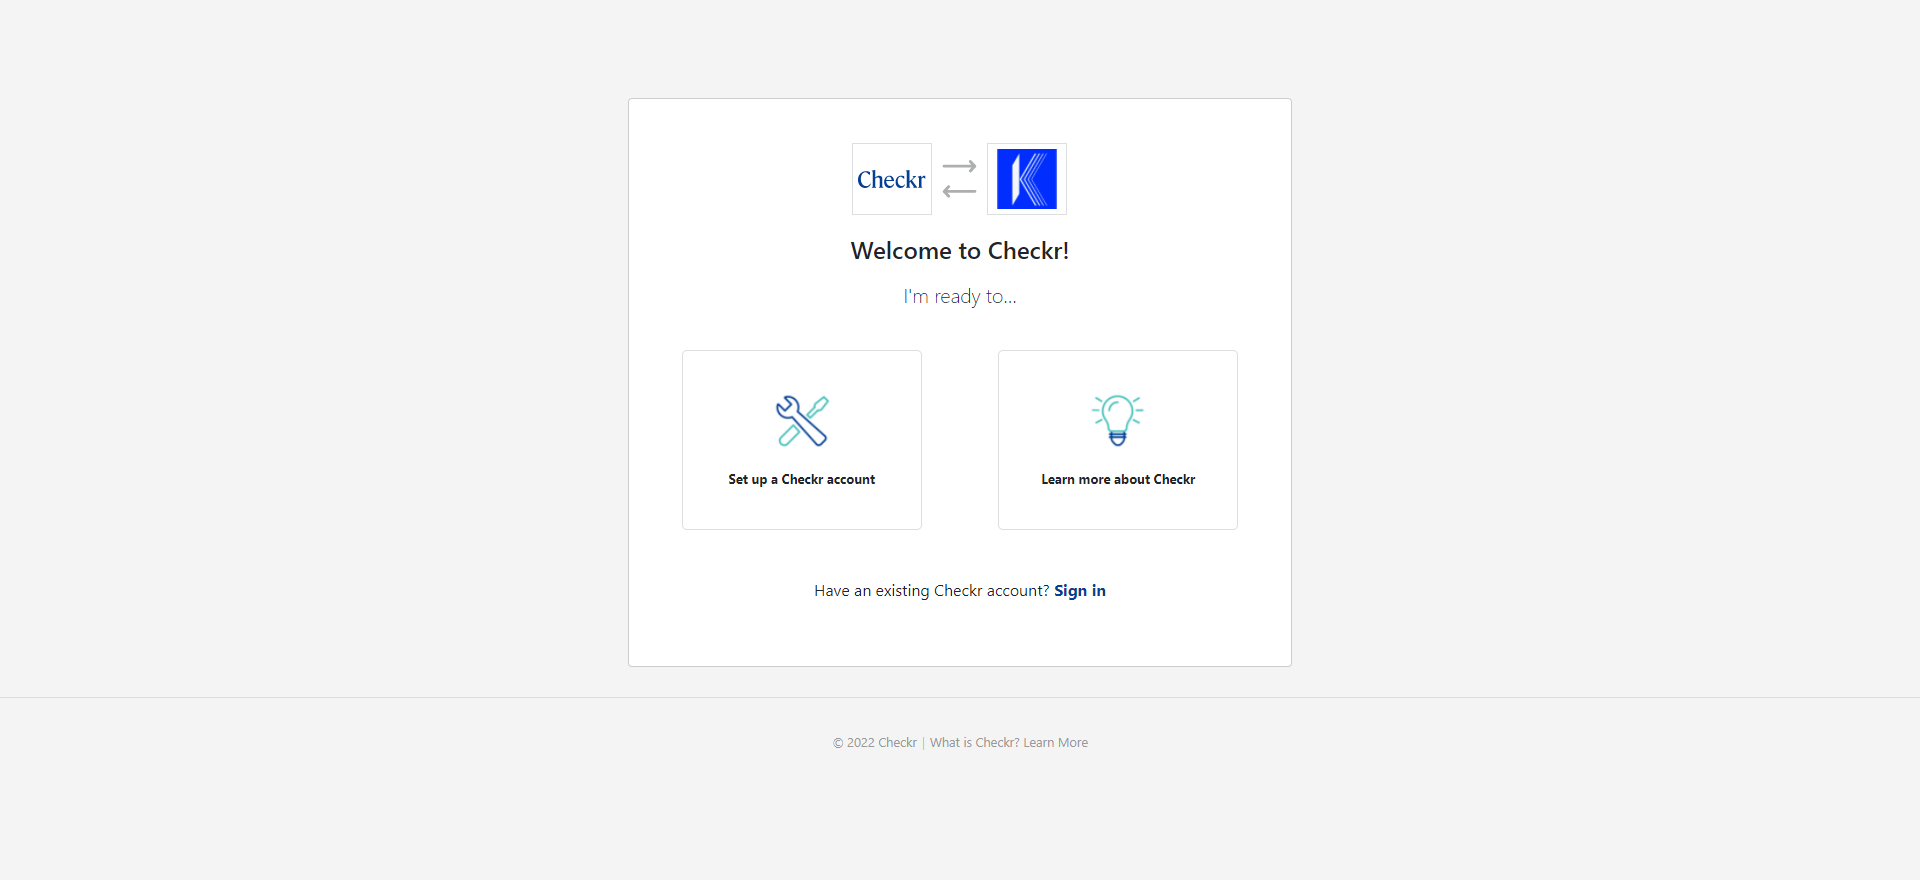
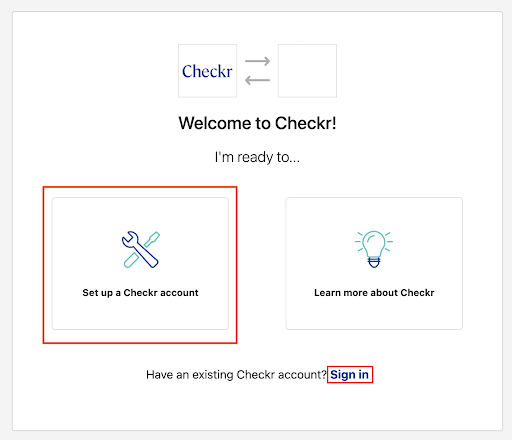
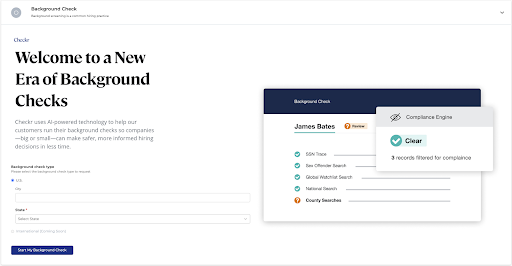
Read MoreWelcome to Checkr!
This guide will walk you through the Checkr /Kwant integration process, and outline how to use the Checkr dashboard for the background check process.
The Checkr Help Center is a great resource for any questions that may not be covered in this user guide. If you have any questions not covered in this guide that are specific to Kwant, please fill out a support request for additional assistance.
_________________________________________________________
- Prerequisites
- Add Checkr to Kwant
- Create a Checkr account
- Order Background Checks
- Use the Checkr Dashboard
_________________________________________________________
This guide describes how to set up Checkr to use within Kwant such that Kwant users can initiate and view Checkr background checks from within the Kwant interface.
Prerequisites
The following items are required to initiate Kwant / Checkr integration. Please ensure you have the following before proceeding.
- Access to Kwant , with Admin rights
Add Checkr to Kwant
First, enable Checkr from within Kwant . You must have admin access to both Checkr and Kwant to complete this process.
Create a Checkr account
If your company does not yet have a Checkr account, one must be created before integration with Kwant.
To create an account for use with Kwant:
- Log into your Kwant account and click on the gear icon in the top navigation bar
- Locate and select ‘Edit Project’ from the drop-down menu.
- Select the ‘Integration’ option and click on ‘CONNECT’ under Checkr Authorization.

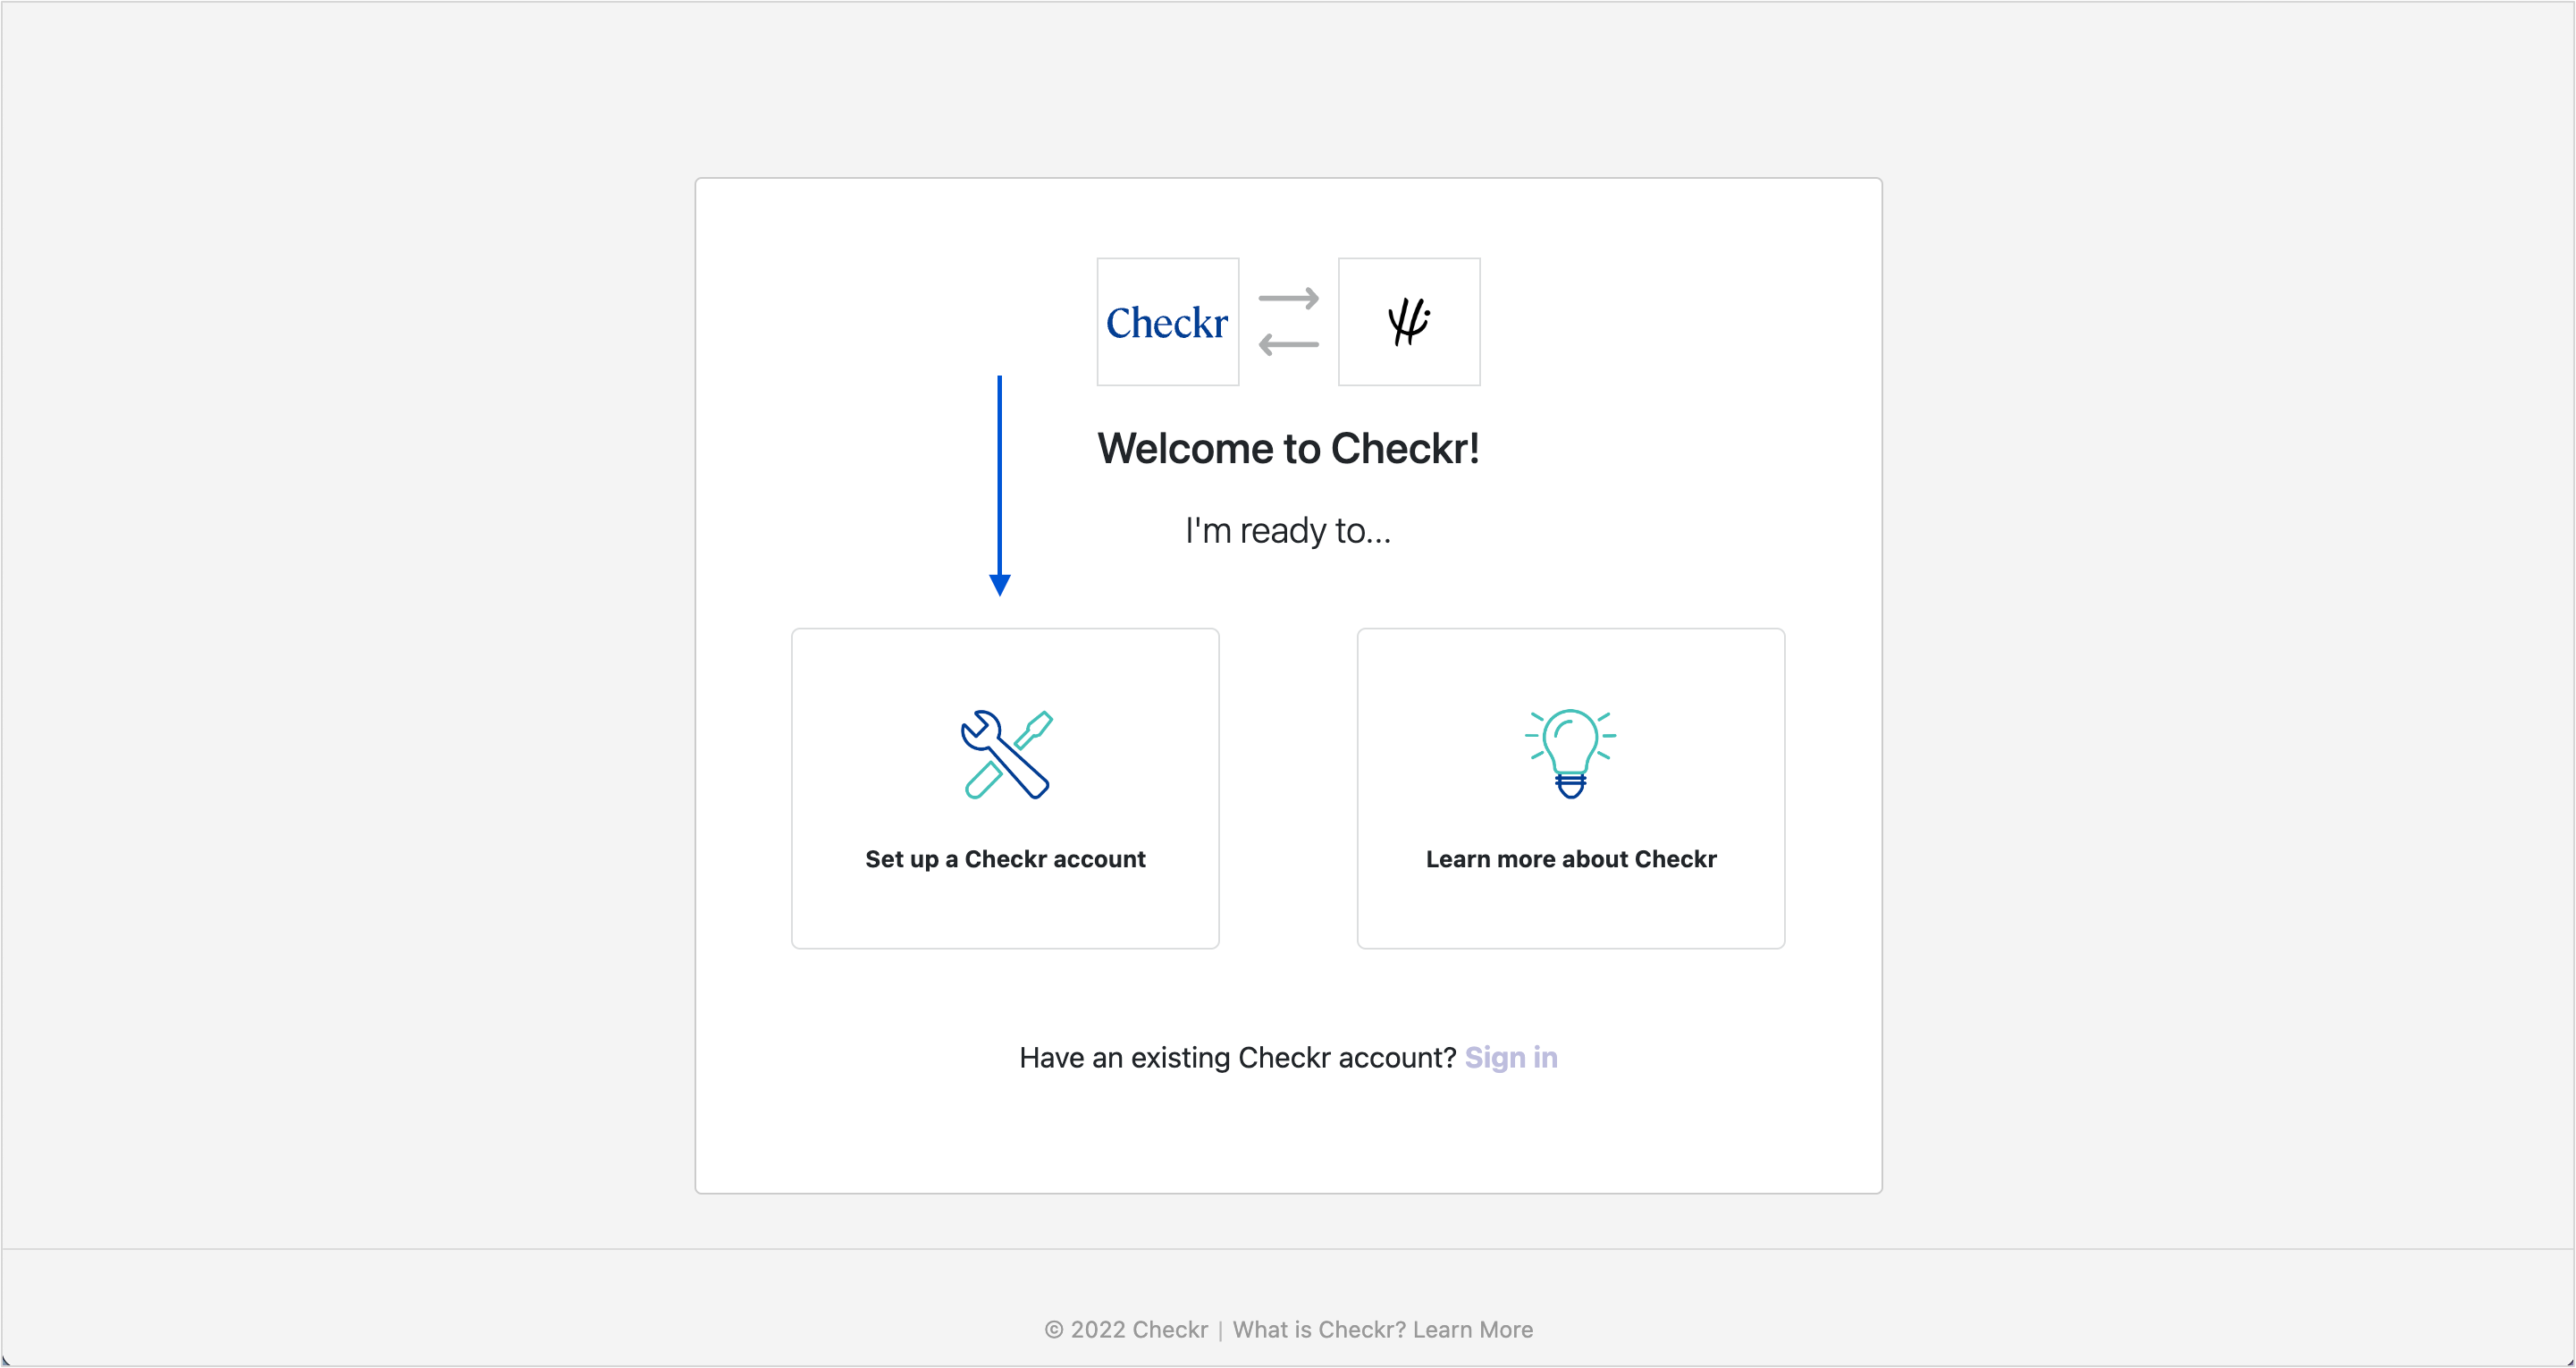
- Select set up a Checkr account if you don’t have an existing account with Checkr.
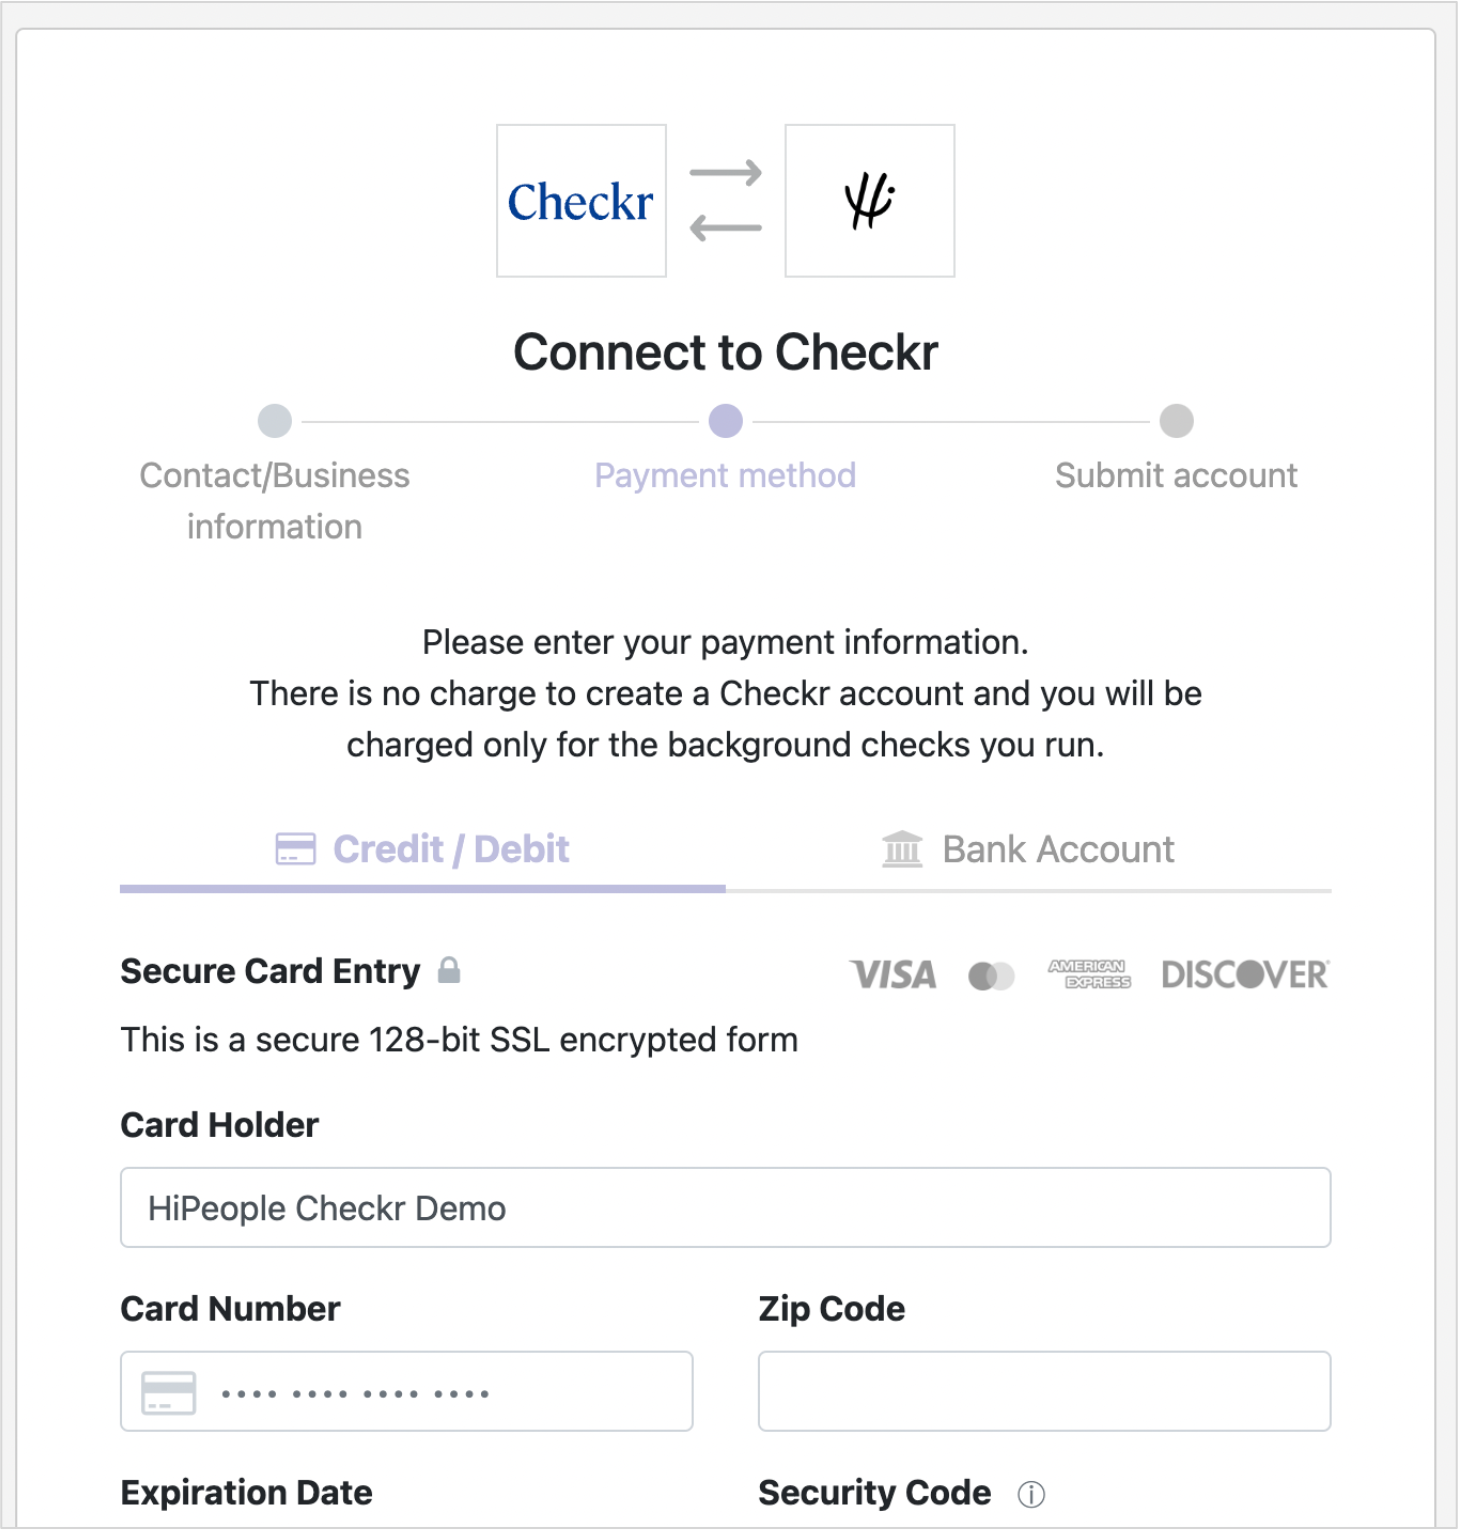
- Enter the information in the form below and submit it.
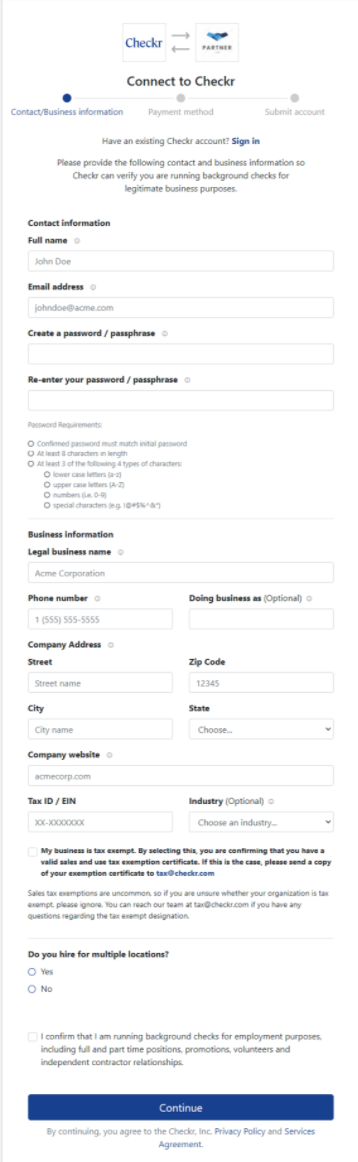
-
Provide the requested credentialing information. This information is required by law to ensure that only legitimate companies, with legitimate business needs, can run background checks.
- Note: Select Purpose: Pre-employment to use Checkr to run background checks for hiring/employment purposes.
- Click Continue to submit your information to Checkr for review. Once the credentialing process is complete, Checkr will notify both Kwant and you, and you may begin ordering background checks through the OnTarget platform.
- Credentialing typically takes 1-2 business days. If Checkr needs additional information, they will reach out to you directly by email.
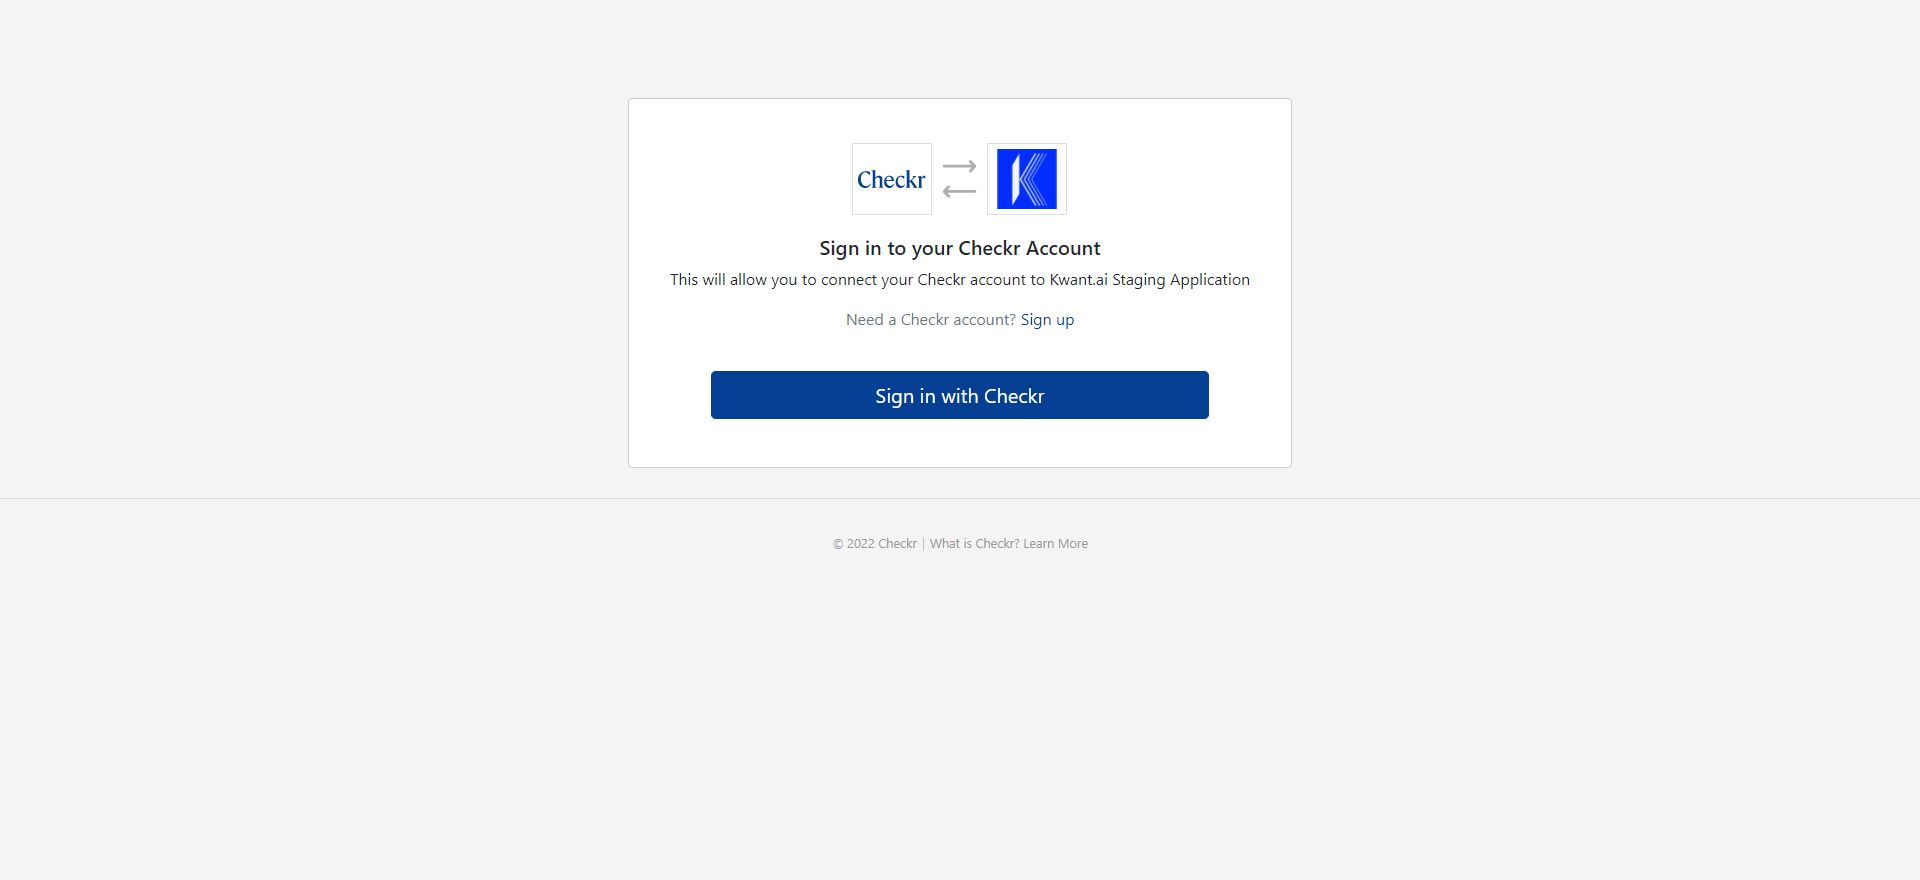
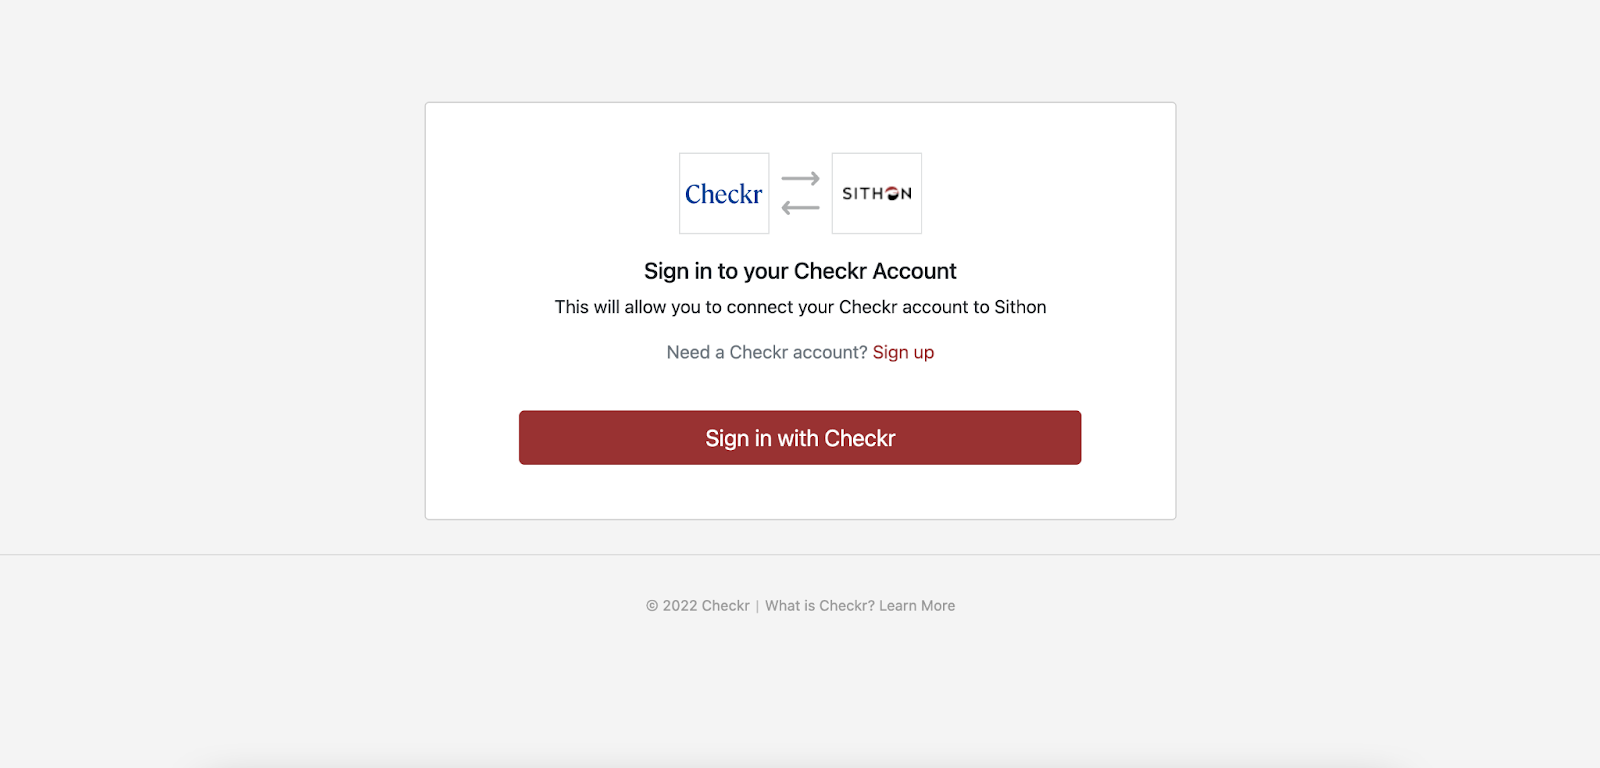
If you already have an account or have created the account using the above process, click on sign in and select sign in with Checkr.
Order Background Checks
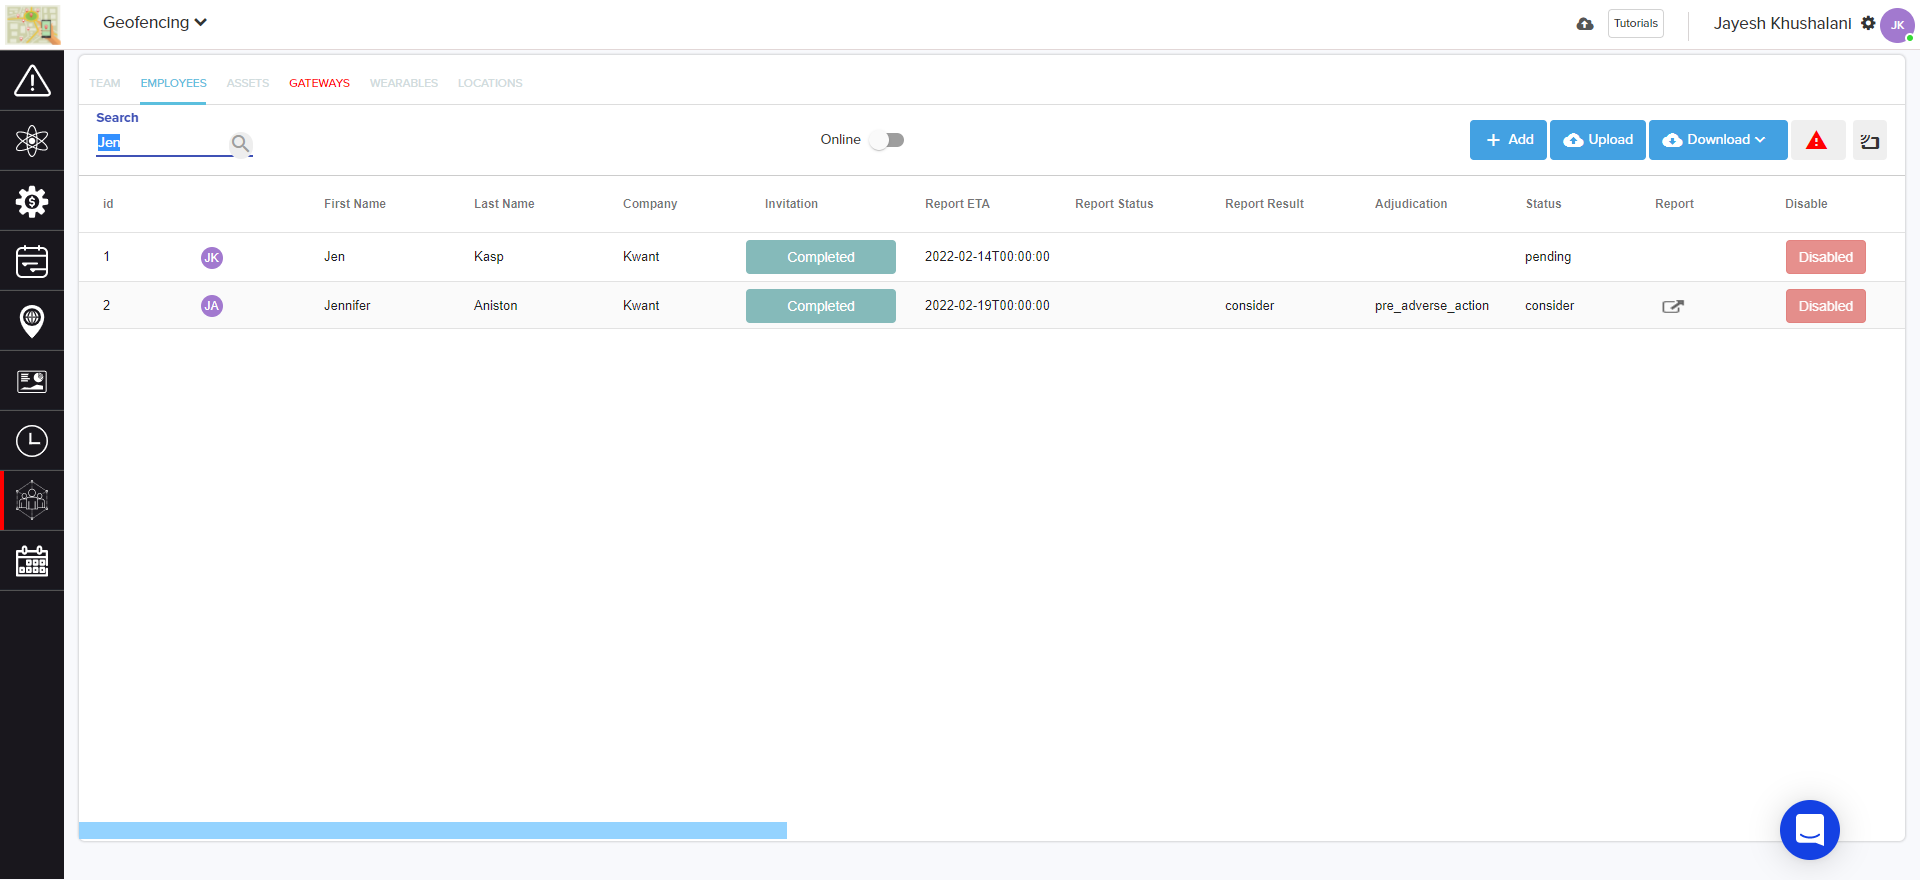
Once your Kwant and Checkr accounts are connected, return to the employee tab under team and resources, and click ‘Request Verification’ under each employee.
In the window that opens, select options for the check, and click ‘Submit’ to send the invitation to the worker. You can only send an invitation via email, thus making it mandatory to record the email ID for each employee.

Once the background check has been ordered, the status of the report will be listed in the employee dashboard in OnTarget. Once Complete, click on the link icon in the report column to open the report in the Checkr Dashboard, and review details. (For more information on reports and report statuses, see How do I interpret a background report in the Checkr Help Center.)
Most background checks will be completed within 24 hours, but the time to complete can range from a few minutes to a few weeks, depending on the type of check ordered, the geographic location of the candidate, and/or county courthouse operations.
Use the Checkr Dashboard
While the Kwant integration allows users to order background checks and view their status, the following features are available only within Checkr:
- Background check invitation links
- Full background check report results
- Adverse Action initiation and processing tools
- Checkr settings
For a quick overview of the Checkr Dashboard, please see Getting started with Checkr.
-
Sithon / Checkr Integration Guide
Read MoreWelcome to Checkr!
This guide will walk you through the Checkr / Sithon integration process, and outline how to use the Checkr dashboard for the background check process.
The Checkr Help Center is a great resource for any questions that may not be covered in this user guide. If you have any questions not covered in this guide that are specific to Sithon, please fill out a support request for additional assistance.
_________________________________________________________
- Prerequisites
- Add Checkr to Sithon
- Create a Checkr account
- Order Background Checks
-
Use the Checkr Dashboard
_________________________________________________________
This guide describes how to set up Checkr to use within Sithon, such that Sithon users can initiate and view Checkr background checks from within the Sithon interface.
Prerequisites
The following items are required to initiate Sithon / Checkr integration. Please ensure you have the following before proceeding.
- Access to Sithon, with admin rights
Add Checkr to Sithon
First, enable Checkr from within Sithon. You must have admin rights access to both Checkr and Sithon to complete this process.
Create a Checkr account
If your company does not yet have a Checkr account, one must be created before full integration and background check capabilities are available within Sithon.
To create a Checkr account for use within Sithon:
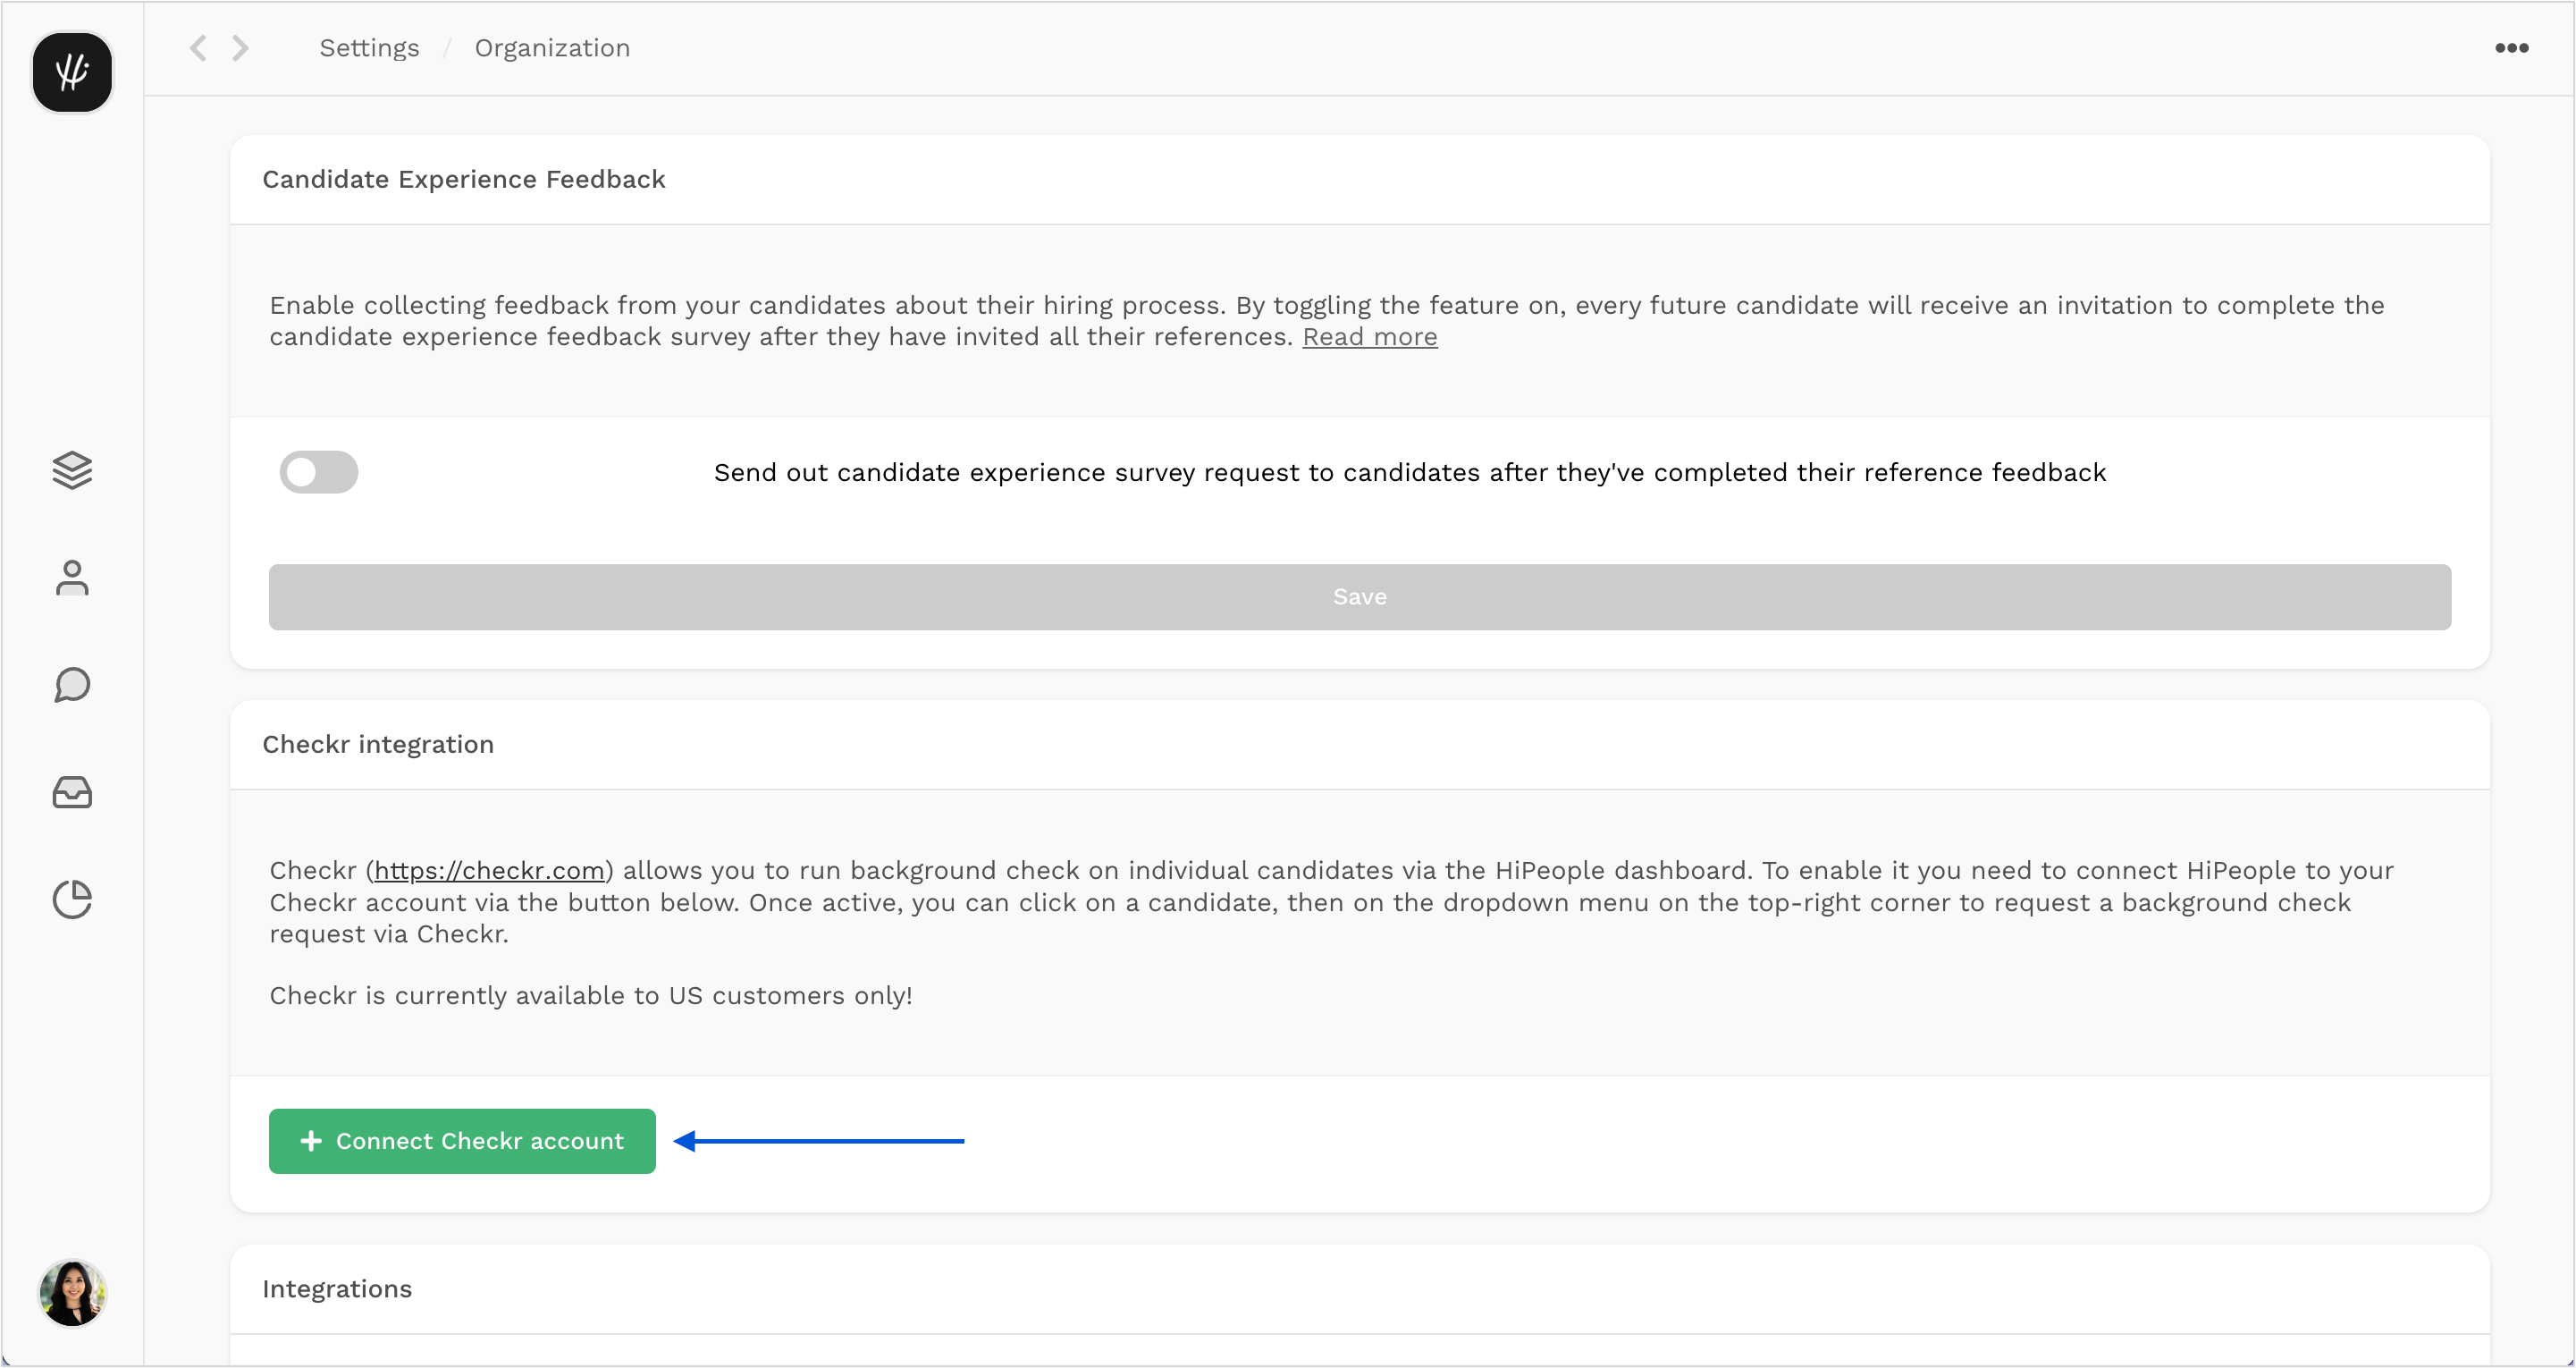
- Navigate to your setting dropdown menu (top right hand corner) and select Background Checks.
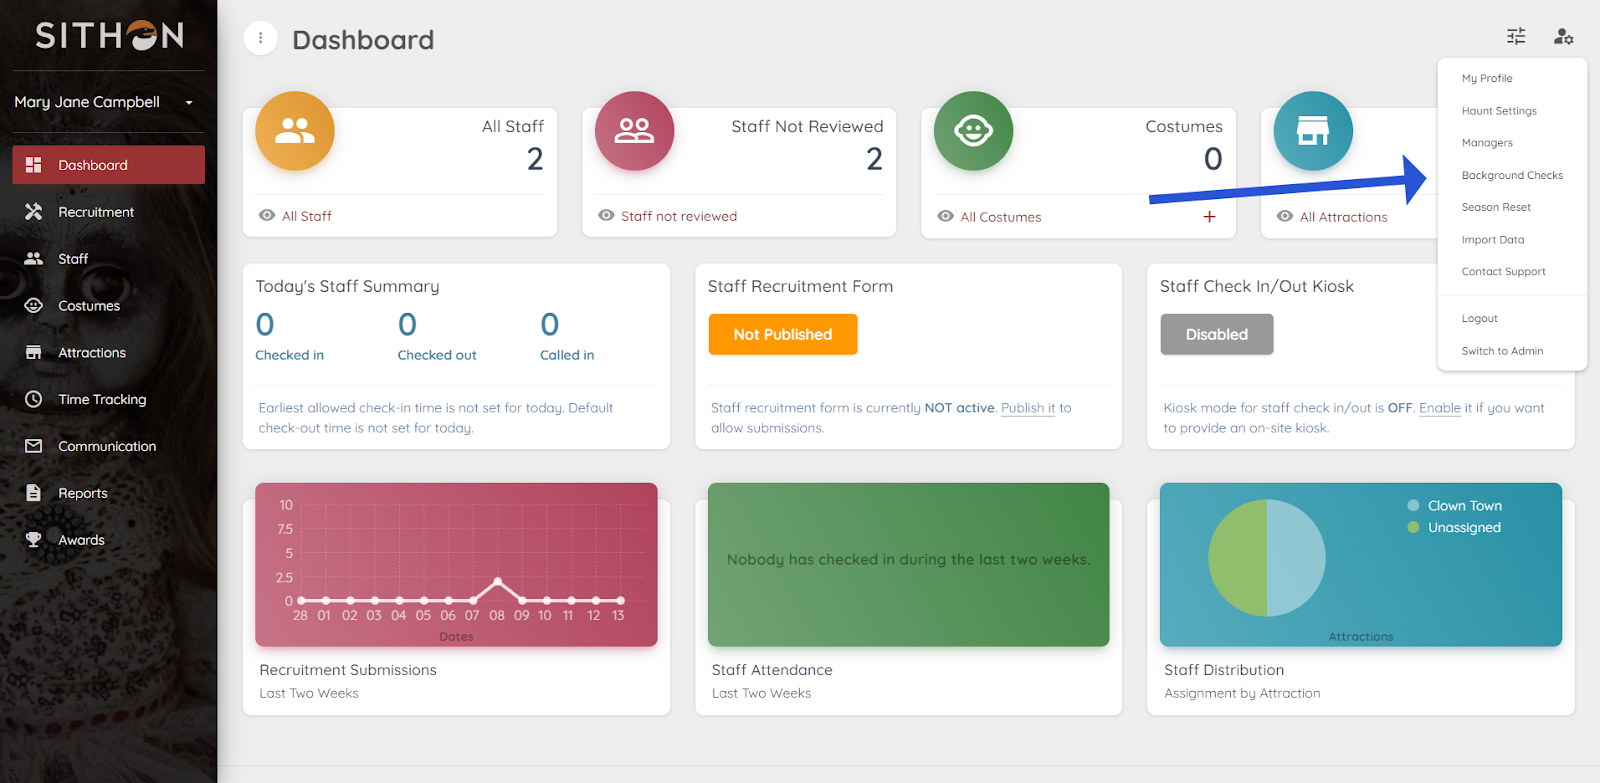
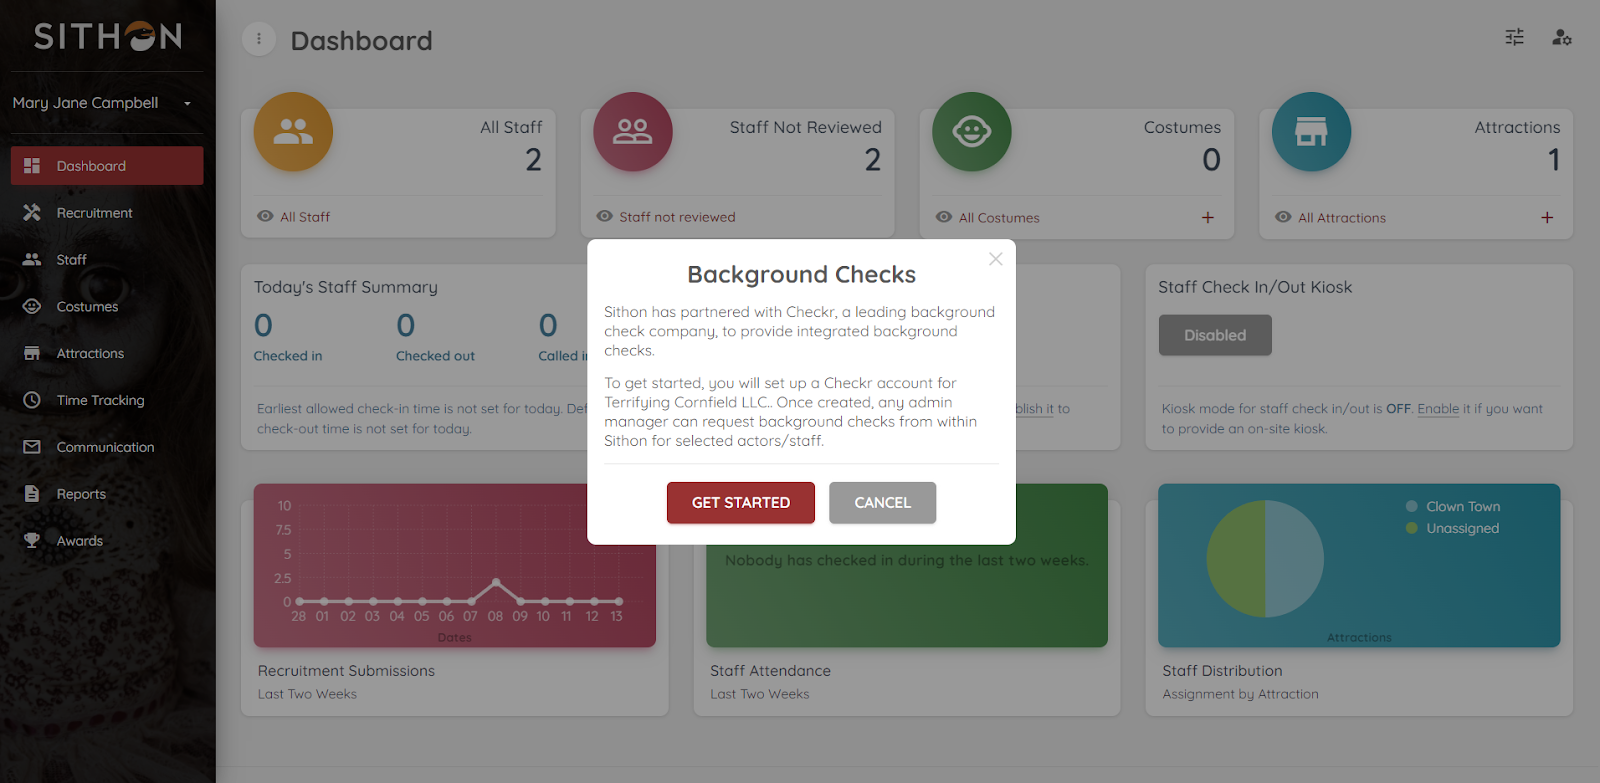
- Select the “Get Started” button, which will open the Checkr connect URL in the same tab.
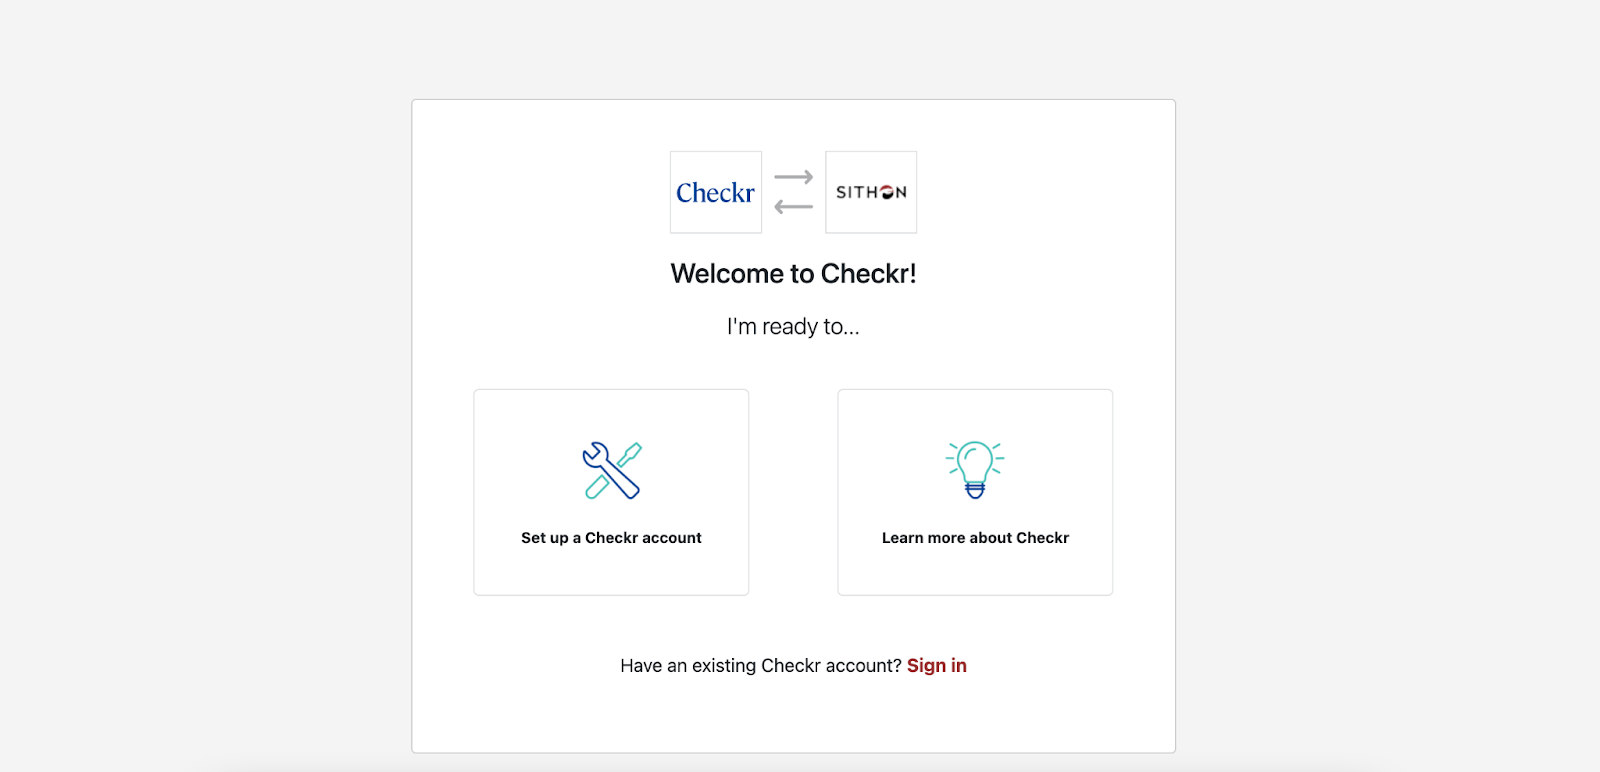
- Select “Set up a Checkr account” of you don’t have an existing account with Checkr.
- You will be prompted with the information required to set up your account.

- Enter the information in the form below and submit it.
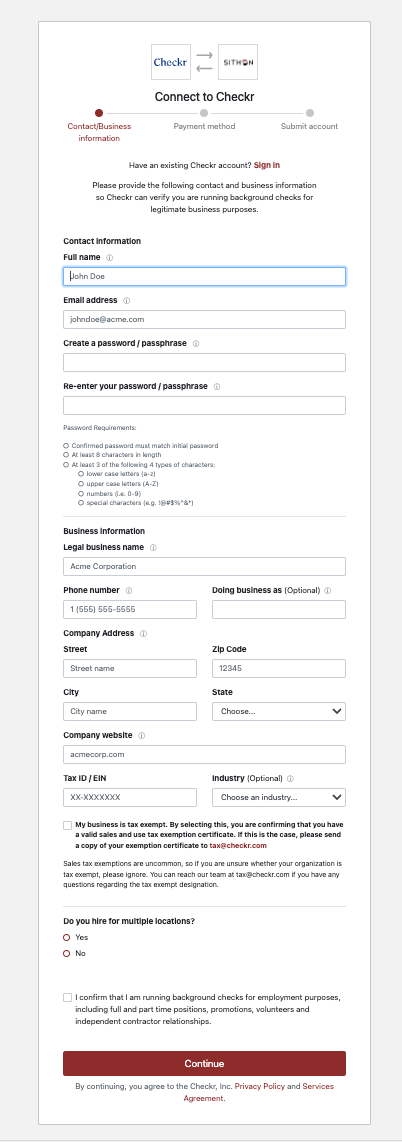
- Enter payment information. Invoices for background checks will come directly from Checkr, and not from Sithon. (Payment information may be edited on the Checkr dashboard after the account has been created.)
- Provide the requested credentialing information. This information is required by law to ensure that only legitimate companies, with legitimate business needs, can run background check
Note: Select Purpose: Pre-employment to use Checkr to run background checks for hiring/employment purposes. - Click Continue to submit your information to Checkr for review. Once the credentialing process is complete, Checkr will notify both Sithon and you, and you may begin ordering background checks through the Sithon platform.
- Credentialing typically takes 1-2 business days. If Checkr needs additional information, they will reach out to you directly by email.
If you already have an account or have created the account using the above process, click on sign in and select sign in with Checkr.
Order Background Checks
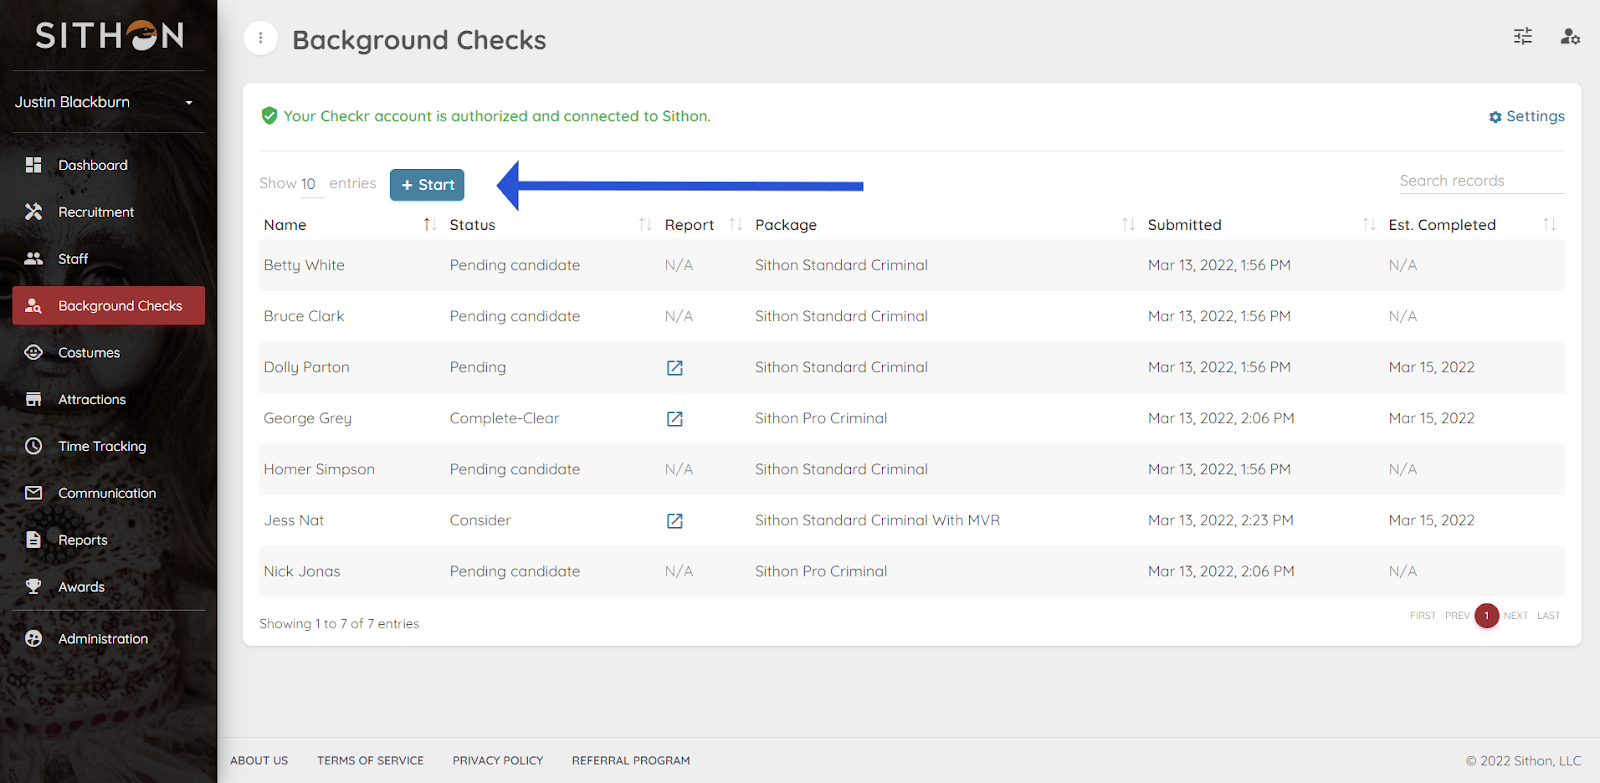
Once your Sithon and Checkr accounts are connected, Background Checks will now be accessible via the left hand side bar menu. Select ‘Background Checks’ to start running checks.
In the window that opens, select “start” to initiate a background check.
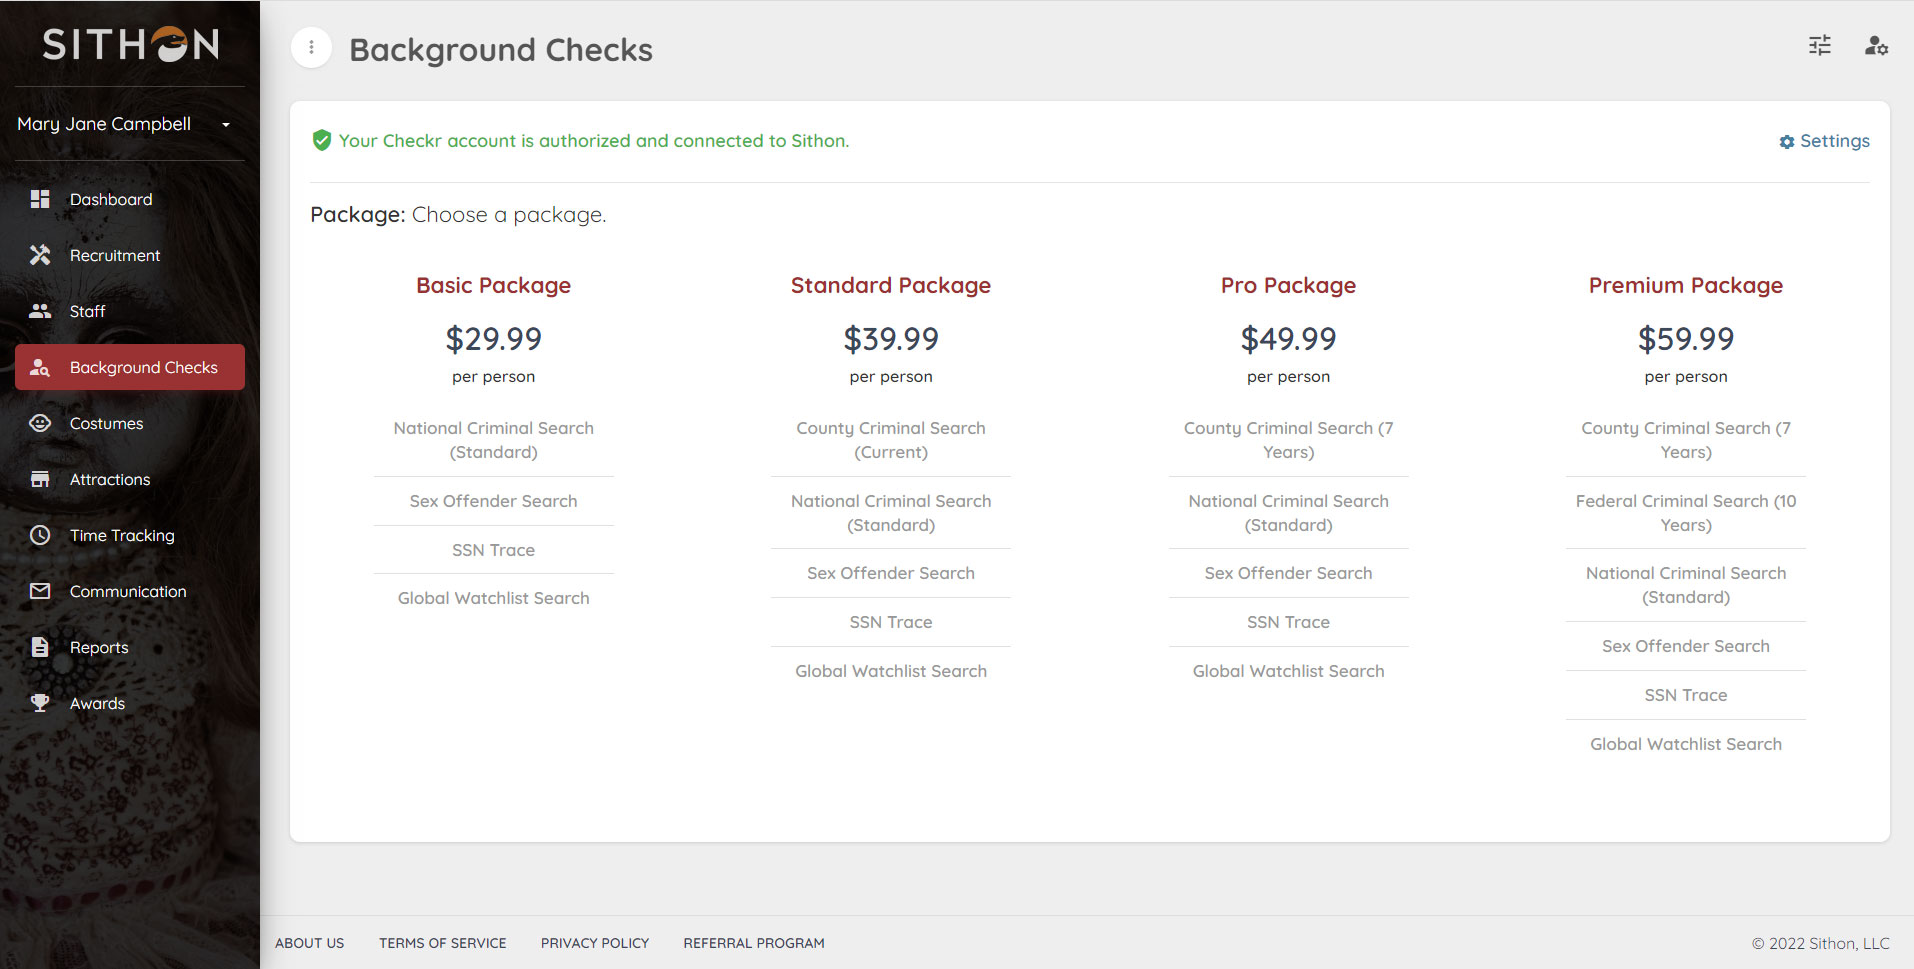
After you select start, you will be prompted to select the package you would like to apply to the background check.
Once a package is selected, select the actors / staff that you want to run background checks on.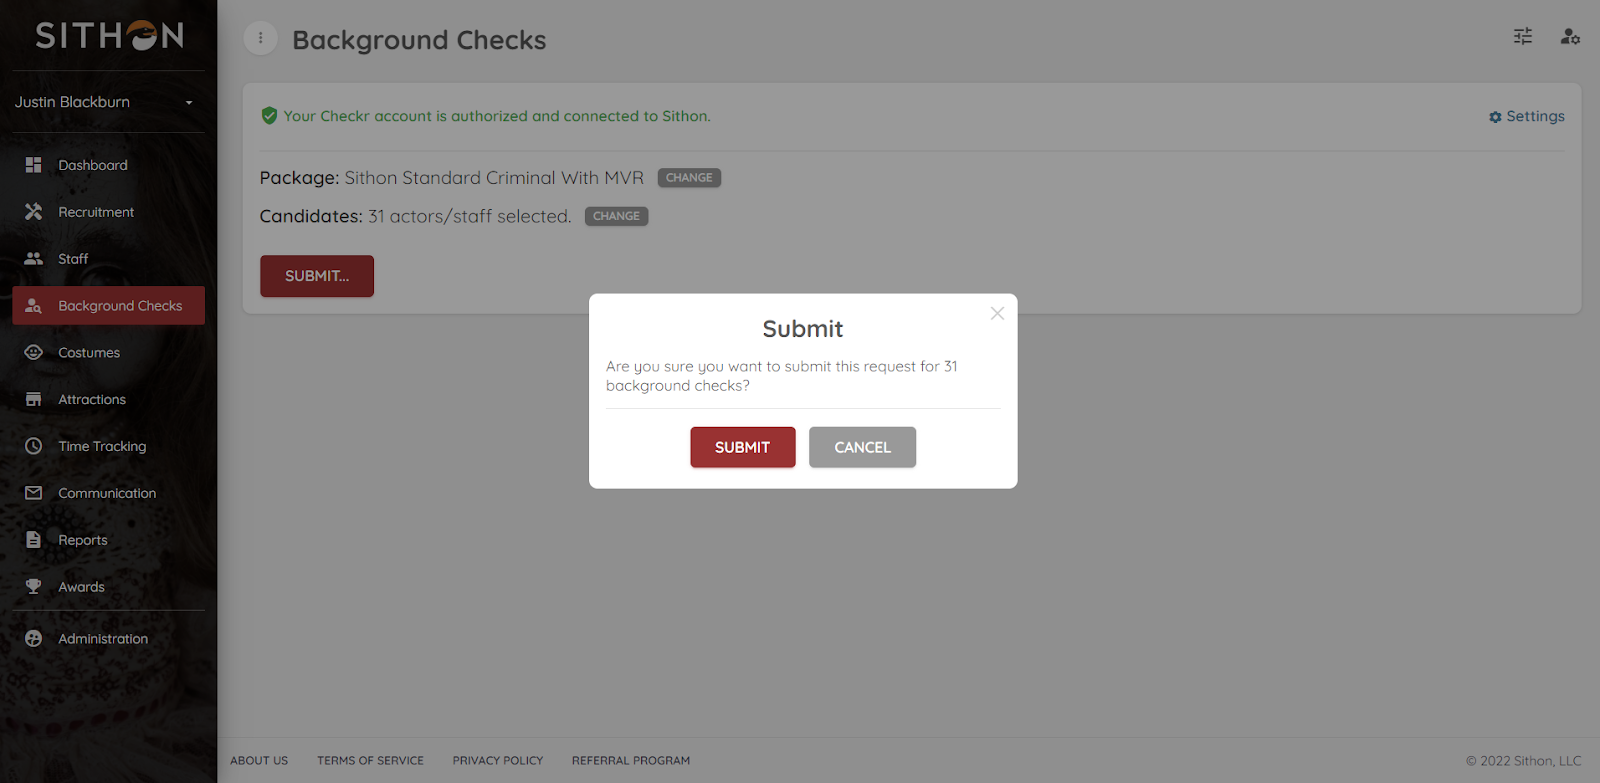
Once actors / staff are selected, you will be prompted to submit the checks. Selecting “Submit” triggers the background check invitation to be sent to the candidate.
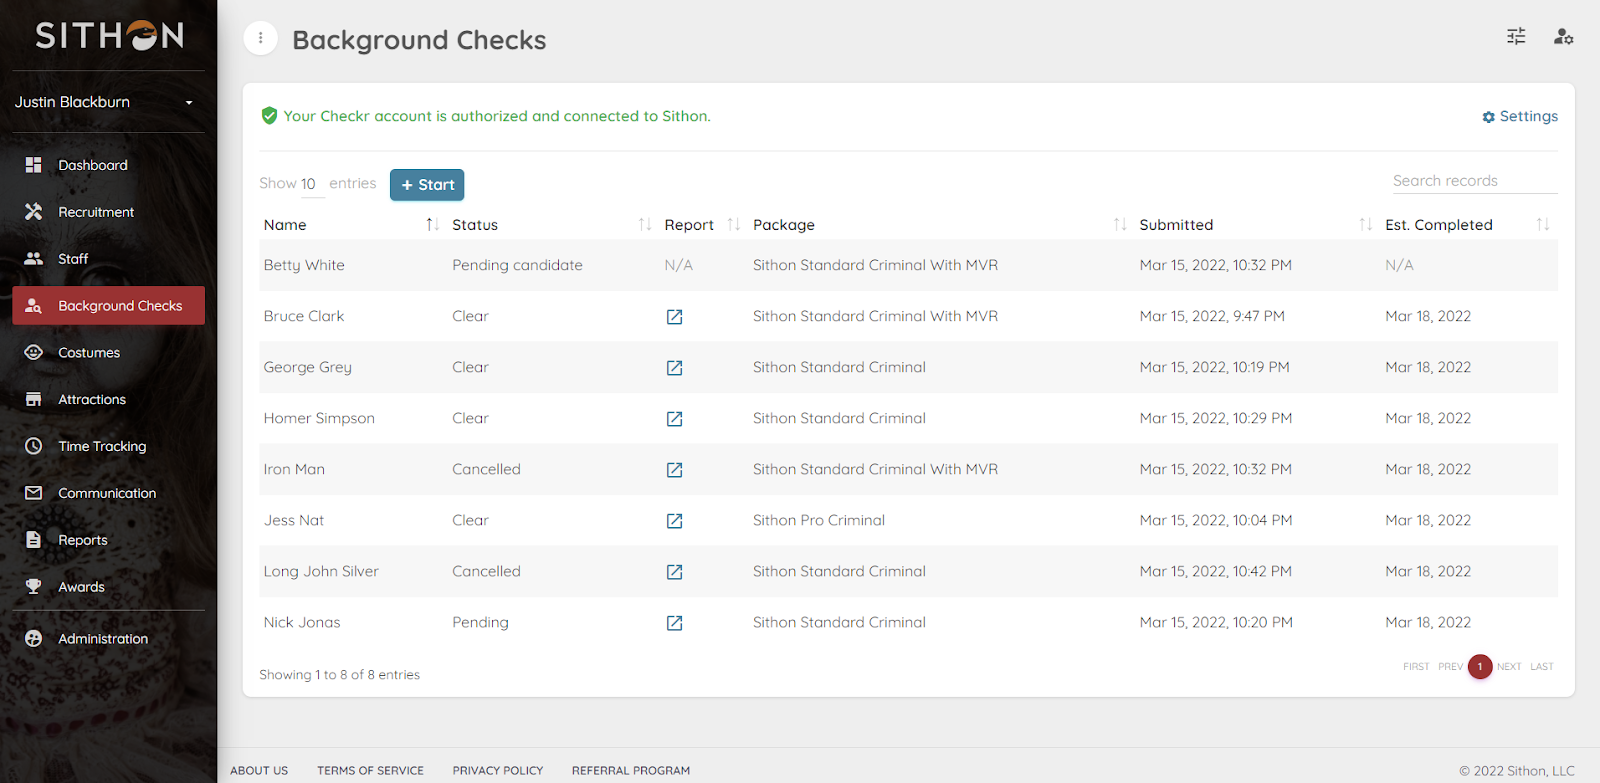
Once the background check has been ordered, the status of the report will be listed in the Sithon background check dashboard under the status column. Once Complete, click the arrow in a box icon under the report column to open the report in the Checkr Dashboard, and review details. (For more information on reports and report statuses, see How do I interpret a background report in the Checkr Help Center.)
Most background checks will be completed within 24 hours, but the time to complete can range from a few minutes to a few weeks, depending on the type of check ordered, the geographic location of the candidate, and/or county courthouse operations. The column “est. completed” will reflect the estimated date of completion.
Use the Checkr Dashboard
While the Sithon integration allows users to order background checks and view their status, the following features are available only within Checkr:
- Background check invitation links
- Full background check report results
- Adverse Action initiation and processing tools
- Create customizable packages and add-ons
- Checkr settings
For a quick overview of the Checkr Dashboard, please see Getting started with Checkr.
-
HiPeople / Checkr Integration User Guide
Read MoreWelcome to Checkr!
This guide will walk you through the Checkr / HiPeople integration process, and outline how to use the Checkr dashboard for the background check process.
The Checkr Help Center is a great resource for any questions that may not be covered in this user guide. If you have any questions not covered in this guide that are specific to HiPeople, please fill out a support request for additional assistance.
_________________________________________________________
- Prerequisites
- Add Checkr to HiPeople
- Enable Checkr setup
- Create a Checkr account
- Order Background Checks
- Use the Checkr Dashboard
_________________________________________________________
This guide describes how to set up Checkr to use within HiPeople, such that HiPeople users can initiate and view Checkr background checks from within the HiPeople interface.
Prerequisites
The following items are required to initiate HiPeople/ Checkr integration. Please ensure you have the following before proceeding.
- Access to HiPeople, with admin rights
Add Checkr to HiPeople
First, enable Checkr from within HiPeople. You must have admin access to both Checkr and HiPeople to complete this process.
If your company does not yet have a Checkr account, one must be created for the integration with HiPeople. Please see the steps below.
If your company does have a Checkr account, you can follow the steps below and Sign In instead of Signing Up.
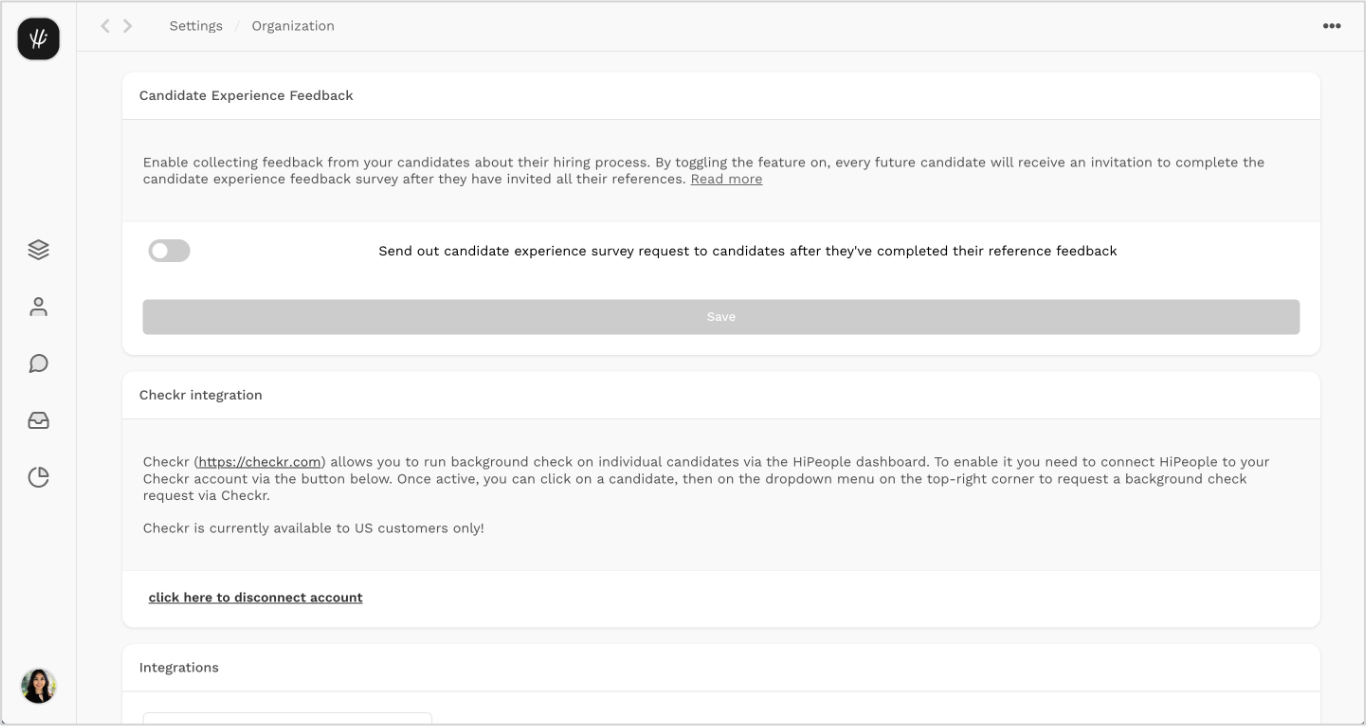
Enable Checkr setup
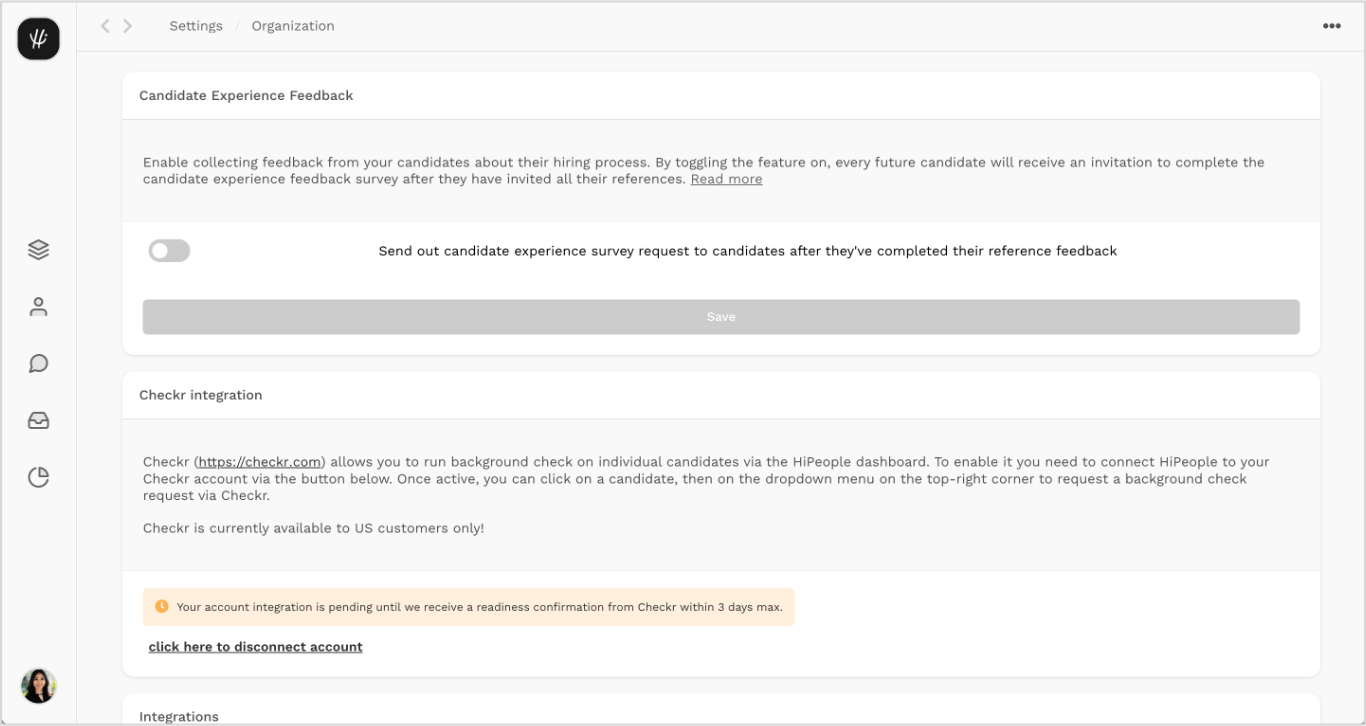
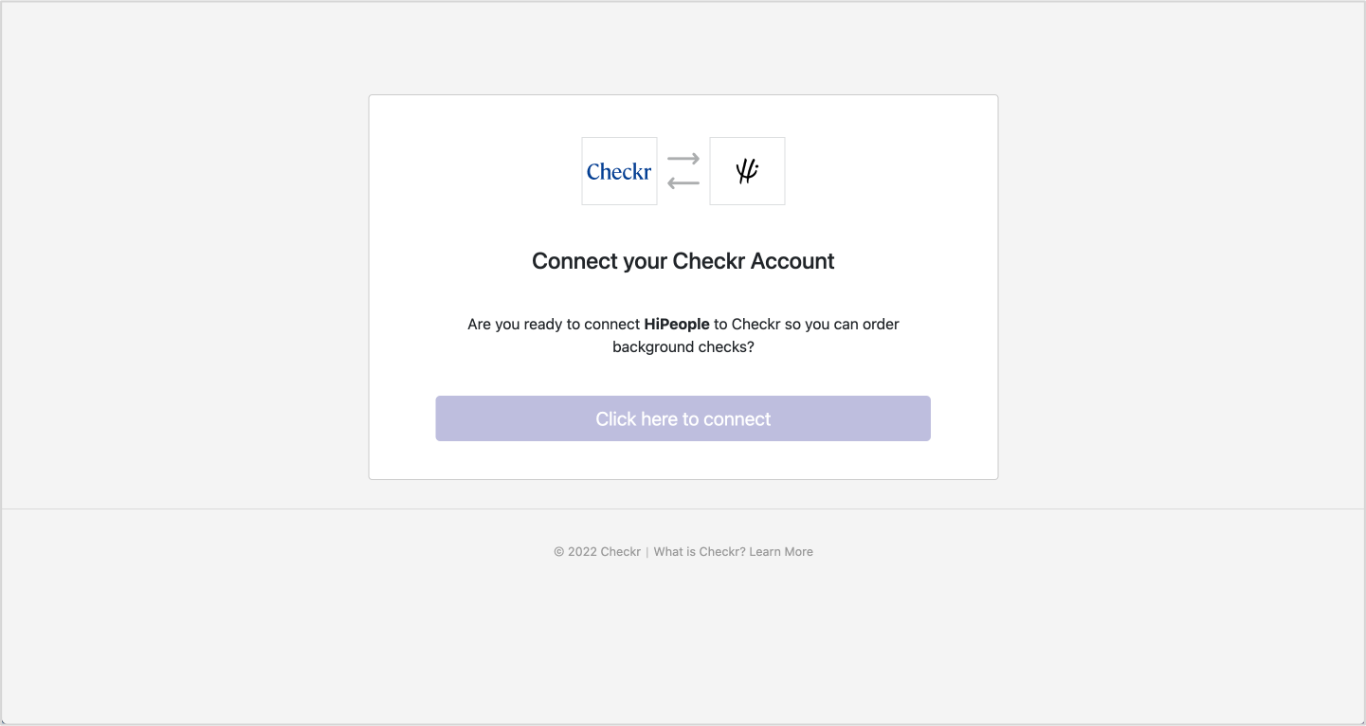
To initiate integration, log into your HiPeople account. Click the top logo in the sidebar to open the dropdown menu, and navigate your organization settings.

Click the “Connect Checkr Account” button in the settings page.
Create a Checkr account
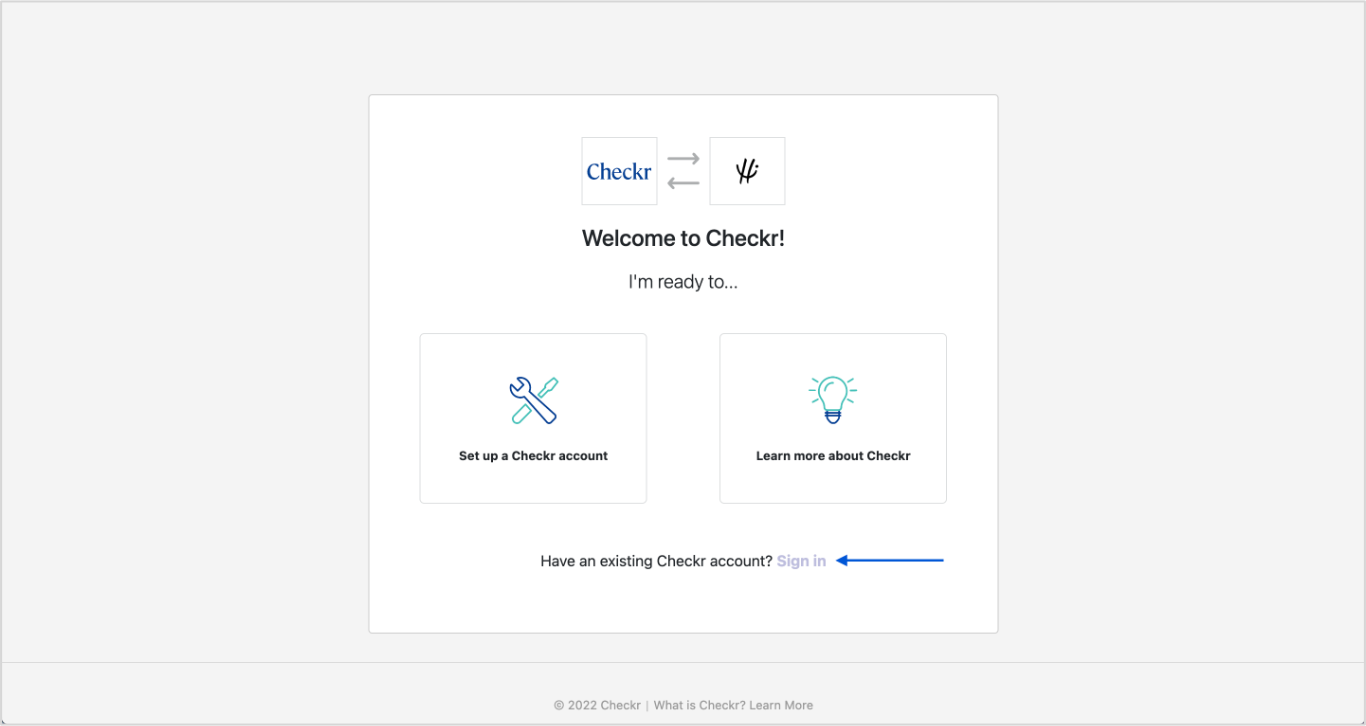
- If your company does not yet have a Checkr account, click “Set Up a Checkr Account” and “Continue”.
- Enter your contact and business information and click “Continue”

- Enter your payment details and click “Continue”.
Note: Invoices for background checks will come directly from Checkr and not from HiPeople. Payment information may be edited on the Checkr dashboard after the account has been created.
- Next, click “submit account” to submit your account to Checkr for Authorization. Once the credentialing process is complete, Checkr will notify both HiPeople and you, and you may begin ordering background checks through HiPeople.
Credentialing typically takes 1-2 business days. If Checkr needs additional information, they will reach out to you directly by email.
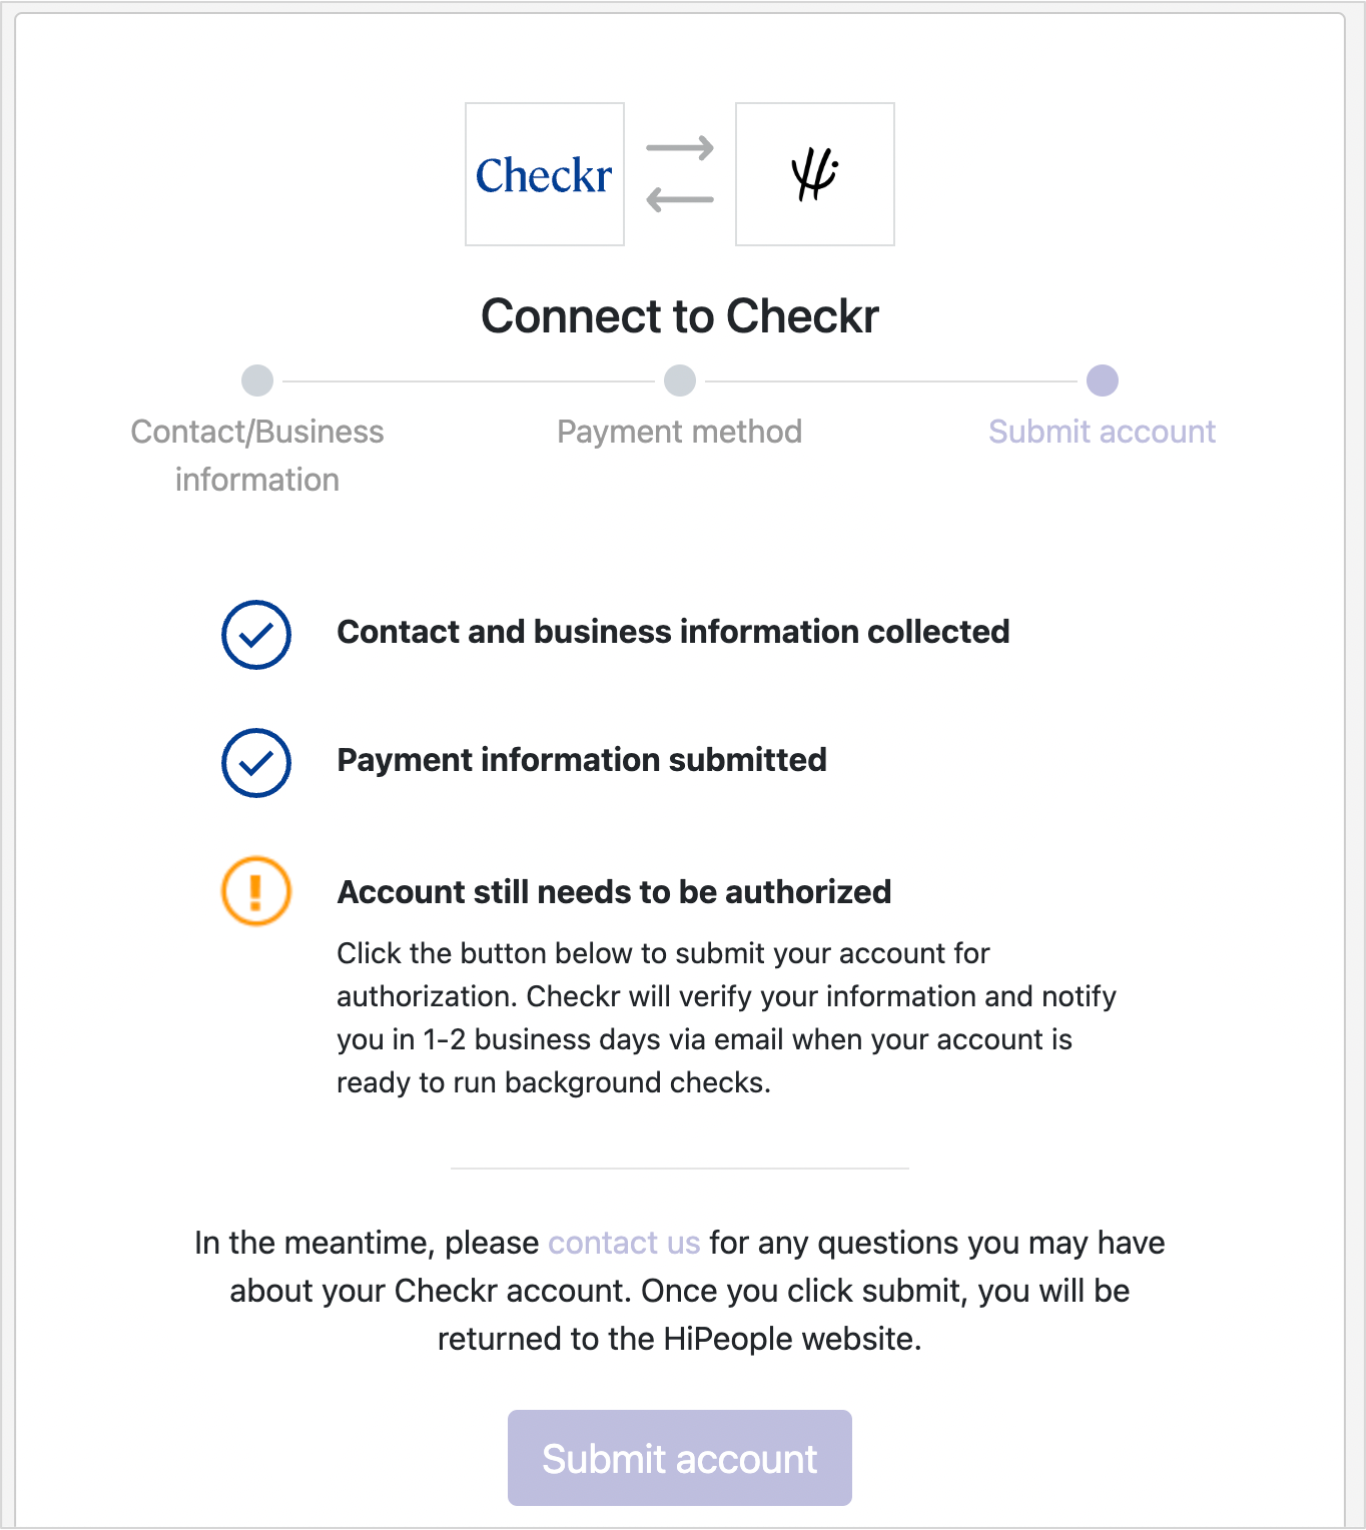
You will be redirected back to HiPeople. In your organization settings in HiPeople, you will see a pending Checkr approval message until your account is credentialed. Once the account is approved, the message will disappear and you will be able to start using Checkr with HiPeople.
Sign In to an Existing Checkr account
To initiate integration, log into your HiPeople account. Click the top logo in the sidebar to open the dropdown menu, and navigate your organization settings. Click the “Connect Checkr Account” button on the settings page.
- Here, existing customers can click “Sign In”, then “Sign In with Checkr”
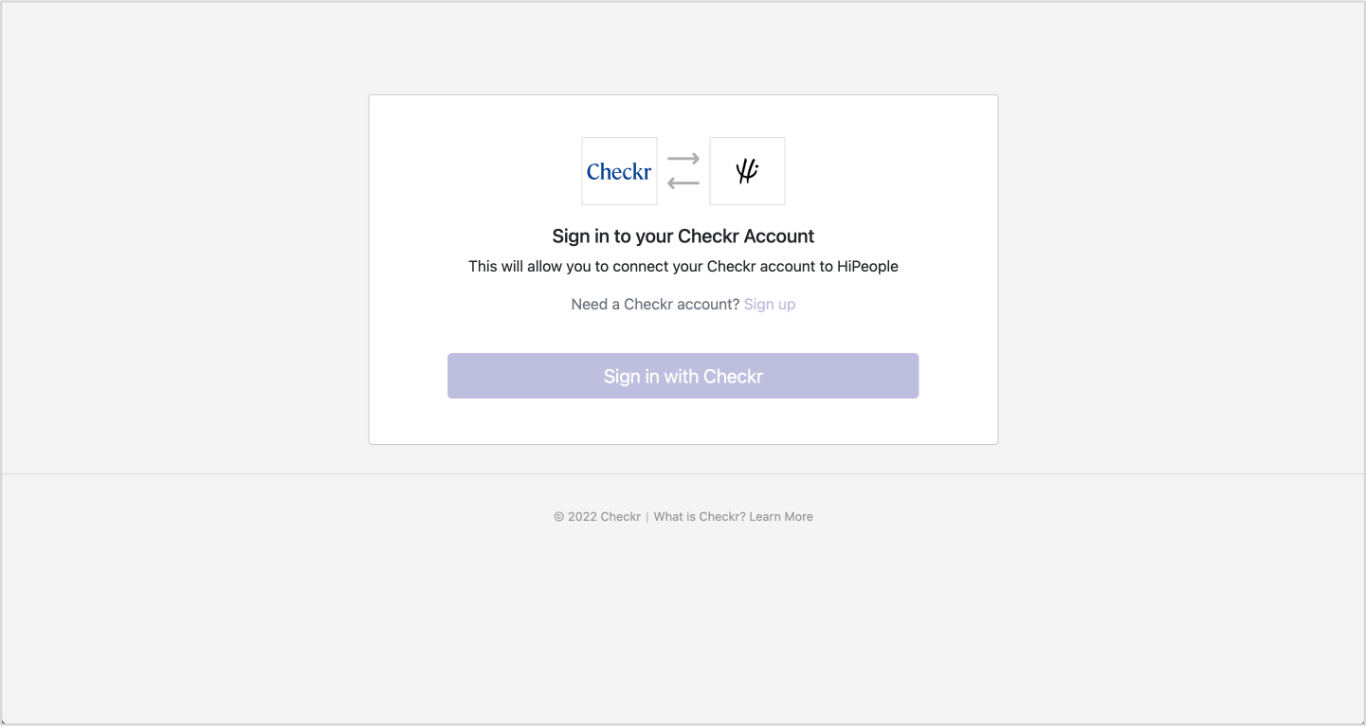
- Log in with your Checkr Account details.
- Continue with “Click here to connect.”
- You will be redirected to HiPeople. As long as your account is credentialed for Checkr usage, you will be able to start using Checkr with HiPeople. Otherwise, you will see a pending Checkr approval message until your account is credentialed.
Order Background Checks
Once your HiPeople and Checkr accounts are connected, you will be able to request a background check. Step by step can be found below.
Note: the role must have either Reference Checks or Assessment enabled.
- Visit the page of the candidate you would like to request a background check for.
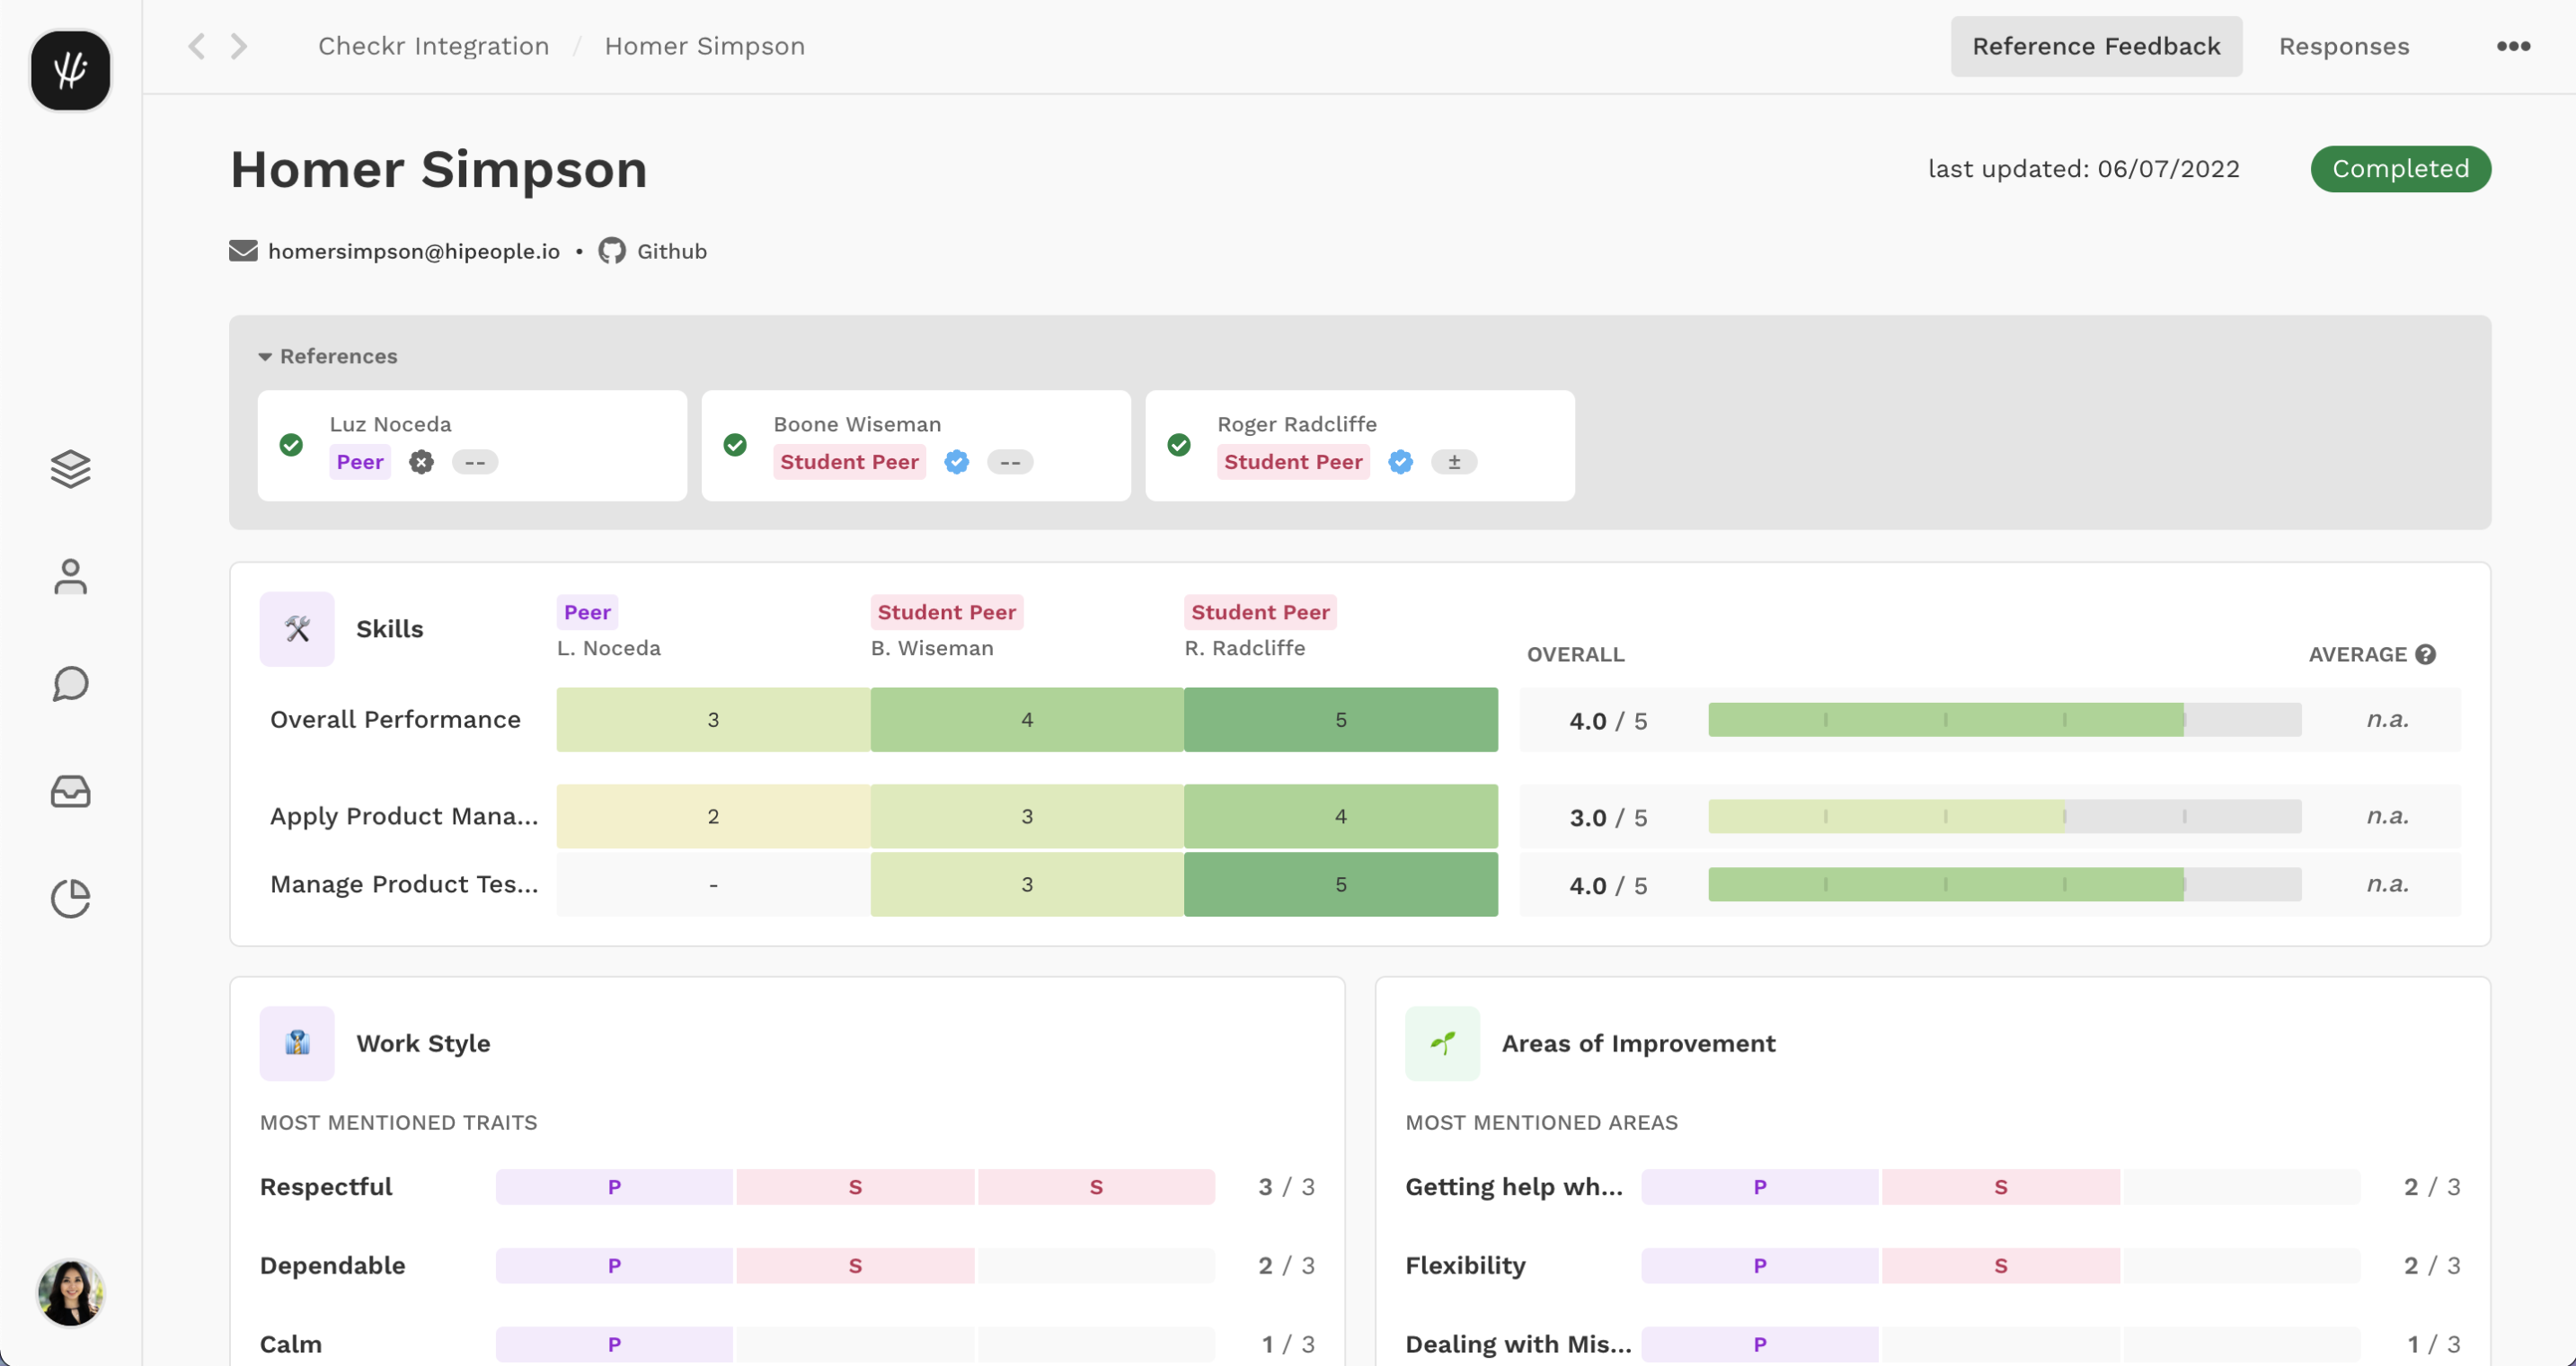
- Click on the three dots in the top right-hand corner to open the candidate drop-down menu.
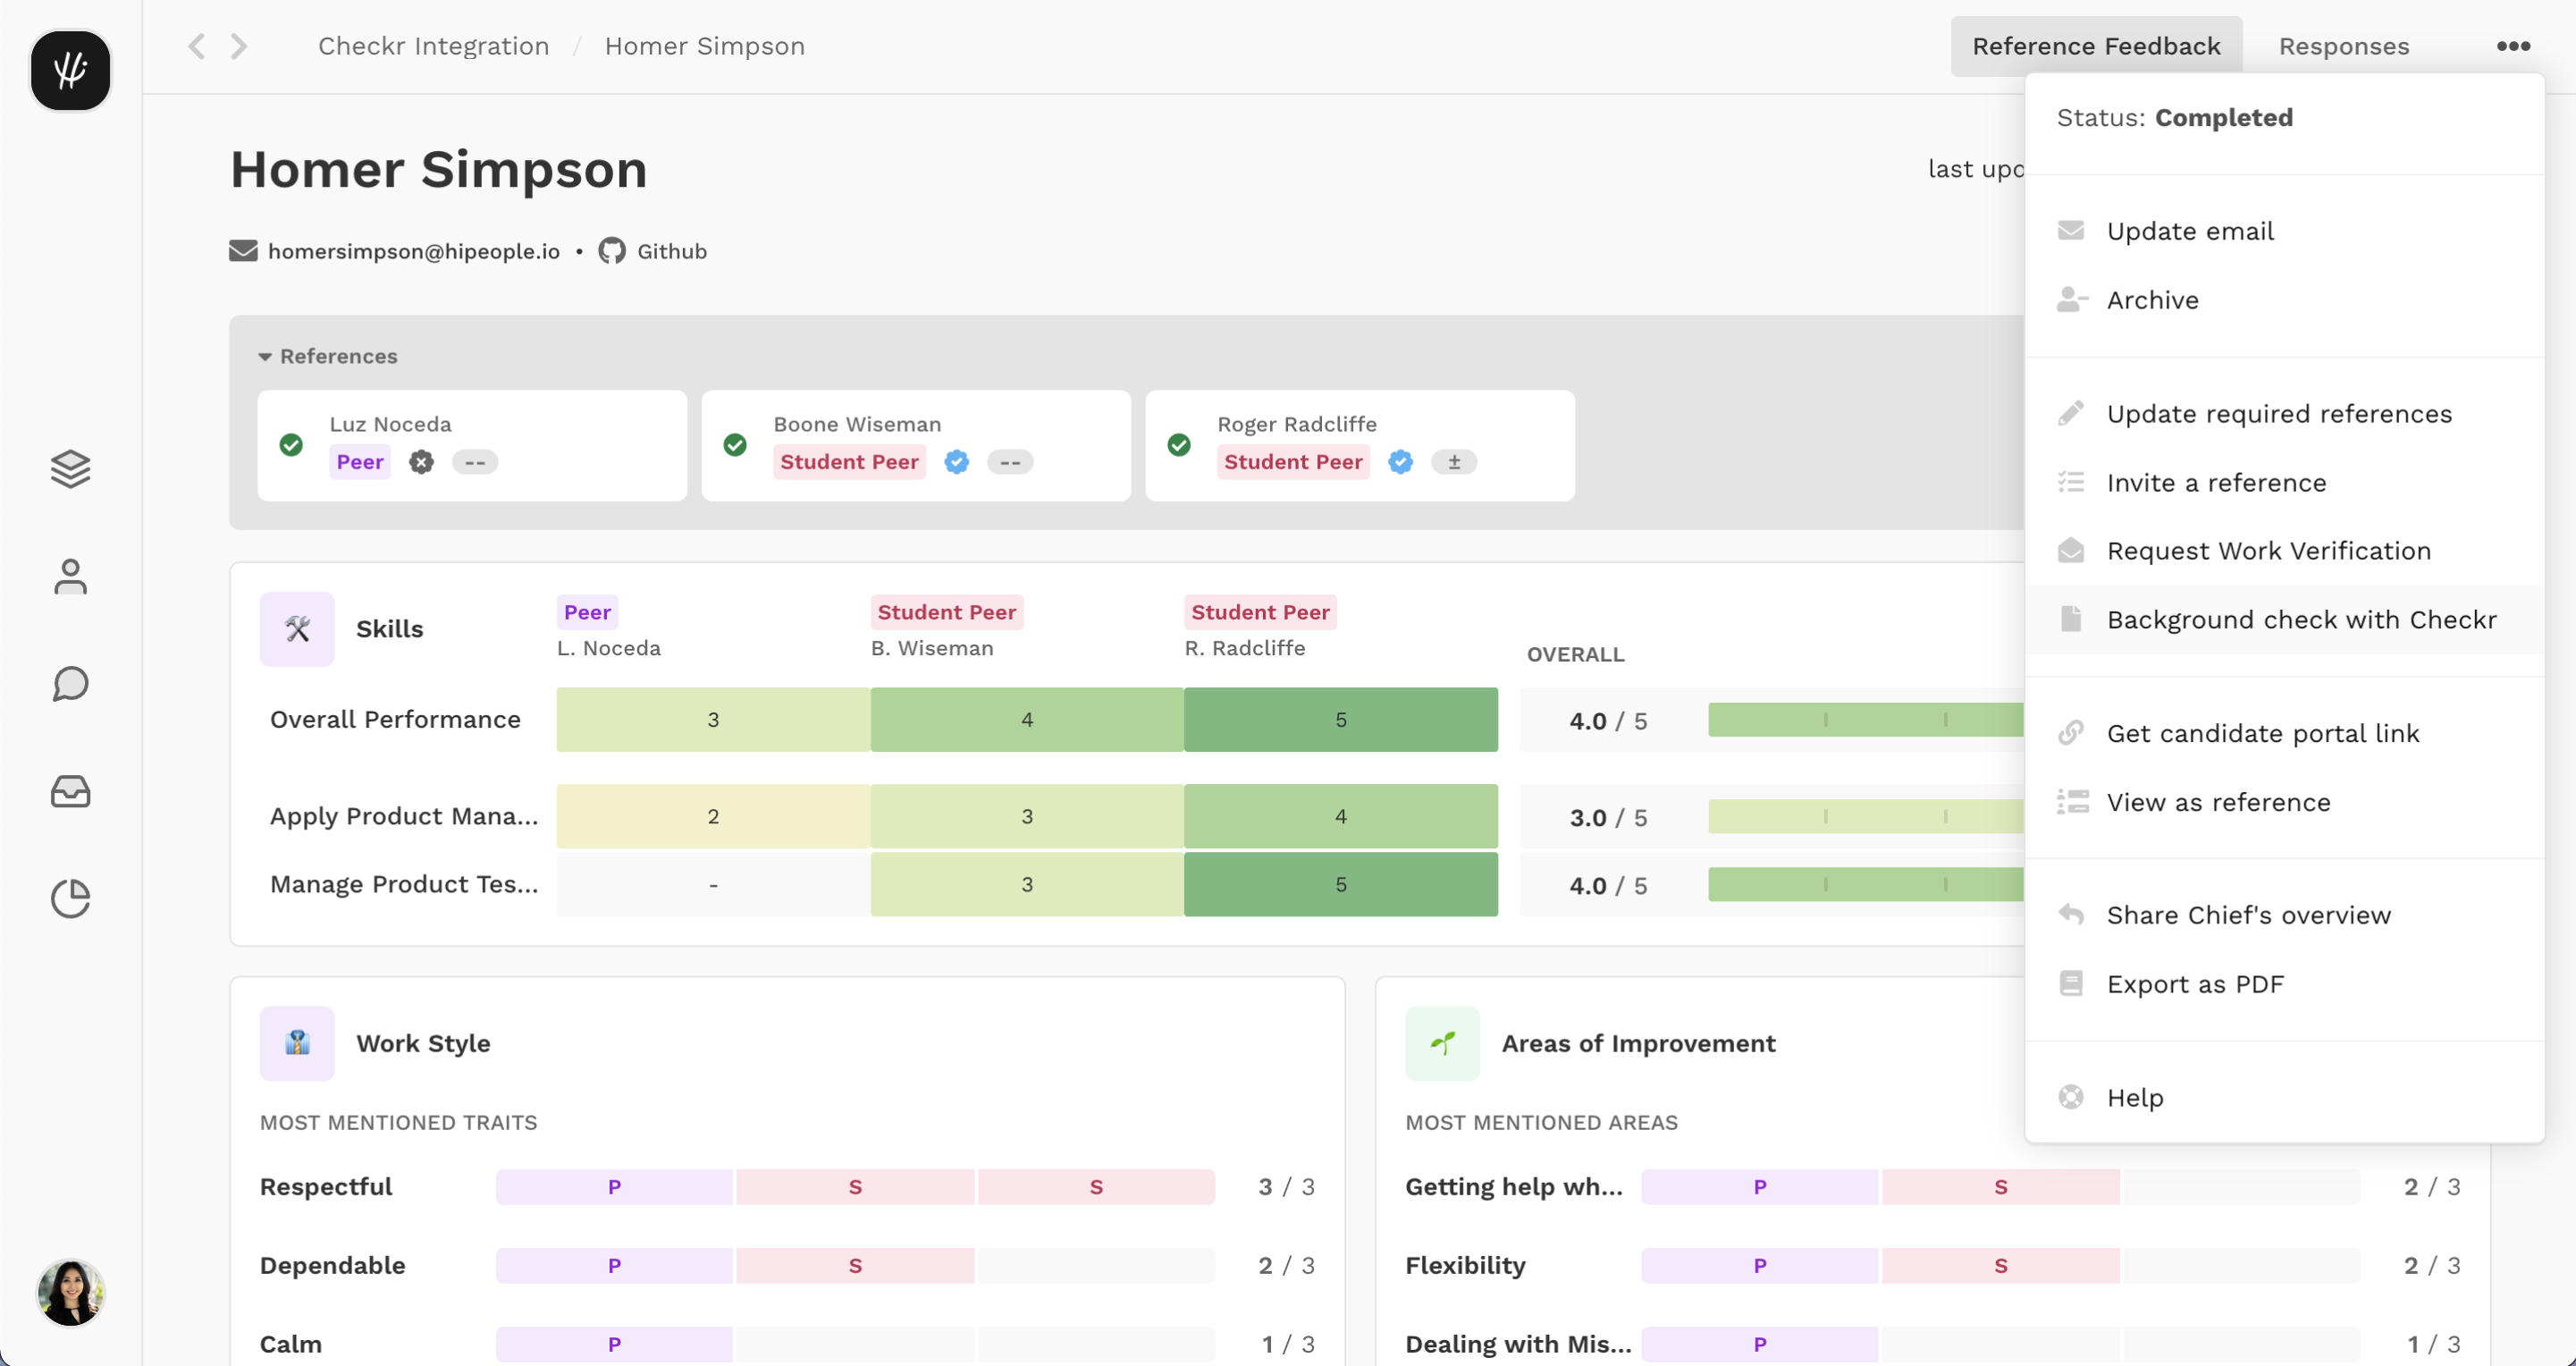
-
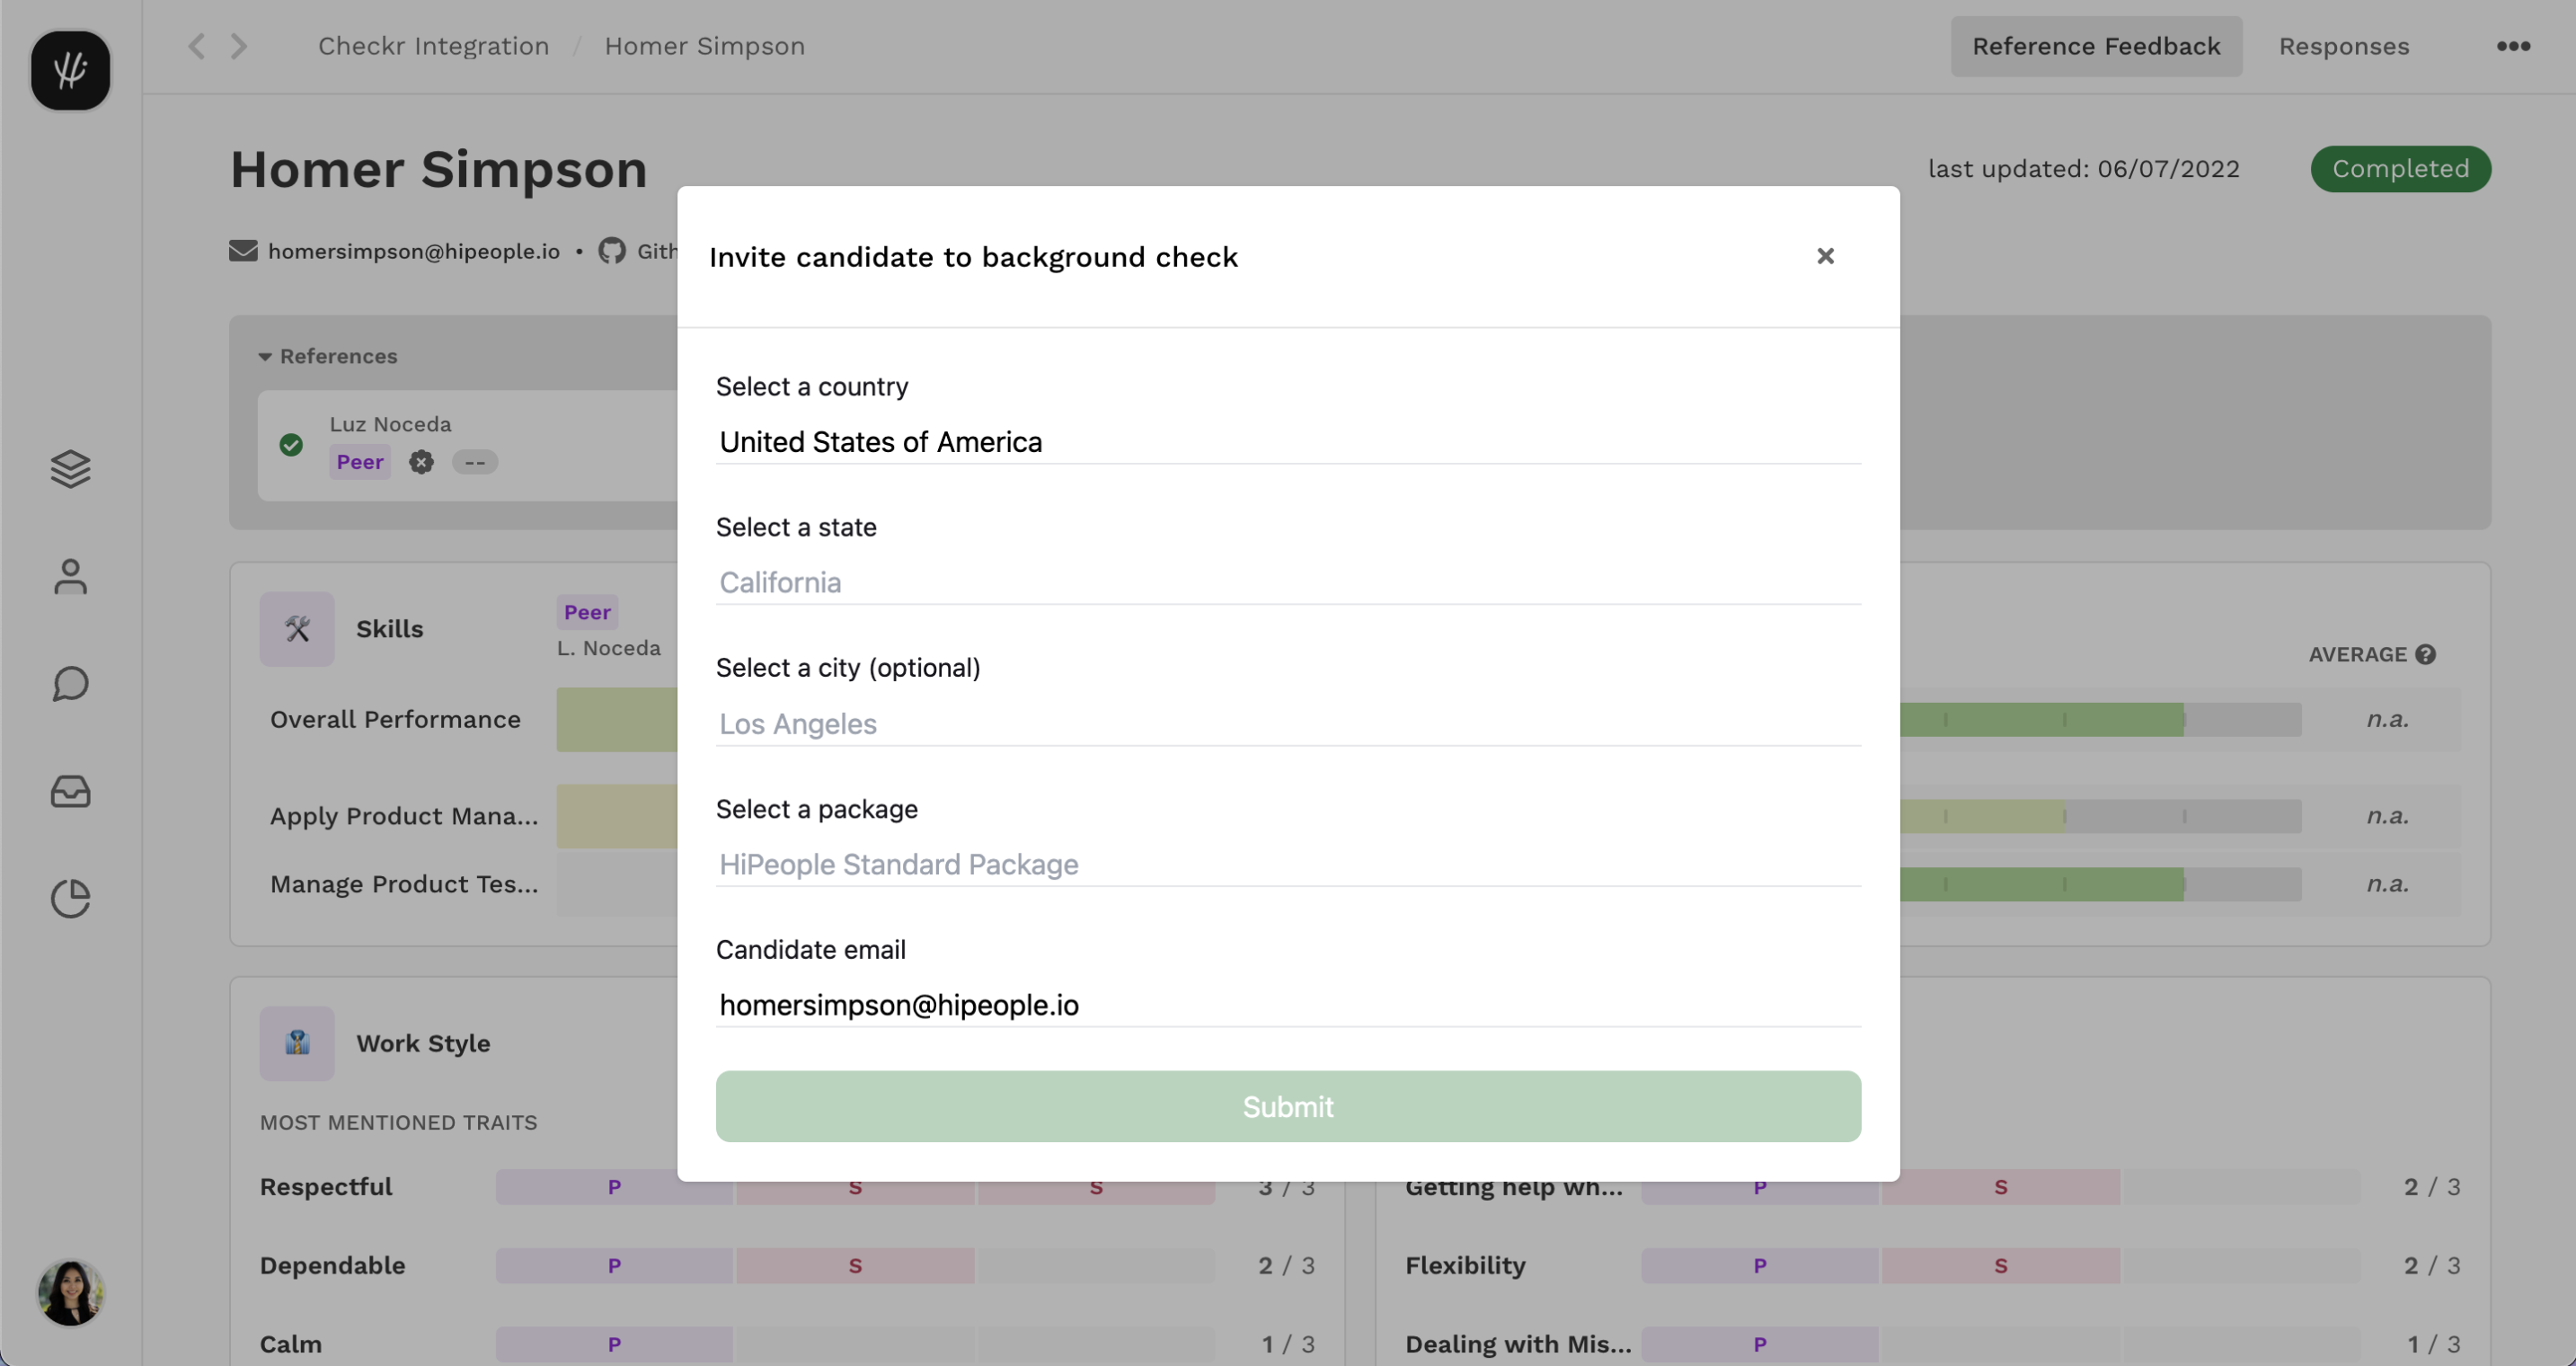
Click on the background check with Checkr button to open the New Invitation modal.
-
Fill in the options for the background check and click submit. You should see a confirmation message, then you can close the modal by clicking the cross in the top right-hand corner.
- The candidate will receive an email from Checkr to initiate the background check process.
Monitor Background Checks
- Once the background check has been ordered, the Checkr results tab will be available to view in the candidate’s page.
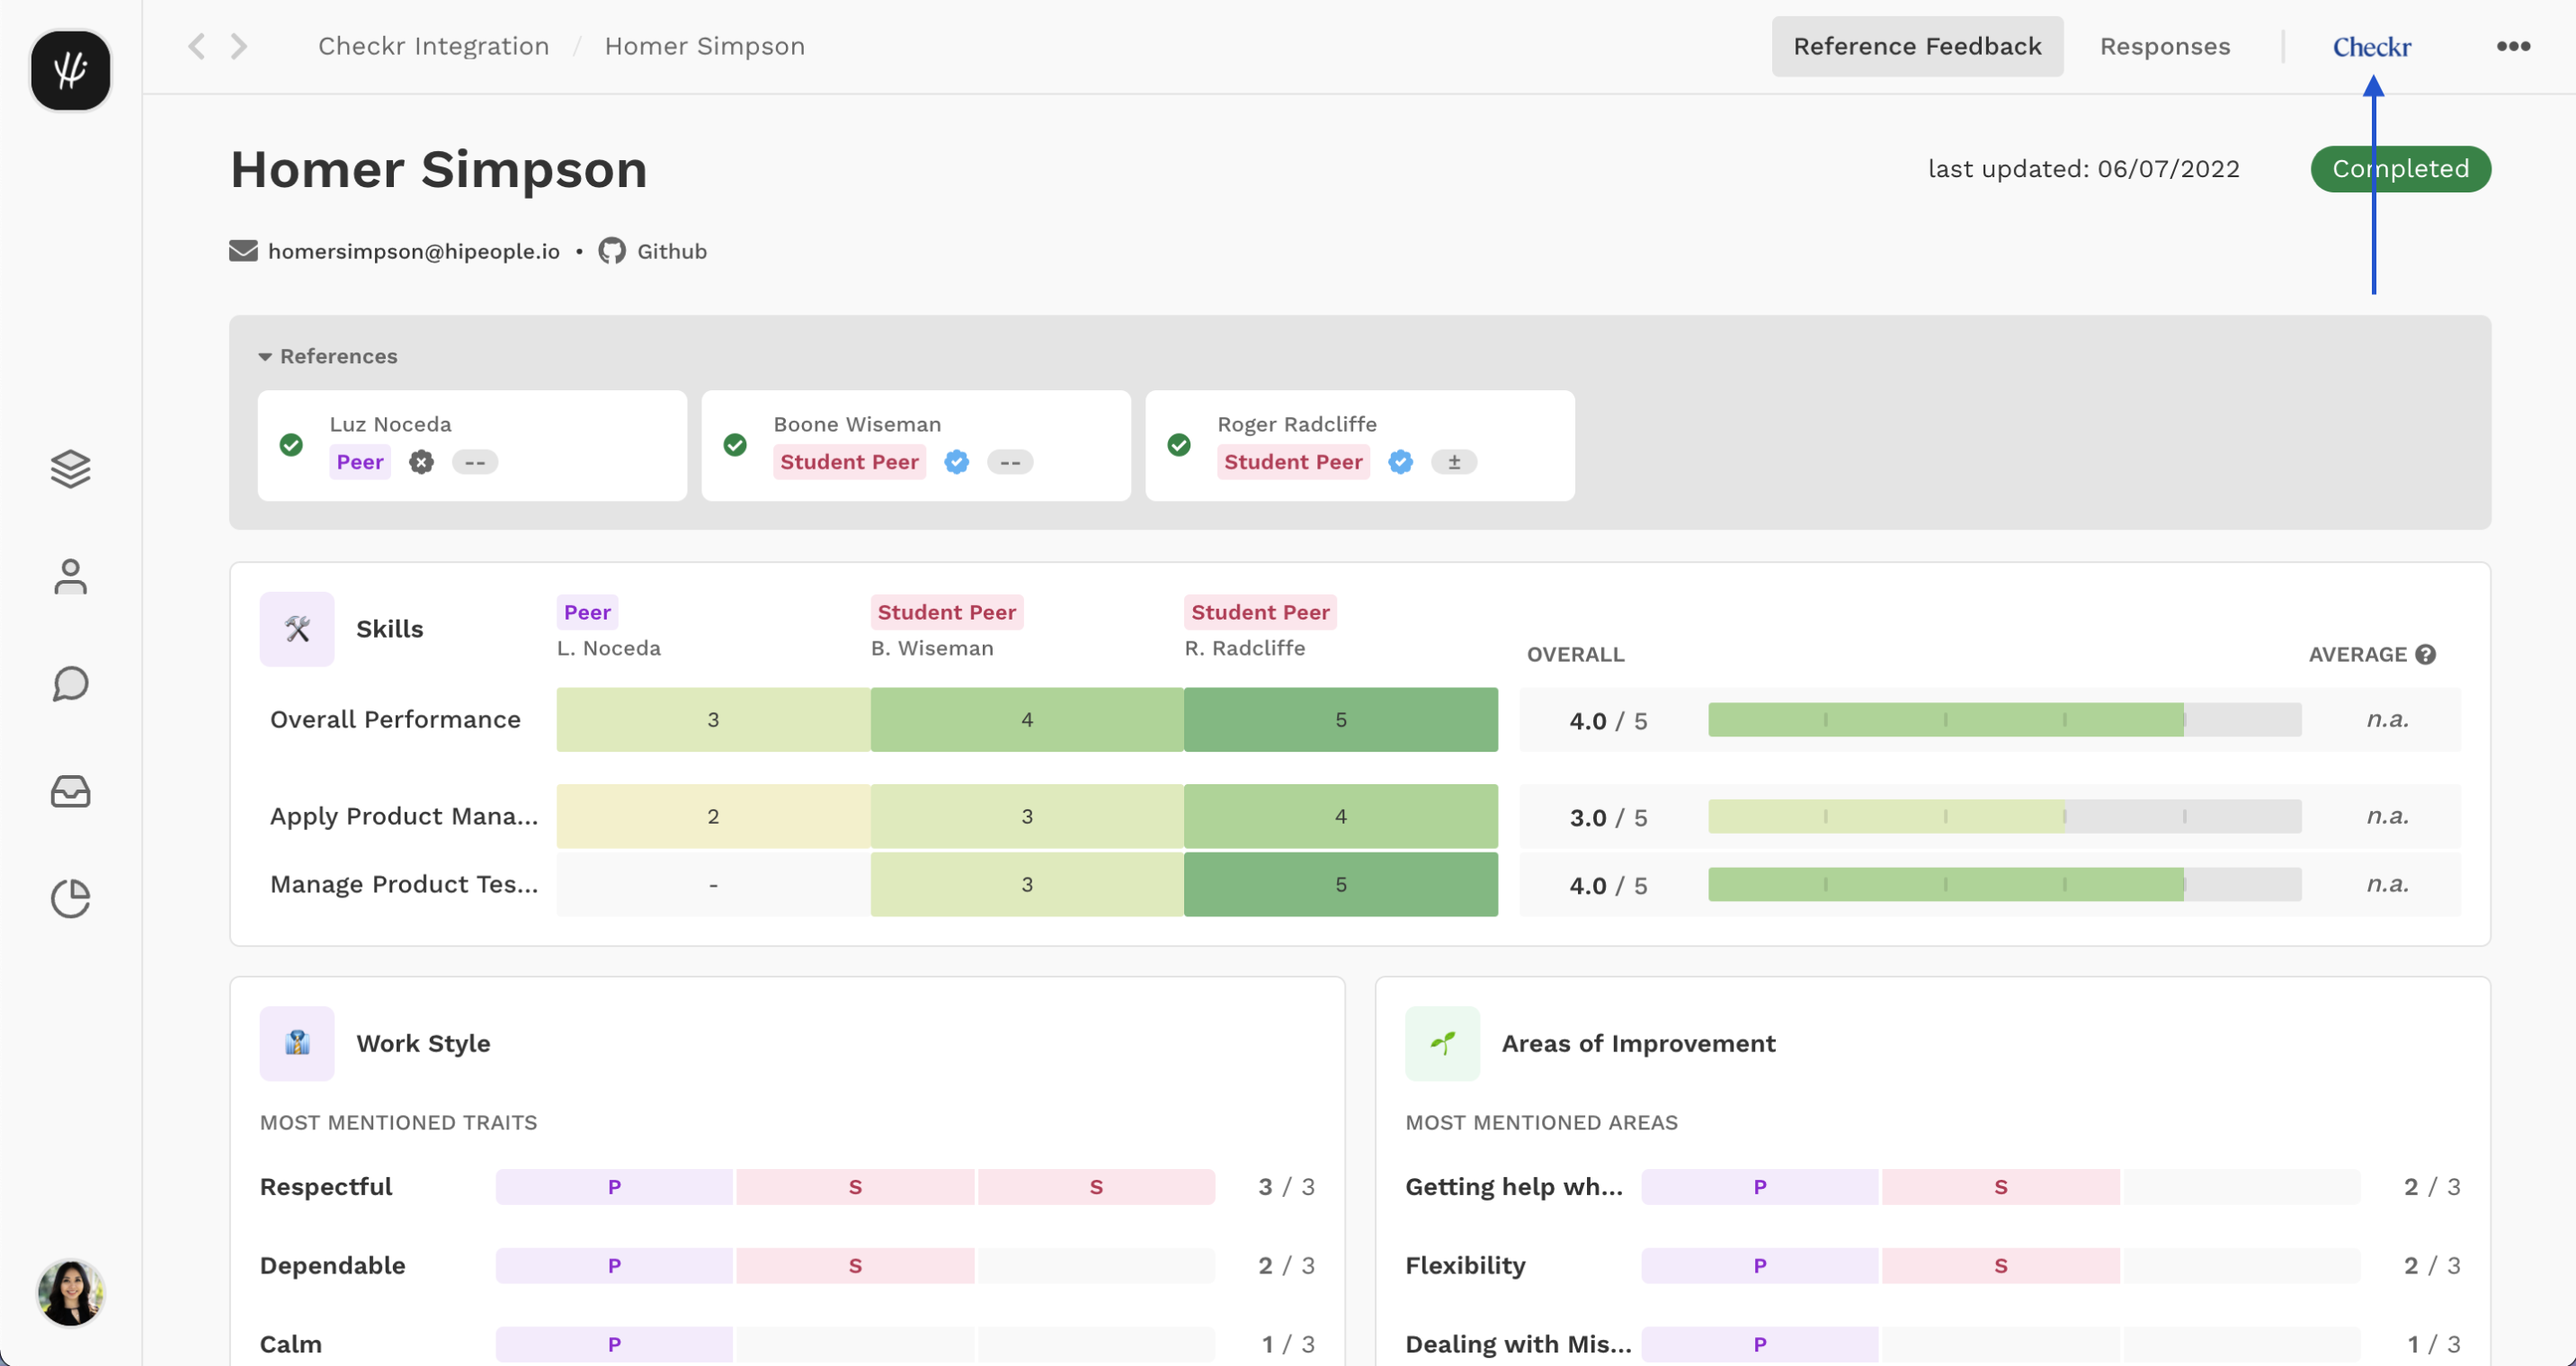
- Click on the Checkr results tab. The current status of the report will be shown in blue.
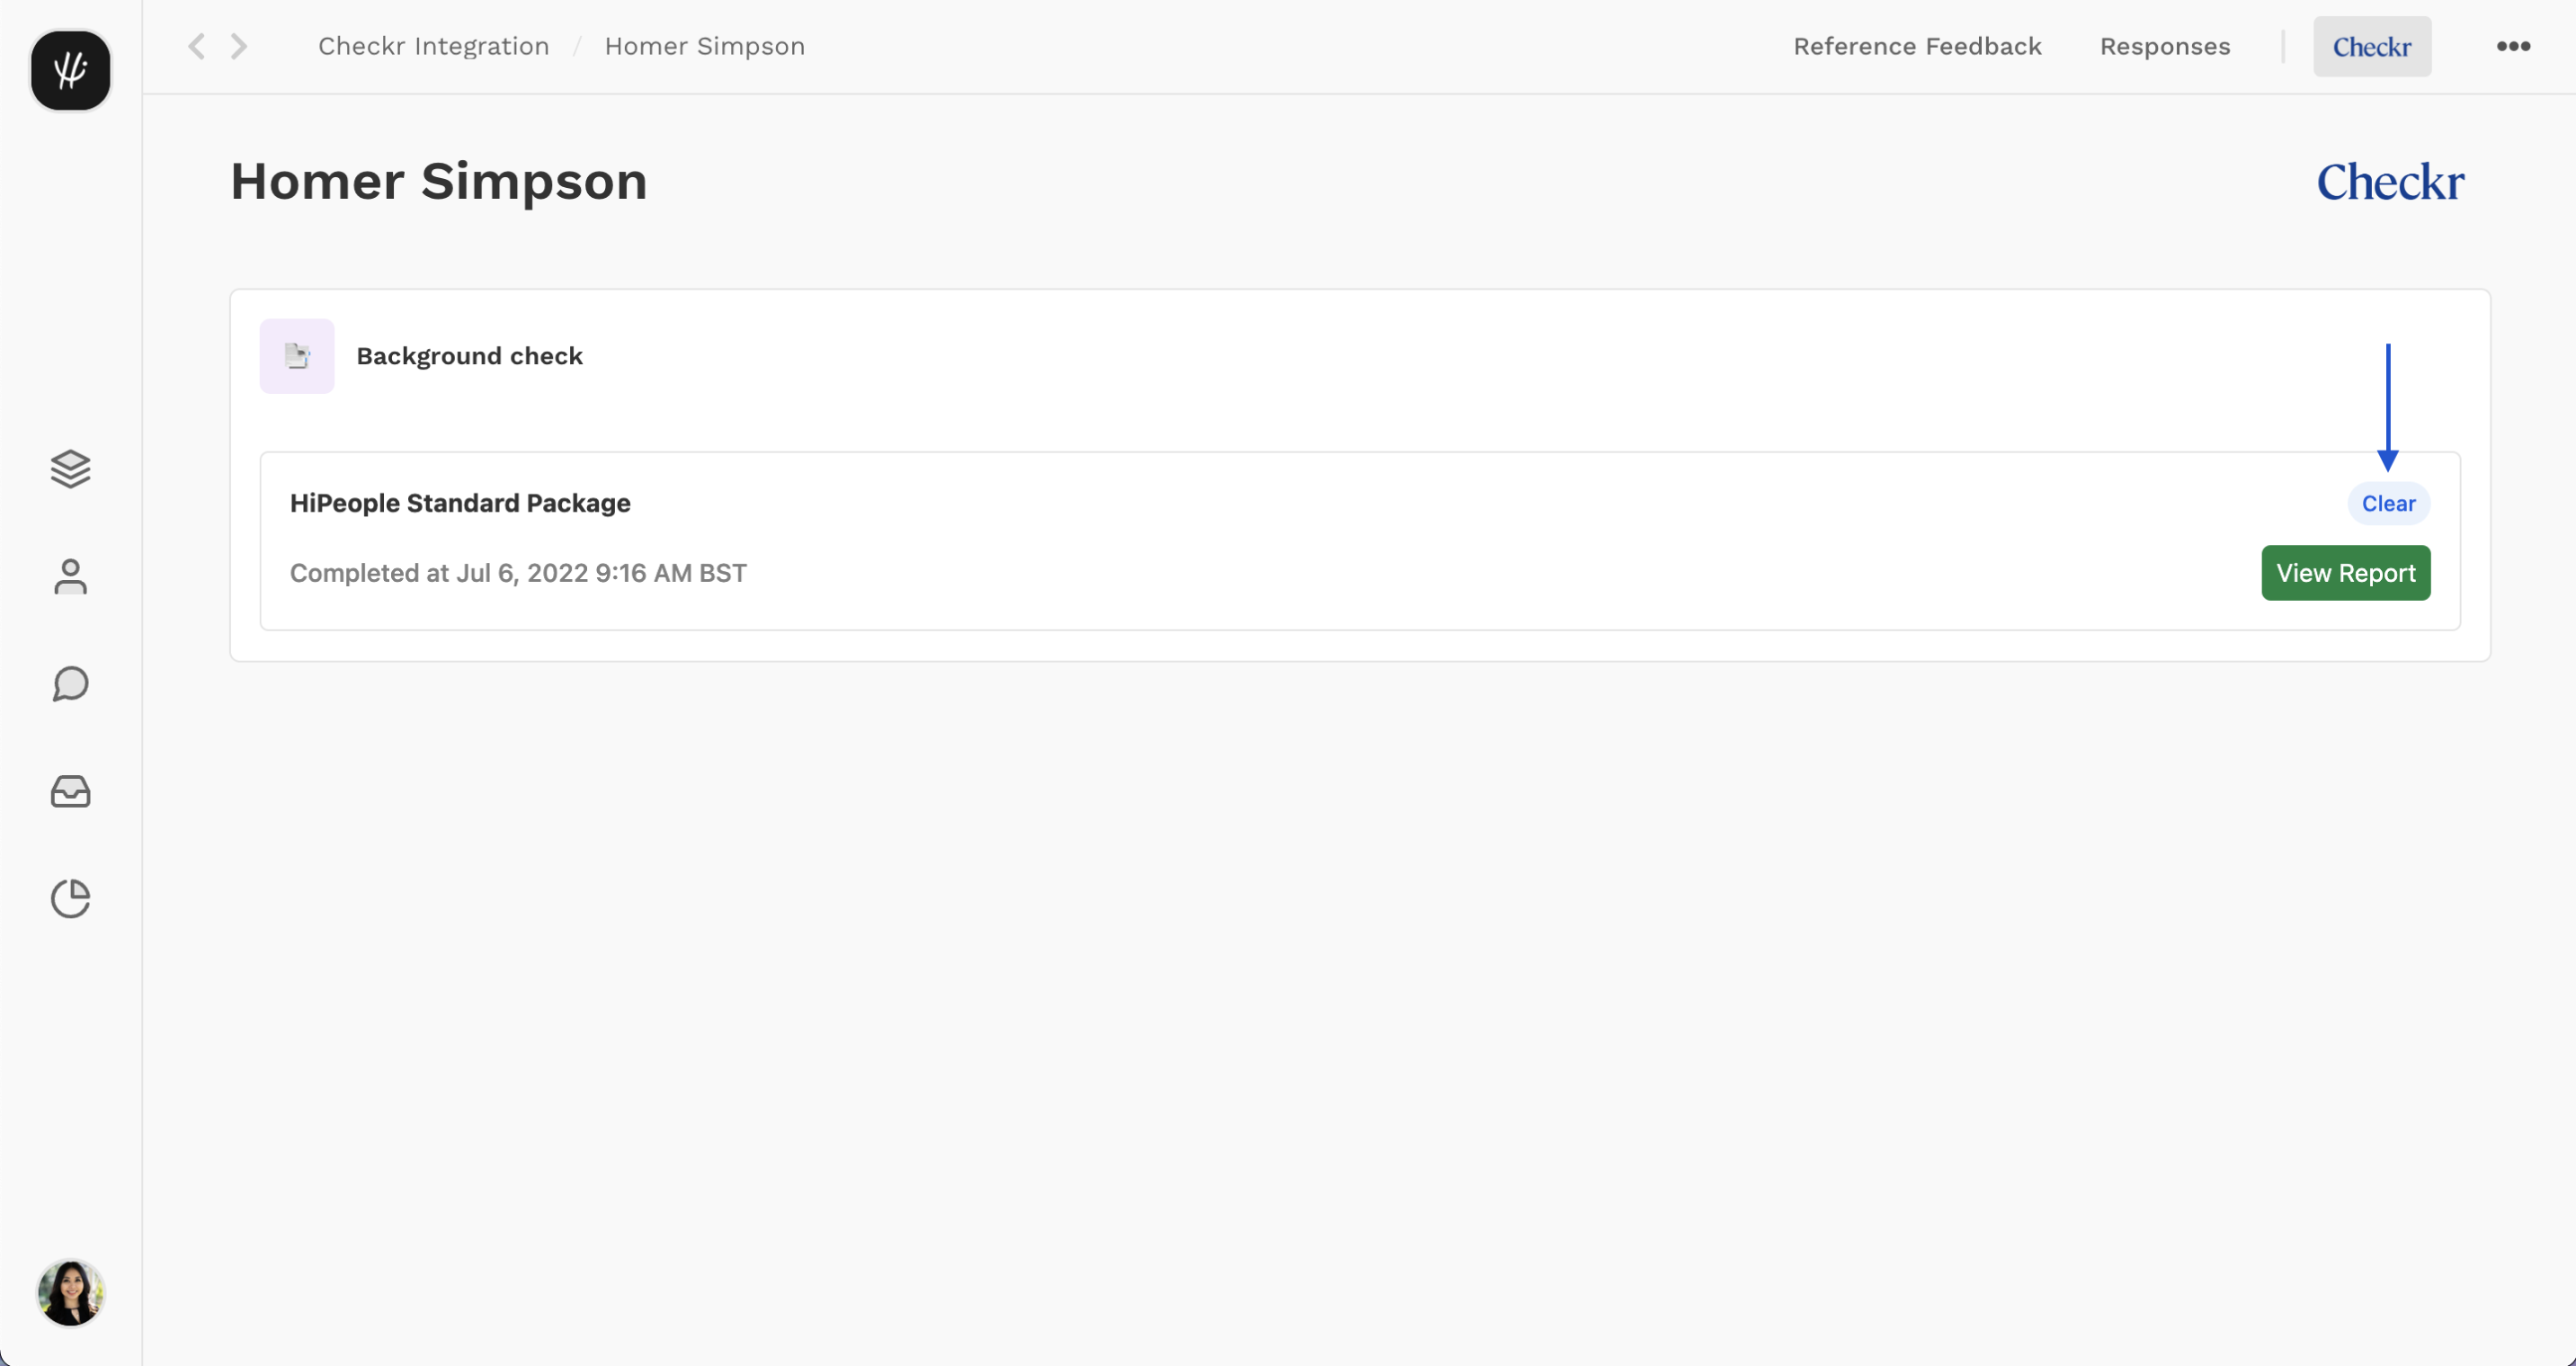
-
You can view the candidate in your Checkr dashboard by clicking on the view candidate / view report. Note: you must have the correct Checkr user permissions to access status of the report will be listed in the HiPeople candidate dashboard

For more information on reports and report statuses, see How do I interpret a background report in the Checkr Help Center.)
Most background checks will be completed within 24 hours, but the time to complete can range from a few minutes to a few weeks, depending on the type of check ordered, the geographic location of the candidate, and/or county courthouse operations.
Use the Checkr Dashboard
While the HiPeople integration allows users to order background checks and view their status, the following features are available only within Checkr:
- Background check invitation links
- Full background check report results
- Adverse Action initiation and processing tools
- Create customizable packages and add-ons
- Checkr settings
For a quick overview of the Checkr Dashboard, please see Getting started with Checkr.
-
Orion / Checkr Integration User Guide
Read MoreWelcome to Checkr!
This guide will walk you through the Checkr / Orion integration process, and outline how to use the Checkr dashboard for the background check process.
The Checkr Help Center is a great resource for any questions that may not be covered in this user guide. If you have any questions not covered in this guide that are specific to Orion, please fill out a support request for additional assistance.
_________________________________________________________
- Prerequisites
- Add Checkr to Orion
- Create a Checkr account
- Order Background Checks
- Monitor a Background Check
- Use the Checkr Dashboard
_________________________________________________________
Orion / Checkr User Guide
This guide describes how to set up Checkr to use within Orion, such that Orion users can initiate and view Checkr background checks from within the Orion interface.
Prerequisites
The following items are required to initiate Orion / Checkr integration. Please ensure you have the following before proceeding.
- Access to Orion & Checkr, with admin user rights.
Add Checkr to Orion
First, enable Checkr from within Orion. You must have admin access to both Checkr and Orion to complete this process.
If your company does not yet have a Checkr account, one must be created for the integration with Orion. Please see the steps below.
If your company does have a Checkr account, you can follow the same steps and Sign In instead of Signing Up.
Create a Checkr account
If your company does not yet have a Checkr account, one must be created before accessing the integration capabilities with Orion.
To create a Checkr account for use with Orion:
- Navigate to your dashboard’s “Compliance” drop-down across the top menu bar. Within the “Compliance” dropdown, navigate to “Checkr” and select “Activate or Deactivate”.
- Click the green “Connect Checkr Account” option.

- If your company does not yet have a Checkr account, click “Set Up a Checkr Account” and “Continue. If your company already has a Checkr account, you can select “Sign In”.
- Enter your contact and business information, and click Continue.

- Once all of your information has been entered per the instructions in the Checkr modules, click “submit account” to submit your account to Checkr for Credentialing. Once the credentialing process is complete, Checkr will notify both Orion and you, and you may begin ordering background checks through Orion.
- Credentialing is required by law to ensure that only legitimate companies, with legitimate business needs, can run background checks and typically takes 1-2 business days. If Checkr needs additional information, they will reach out to you directly by email.
Order Background Checks
Once your Orion and Checkr accounts are connected, you can begin to order background checks by following the steps below.
-
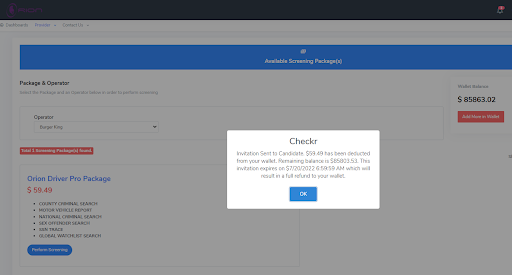
A transit provider can order screenings by navigating to the Provider Dropdown, selecting Checkr and then selecting Perform Screening.

- Once on the perform screening page, the provider can select the package they want to run for the background check and then select Perform Screening.
- A message will appear to the provider, for the provider to acknowledge the starting cost of the background check, what will be initially deducted from the provider’s wallet and the remaining balance.
- The BackOffice and Provider will receive banner alerts on the bottom right-hand corner of the screening that a background check invitation has been created/sent and for which operator.

Monitor a Background Check
Once the background check has been ordered by the Provider, the Checkr results tab will be available to view in two ways.
Option 1
-
Navigate to Checkr >> Monitor Screening to access the dedicated Checkr List View

There are filters available to the Provider.
Zoomed in view
-
Navigate to Provider >> Operator Management to access the Operator Management Roster Page.
A Provider can view the Last Checkr report status from the Operator Management page. The operator Management page provides all candidates or operators in a list view. This is an easy access view to drill into the operator profile, performance feedback, perform screenings, and order e-sign documents.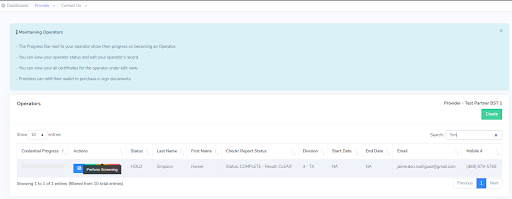
Option 2 - Back Office Portal
Once a background check has been ordered by the Provider, the Checkr results can be assessed by the Backoffice Staff.
-
Navigate to Checkr >> Monitor Screening to access from dedicated Checkr List View.

- Open up the Report.

- The light blue button will take you to the report in Checkr. Click on it to open the report in the Checkr Dashboard, and review details. (For more information on reports and report statuses, see How do I interpret a background report in the Checkr Help Center.)
Most background checks will be completed within 24 hours, but the time to complete can range from a few minutes to a few weeks, depending on the type of check ordered, the geographic location of the candidate, and/or county courthouse operations.
Use the Checkr Dashboard
While the Orion integration allows users to order background checks and view their status, the following features are available only within Checkr:
- Background check invitation links
- Full background check report results
- Adverse Action initiation and processing tools
- Checkr settings
For a quick overview of the Checkr Dashboard, please see Getting started with Checkr.
-
Drata / Checkr Integration User Guide
Read MoreWelcome to Checkr!
This guide will walk you through the Checkr / Drata integration process, and outline how to use the Checkr dashboard for the background check process.
The Checkr Help Center is a great resource for any questions that may not be covered in this user guide. If you have any questions not covered in this guide that are specific to Drata, please fill out a support request for additional assistance.
_________________________________________________________
- Prerequisites
- Add Checkr to Drata
- Enable Checkr setup
- Create a Checkr account
- Account Hierarchy
- Order Background Checks
- Monitor Background Checks
- Checkr Features
- Use the Checkr Dashboard
- Checkr’s Candidate Experience
- Resources
_________________________________________________________
This guide describes how to set up Checkr to use within Drata, such that Drata users can initiate and / or view Checkr background checks from within the Drata interface.
Prerequisites
The following items are required to initiate Drata / Checkr integration. Please ensure you have the following before proceeding.
- Access to Drata, with admin rights
Add Checkr to Drata
First, enable Checkr from within Drata. You must have admin access to both Checkr and Drata to complete this process.
If your company does not yet have a Checkr account, one must be created for the integration with Drata. Please see the steps below.
If your company does have a Checkr account, you can follow the steps below and Sign In instead of Signing Up.
Enable Checkr setup
- Click on your company's name in the lower left corner.
- Click "Connections" from that menu.
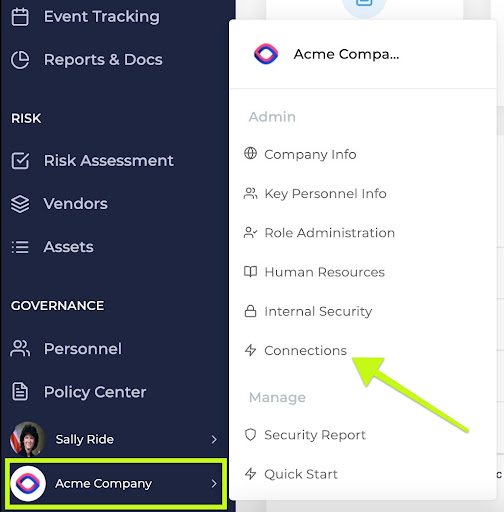
- Click the "Connect" button for the Checkr integration.

- A drawer will extend from the right side of the screen providing details on making the connection.
-
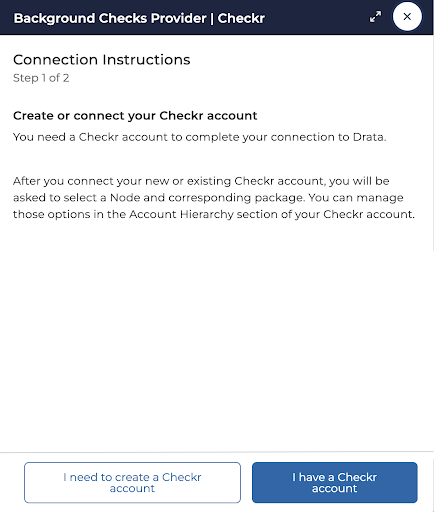
Choosing either option will prompt you to connect to Checkr, where you'll see the visual below, prompting you to begin an OAuth connection.
 If you are not already signed in, you will be prompted to log in to your Checkr Dashboard.
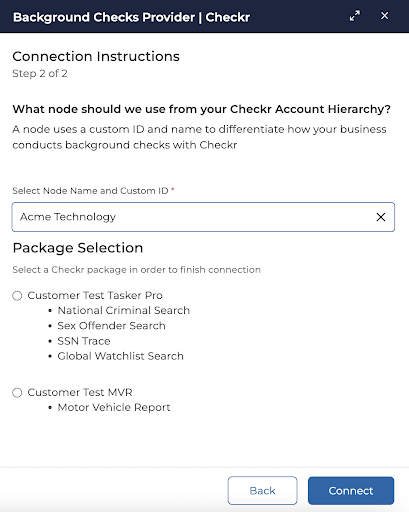
- If Account Hierarchy is enabled, step two of this connection will ask you to select a Node that has been set up in your Checkr account.
- After a Node has been selected (or no nodes were present), you will then be able to select which package will be used by any candidates initiating background checks from within Drata.
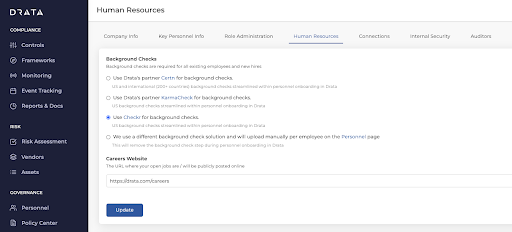
- After the connection has been made, it’s important to determine whether you would like to enable ordering through the Drata platform. NOTE: Drata’s product aims to remove admin bottlenecks and instead allows employees to initiate background checks on themselves. If you would like to restrict employees from being able to initiate background checks on themselves, please follow Step #9 below
- If you do not want employees to have any view in their 'My Drata' onboarding related to background checks, instead choose the option "We use a different background check solution and will upload manually per employee on the Personnel page". This will hide the "Background Check" section for your employees.
- Click the “Update” button to configure the changes.
Create a Checkr account
If your company does not yet have a Checkr account, one must be created before integration with Drata.
To create an account for use with Drata:
- If your company does not yet have a Checkr account, click “Set Up a Checkr Account” and “Continue”.
- Enter your name and company contact information, and click Continue.
- Enter payment information. Invoices for background checks will come directly from Checkr, and not from Drata. (Payment information may be edited on the Checkr dashboard after the account has been created.)
-
Provide the requested credentialing information. This information is required by law to ensure that only legitimate companies, with legitimate business needs, can run background checks.
- Note: Select Purpose: Pre-employment to use Checkr to run background checks for hiring/employment purposes.
- Click Continue to submit your information to Checkr for review. Once the credentialing process is complete, Checkr will notify both Drata and you, and you may begin ordering background checks through the Drata platform.
- Credentialing typically takes 1-2 business days. If Checkr needs additional information, they will reach out to you directly by email.
Account Hierarchy
The integration allows users to set up different "nodes" inside of their Checkr account to have displayed in the background check ordering workflow. Nodes can be used to designate different locations, teams, or groups that order background checks within your organization. Checkr requires you to assign packages to nodes once they are created, and will then display which node ordered which package on your Checkr invoice.
Each time you order a background check, you will be asked which node to order the check from, and then select from a pre-populated list of packages available to that node. Invoices will show the background checks ordered by each node within 2 billing cycles after setup.
To order a background check with Account Hierarchy and nodes:
- Fill in the work location of the candidate as you normally would for any background check.
- Select which Hierarchy node you would like to order from.
The list of available Packages will automatically generate based on the node you select. Select the background check package you want to run. If you do not see any packages populating, you will need to assign the appropriate packages to that node in your Checkr dashboard before proceeding.
For more information on Account Hierarchy, nodes, and how to configure your account, see Checkr's Payment & Billing, Adverse Actions, and Manage Account Settings Help Articles.
Order Background Checks
Background checks in Drata are ordered by the candidate (employee) themselves initiating the process during an onboarding flow. Refer above (Step 8) for important info to determine how to disable employee ordering.
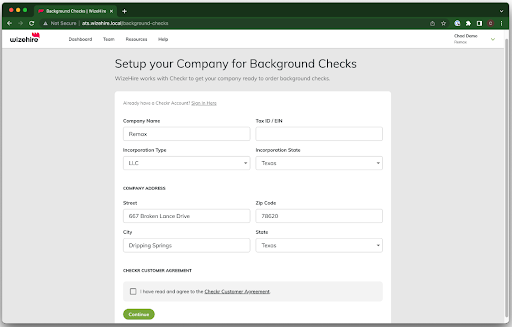
- User will go to their “My Drata” Screen, and scroll down to “Background Checks”, expanding the accordion.
- From here, users will enter their City and State and click “Start My Background Check”.
- This will kick off the Checkr-hosted background check flow, and the candidate should receive an email to finish the process within Checkr.
Monitor Background Checks
There are two places where a Drata administrator can monitor a background check’s complete state.
First Place:
- Navigate to the Drata “Connections” menu
- Find your connected “Checkr” tile
- Click “Manage Background Checks”.

- This will display all background checks detected by Drata that originate in Checkr.

Second Place:
- Navigate to the “Personnel'' section of Drata.
- Sort all users by the “Background Check” column.
- Candidates who have fully completed background check reports will display with a green checkmark, and everyone else will be red X’s
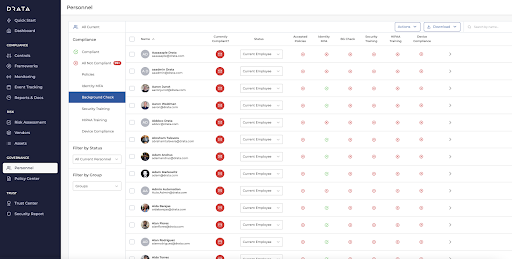
Note: Drata only cares about candidates having a completed check, and does not allow admin users to see any other detailed information for a check. To view additional information related to the background check, you can navigate to the Checkr dashboard.
Most background checks will be completed within 24 hours, but the time to complete can range from a few minutes to a few weeks, depending on the type of check ordered, the geographic location of the candidate, and/or county courthouse operations.
Checkr Features
Use the Checkr Dashboard
While the integration allows users to order background checks and view their status, the following features are available only within Checkr:
- Background check invitation links
- Full background check report results
- Adverse Action initiation and processing tools
- Checkr settings
For a quick overview of the Checkr Dashboard, please see Getting started with Checkr
Checkr’s Candidate Experience
The checkr candidate experience overview describes the Checkr candidate experience of the background check process. It includes information about the Checkr Candidate Portal and Help Center where candidates can self-serve and address common issues that can stall or delay their background checks. The overview also includes common reasons candidates contact Checkr and how to address these issues.
The overview includes:
- An overview of the candidate process
- General information about the background check process, including exceptions and disputes
- An overview of the Checkr Candidate Portal
- An introduction to the Candidate Experience team
- A list of some of the most common candidate questions
- Links to the most frequently used pages in the Checkr Help Center
Resources
For a quick overview of the Checkr Dashboard, please see Getting started with Checkr
-
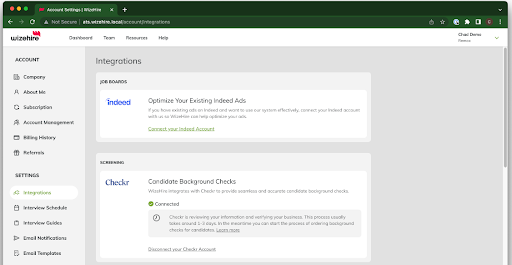
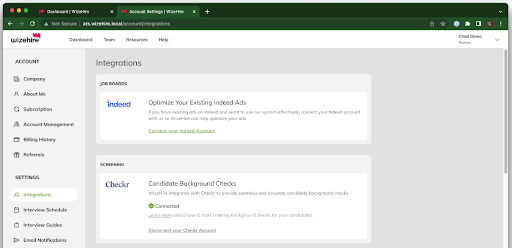
WizeHire / Checkr Integration User Guide
Read MoreWelcome to Checkr!
This guide will walk you through the Checkr / WizeHire integration process, and outline how to use the Checkr dashboard for the background check process.
The Checkr Help Center is a great resource for any questions that may not be covered in this user guide. If you have any questions not covered in this guide that are specific to WizeHire, please fill out a support request for additional assistance.
_________________________________________________________
- Prerequisites
- Add Checkr to WizeHire
- Enable Checkr setup
- Create a Checkr account
- Order Background Checks
- Use the Checkr Dashboard
_________________________________________________________
This guide describes how to set up Checkr to use within WizeHire, such that WizeHire users can initiate and view Checkr background checks from within the WizeHire interface.
Prerequisites
The following items are required to initiate WizeHire / Checkr integration. Please ensure you have the following before proceeding.
- Access to WizeHire with admin rights
Add Checkr to WizeHire
First, enable Checkr from within WizeHire. If you already have a Checkr account, you must have admin access to both Checkr and WizeHire to complete this process.
Enable Checkr setup
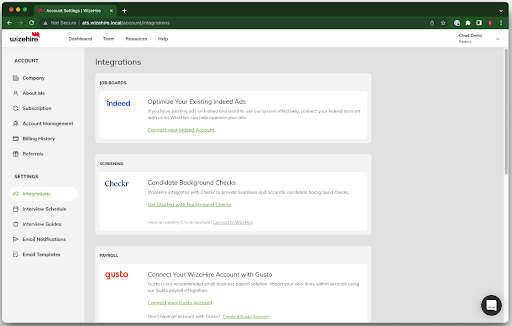
To initiate integration in WizeHire, go to the Integrations Page and search for Checkr and click Get Started With Background Checks
- If you are already a Checkr customer, select Sign In to connect your current Checkr account to WizeHire.
-
If you are not a current Checkr customer, select Sign Up to create a Checkr account
Create a Checkr account
If your company does not yet have a Checkr account, one must be created before integration with WizeHire.
To create an account for use with WizeHire:
- Click Sign Up when prompted.
- Enter the required company information and accept the Checkr Customer Agreement
-
Click Continue at the bottom
Credentialing typically takes 1-2 business days. If Checkr needs additional information, they will reach out to you directly by email. When your account is ready, you will receive an email from Check and the tile in WizeHire will update to say Connected.
Account Processing:
Account Connected:
Order Background Checks
All background checks ordered through the WizeHire integration will be billed on your WizeHire account. If you need to order a background check outside of WizeHire and use the Checkr Dashboard that background check will be billed on a separate invoice from Checkr. You can make sure your billing info is updated in Checkr from your Account Settings or see this article for help.
Once your WizeHire and Checkr accounts are connected, return to a Candidate’s Profile:
- Click on the Screening Tab
- Scroll to Background Checks
-
Select the Package from your drop-down and click Order
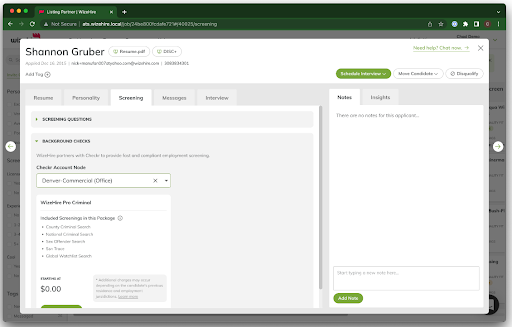
Once the background check has been ordered, the status of the report will be listed in the WizeHire candidate dashboard. You can see updates on the ETA of the report and the status from the Candidate Profile.

Once Complete, click on it to open the report in the Checkr Dashboard, and review details. (For more information on reports and report statuses, see How do I interpret a background report in the Checkr Help Center.)
Most background checks will be completed within 24 hours, but the time to complete can range from a few minutes to a few weeks, depending on the type of check ordered, the geographic location of the candidate, and/or county courthouse operations.
Use the Checkr Dashboard
While the WizeHire integration allows users to order background checks and view their status, the following features are available only within Checkr:
- Background check invitation links
- Full background check report results
- Adverse Action initiation and processing tools
- Checkr settings
For a quick overview of the Checkr Dashboard, please see Getting started with Checkr.
-
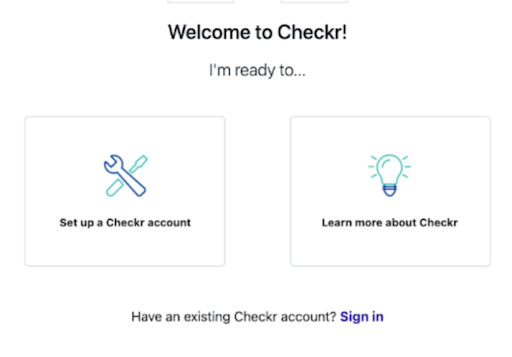
WorkLLama / Checkr Integration User Guide
Read MoreWelcome to Checkr!
This guide will walk you through the Checkr / WorkLLama integration process, and outline how to use the Checkr dashboard for the background check process.
The Checkr Help Center is a great resource for any questions that may not be covered in this user guide. If you have any questions not covered in this guide that are specific to WorkLLama, please fill out a support request for additional assistance.
_________________________________________________________
- Prerequisites
- Add Checkr to WorkLLama
- Create a Checkr account
- Account Hierarchy
- Order Background Checks
- International Packages
- Domestic Package with International Verifications
- Monitoring Background Checks
- Checkr Features
- Use the Checkr Dashboard
- Checkr’s Candidate Experience
- Resources
_________________________________________________________
This guide describes how to set up Checkr to use within WorkLLama, such that WorkLLama users can initiate and view Checkr background checks from within the WorkLLama interface.
Prerequisites
The following items are required to initiate WorkLLama / Checkr integration. Please ensure you have the following before proceeding.
- Access to WorkLLama Admin Portal with Admin Rights
- Admin privileges to your Checkr account or Business contact and payment information if you are setting up a new account
Connecting your Checkr account with WorkLlama
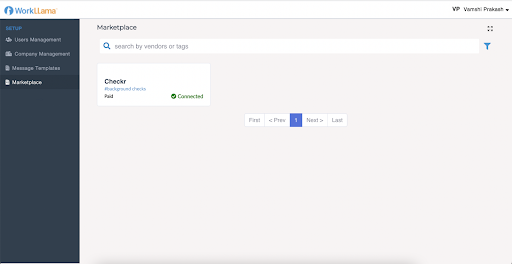
- Log into WorkLLama Admin Portal and navigate to the ‘Marketplace’ link in the side navigation bar.
- Search for Checkr or locate the Checkr card, and click ‘Connect’.

- In the right sidebar, click ‘Connect’.
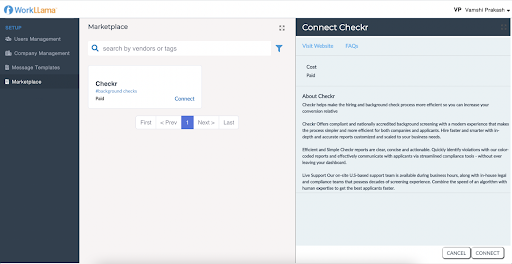
- In the ‘Welcome to Checkr’ screen, if you are connecting to a current Checkr account, select ‘Sign In’ and follow the instructions. If you are new to Checkr, follow the instructions to create a new account.
- If your Checkr account was created recently, Checkr will validate credentials to establish your account as ‘Authorized’ to run background checks. If your account isn’t Authorized yet, your connection status will be ‘Awaiting Authorization’.
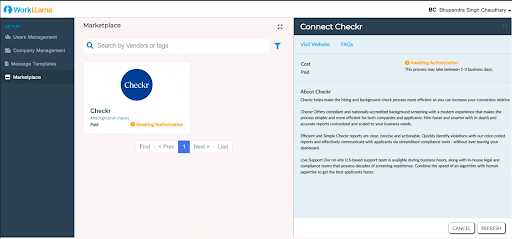
- Checkr will notify you when your account is authorized (may take up to 3 business days). Click ‘Refresh’ to refresh your connection when you are notified.
- If your account was authorized, your connection is successfully established as indicated by the status ‘Connected’. The different background packages available in your Checkr account will be listed here.
Create a Checkr account
If your company does not yet have a Checkr account, one must be created before integration with WorkLLama.
To create an account for use with WorkLLama:
- Click Sign Up when prompted.
- Enter your name and company contact information, and click Continue.
- Enter payment information. Invoices for background checks will come directly from Checkr, and not from WorkLLama. (Payment information may be edited on the Checkr dashboard after the account has been created.)
-
Provide the requested credentialing information. This information is required by law to ensure that only legitimate companies, with legitimate business needs, can run background checks.
- Note: Select Purpose: Pre-employment to use Checkr to run background checks for hiring/employment purposes.
- Click Continue to submit your information to Checkr for review. Once the credentialing process is complete, Checkr will notify both WorkLLama and you, and you may begin ordering background checks through the WorkLLama platform.
- Credentialing typically takes 1-2 business days. If Checkr needs additional information, they will reach out to you directly by email.
Account Hierarchy
The integration allows users to set up different "nodes" inside of their Checkr account to have displayed in the background check ordering workflow. Nodes can be used to designate different locations, teams, or groups that order background checks within your organization. Checkr requires you to assign packages to nodes once they are created, and will then display which node ordered which package on your Checkr invoice.
Each time you order a background check, you will be asked which node to order the check from, and then select from a pre-populated list of packages available to that node. Invoices will show the background checks ordered by each node within 2 billing cycles after setup.
To order a background check with Account Hierarchy and nodes:
- Fill in the work location of the candidate as you normally would for any background check.
- Select which Hierarchy node you would like to order from.
The list of available Packages will automatically generate based on the node you select. Select the background check package you want to run. If you do not see any packages populating, you will need to assign the appropriate packages to that node in your Checkr dashboard before proceeding.
For more information on Account Hierarchy, nodes, and how to configure your account, see Checkr's Payment & Billing, Adverse Actions, and Manage Account Settings Help Articles.
Order Background Checks
- When you are ready to order a background check for an applicant for a job, click on the ‘More Options’ button on the application card.
- The application card will display the different actions available.
- Click the ‘Background Check’ option to order a new background check.
- Complete the form as prompted.
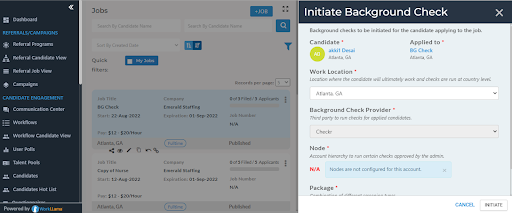
Ordering Notes:
- The Background Check option is only available if the ‘Requires Background Check’ option is selected for the job
- You can’t trigger a background check for a candidate if there is not a job application associated.
- The Location is automatically prefilled from the location of the job
- If your organization has Nodes / Hierarchy setup in Checkr, they will be available here for you to select. This option is disabled if No Nodes are defined
- If Nodes / Hierarchy is defined, only associated packages are displayed.
International Packages
Checkr defines international background checks as background checks run on candidate’s living and working outside of the United States.
Checkr currently offers the following international screenings for candidate’s with work locations outside the United States:
- International Criminal
- Adverse Media Search - may be enabled to automatically run if criminal not available
- Identity Document Verification
- Global Watchlist
- Education Verification
- Employment Verification
Domestic Package with International Verifications
If your candidate works in the United States but has out-of-country history, for example attended school internationally, request a package that includes an education verification with out-of-country history enabled. Checkr currently offers an out-of-country history setting that can be added to any domestic criminal search or verification.
The option can be applied for candidates who will perform their work inside the US, but who have an address history outside the US. Screening types that can be run on domestic screenings with out-of-country history include:
- Education Verification
- Employment Verification
Monitoring Background Checks
- Once a background is ordered successfully, switching to the ‘BG Check’ tab shows the status of the background check.
- When the candidate / applicant has submitted the required information to generate a report, a link to the Background Check report in Checkr is available, as well as the report status and the report complete ETA. Note that a login to your Checkr portal is required to view the report.
Once Complete, click on it to open the report in the Checkr Dashboard and review the details. (For more information on reports and report statuses, see How do I interpret a background report in the Checkr Help Center.)
Most background checks will be completed within 24 hours, but the time to complete can range from a few minutes to a few weeks, depending on the type of check ordered, the geographic location of the candidate, and/or county courthouse operations.
Checkr Features
Use the Checkr Dashboard
While the integration allows users to order background checks and view their status, the following features are available only within Checkr:
- Background check invitation links
- Full background check report results
- Adverse Action initiation and processing tools
- Checkr settings
For a quick overview of the Checkr Dashboard, please see Getting started with Checkr
Checkr’s Candidate Experience
The checkr candidate experience overview describes the Checkr candidate experience of the background check process. It includes information about the Checkr Candidate Portal and Help Center where candidates can self-serve and address common issues that can stall or delay their background checks. The overview also includes common reasons candidates contact Checkr and how to address these issues.
The overview includes:
- An overview of the candidate process
- General information about the background check process, including exceptions and disputes
- An overview of the Checkr Candidate Portal
- An introduction to the Candidate Experience team
- A list of some of the most common candidate questions
- Links to the most frequently used pages in the Checkr Help Center
Resources
For a quick overview of the Checkr Dashboard, please see Getting started with Checkr.
-
Gusto / Checkr Integration User Guide
Read MoreWelcome to Checkr!
This guide will walk you through the Checkr / Gusto integration process, and outline how to use the Checkr dashboard for the background check process.
The Checkr Help Center is a great resource for any questions that may not be covered in this user guide. If you have any questions not covered in this guide that are specific to Gusto, please contact Gusto Support at this link or Checkr Support at this link.
_________________________________________________________
- Prerequisites
- Add Checkr to Gusto
- Connect or Create a Checkr Account
- Order Background Checks in Gusto
- Review Background Checks in Gusto
- Use the Checkr Dashboard
_________________________________________________________
This guide describes how to set up Checkr to use within Gusto, such that Gusto users can initiate and view Checkr background checks from within their Gusto account.
Prerequisites
The following items are required to initiate Gusto / Checkr integration. Please ensure you have the following before proceeding.
- Access to Gusto as a Full Access Admin or Hire & Onboard permissions
Add Checkr to Gusto
First, enable Checkr from within Gusto. If you already have a Checkr account, you must have admin access to both Checkr and Gusto to complete this process.
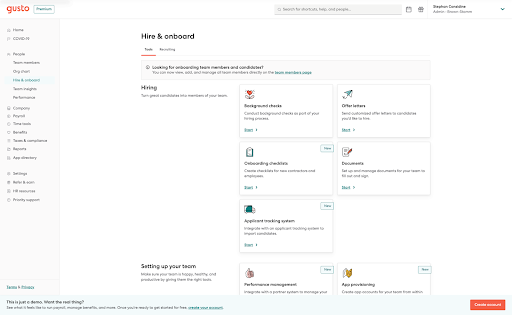
Connect or Create a Checkr Account
To enable the integration, go to People on the left-hand navigation and click on Hire and Onboard > Tools
- Click on the Background Check tile under Tools
- Follow the instructions to add Checkr and background checks to your hiring process
- If you are already a Checkr customer, you will be prompted to Sign In
- If you are not a current Checkr customer, select completing the account set-up with creating a new Checkr account.
Account creation in Gusto includes setting up your Company Policy for background checks and also allows you to map your Gusto roles to specific background checks.
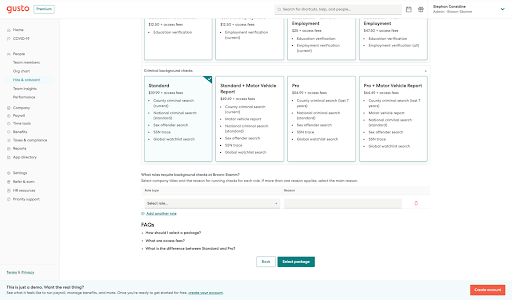
Once complete, you will be able to immediately order a background check in Gusto.
Account Creation Complete:
Order Background Checks in Gusto
All background checks ordered through the Gusto integration will be billed on your Gusto account. If you need to order a background check outside of Gusto and use the Checkr Dashboard that background check will be billed on a separate invoice from Checkr. You can make sure your billing info is updated in Checkr from your Account Settings or see this article for help.
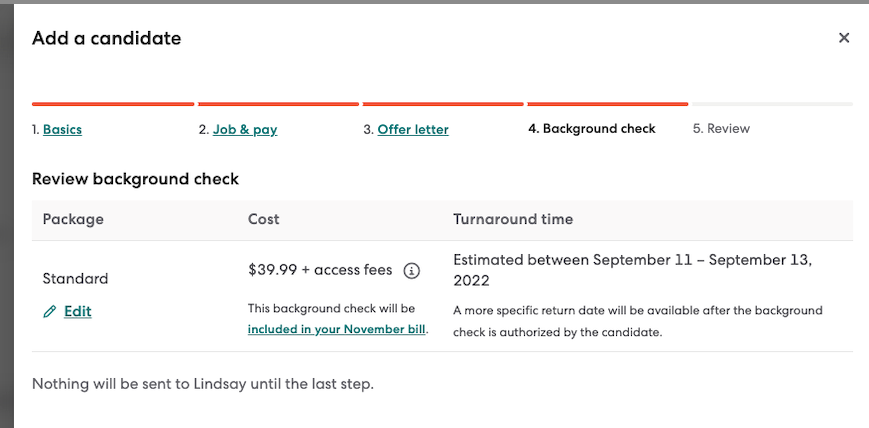
Background Checks can be ordered when you add a new employee or send an offer letter.
- Click Add New Employee and select either with offer letter and background check or with background check only
- Follow the offer letter process, entering all the new employee information
- You will be able to change your default background check package on step 4

Once the background check has been ordered, the new employee will receive an email to start the background check. Checkr will manage collecting all new employee information, compliance disclosures, and collecting consent.
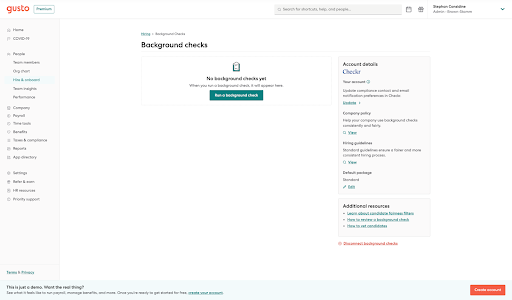
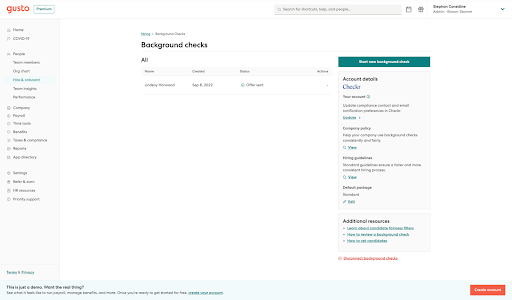
Review Background Checks in Gusto
You can monitor the status of background checks from the Background Check tile in Hire & Onboard Tools and once complete you will be able to see the report status and full report in Gusto.
Once Complete, you can review the Report Status and Assessment of the information found. By using Gusto, your account automatically has Fairness Filters enabled. Details on these Fairness Filters can be found in Gusto in Additional Resources, having these enabled does not remove any information found from the background check but will apply an Assessment of the report to let you know that what was found on the report is marked as Eligible because of the Fairness Filters.
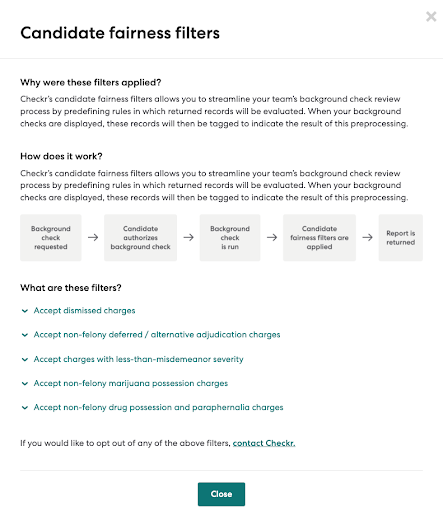
If you need to disable these filters, you can do so by logging into your Checkr account and turning off the Assess Fairness Filters, you can also contact Checkr Support.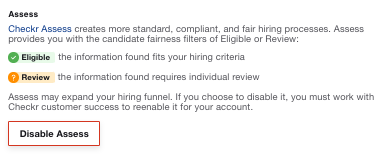
You can view the status of the background check in Gusto and will have access to the full report for 30 days. After 30 days, the full report will no longer be accessible in Gusto but you can always access your reports in your Checkr Account.
Most background checks will be completed within 24 hours, but the time to complete can range from a few minutes to a few weeks, depending on the type of check ordered, the geographic location of the candidate, and/or county courthouse operations.
Use the Checkr Dashboard
While the Gusto integration allows users to order background checks and view their status, the following features are available only within Checkr:
- Adverse Action initiation and processing tools
- Checkr settings
For a quick overview of the Checkr Dashboard, please see Getting started with Checkr.
-
JobDiva / Checkr Integration User Guide
Read MoreWelcome to Checkr!
This guide will walk you through the Checkr / JobDiva integration process, and outline how to use the Checkr dashboard for the background check process.
The Checkr Help Center is a great resource for any questions that may not be covered in this user guide. If you have any questions not covered in this guide that are specific to JobDiva, please fill out a support request for additional assistance.
________________________________________________________
- Prerequisites
- Add Checkr to JobDiva
- Enable Checkr setup
- Create a Checkr account
- Order Background Checks
- Use the Checkr Dashboard
________________________________________________________
This guide describes how to set up Checkr to use within JobDiva, such that JobDiva users can initiate and view Checkr background checks from within the JobDiva interface.
Prerequisites
The following items are required to initiate JobDiva / Checkr integration. Please ensure you have the following before proceeding.
- Access to JobDiva, with admin rights
- Access to Checkr, with admin rights
Add Checkr to JobDiva
First, enable Checkr from within JobDiva. You must have admin access to both Checkr and JobDiva to complete this process.
Enable Checkr setup
To initiate the Checkr integration from within JobDiva, navigate to JobDiva’s Team Profile page.
- From the client settings page, the client’s admin can click on the “Manage Background Check Settings” link.
- The user can click on the “Checkr” checkbox to start the account sign-up or sign-in process.
-
Once selected, the user is prompted to either sign in or sign up for the Checkr integration by following the prompts on the screen. Please see the next section to differentiate whether you should select “Set up a Checkr account” or “Sign In”.
Sign In or Sign Up - Create a Checkr account
- If you are already a Checkr customer, select Sign In to connect your current Checkr account to JobDiva.
- If your company does not yet have a Checkr account, one must be created before integration with JobDiva. Select Sign Up to create a Checkr account, and add your billing and credentialing information
To create a Checkr account for use with JobDiva:
- Click Sign Up when prompted.
- Enter your name and company contact information, and click Continue.
- Enter payment information. Invoices for background checks will come directly from Checkr, and not from JobDiva. (Payment information may be edited on the Checkr dashboard after the account has been created.)
-
Provide the requested credentialing information. This information is required by law to ensure that only legitimate companies, with legitimate business needs, can run background checks.
- Note: Select Purpose: Pre-employment to use Checkr to run background checks for hiring/employment purposes.
- Click Continue to submit your information to Checkr for review. Once the credentialing process is complete, Checkr will notify both JobDiva and you, and you may begin ordering background checks through the JobDiva platform.
- Credentialing typically takes 1-2 business days. If Checkr needs additional information, they will reach out to you directly by email.
Order Background Checks
Once your JobDiva and Checkr accounts are connected, return to JobDiva’s candidate profile page.
-
On JobDiva’s candidate profile page, there is a “Checkr” tab that hosts the Checkr application for a new background check invitation.
- Note: Only users with the ‘Allow to request background check’ user permission will be able to see this tab.
- In the window that opens, select the options for the check and click Submit. The options selected should be as they relate to the candidate.
- Once Submit is selected, an invitation email will be sent to the candidate prompting them to begin the background check.
Monitoring Background Checks
Once the background check has been ordered, the status of the report will be listed in the JobDiva candidate dashboard. Once Complete, click on it to open the report in the Checkr Dashboard, and review details. (For more information on reports and report statuses, see How do I interpret a background report in the Checkr Help Center.)
Most background checks will be completed within 24 hours, but the time to complete can range from a few minutes to a few weeks, depending on the type of check ordered, the geographic location of the candidate, and/or county courthouse operations.
Use the Checkr Dashboard
While the JobDiva integration allows users to order background checks and view their status, the following features are available only within Checkr:
- Background check invitation links
- Full background check report results
- Adverse Action initiation and processing tools
- Checkr settings
For a quick overview of the Checkr Dashboard, please see Getting started with Checkr.
-
Ceipal / Checkr Integration User Guide
Read MoreWelcome to Checkr!
This guide will walk you through the Checkr / Ceipal integration process, and outline how to use the Checkr dashboard for the background check process.
The Checkr Help Center is a great resource for any questions that may not be covered in this user guide. If you have any questions not covered in this guide that are specific to Ceipal, please fill out a support request for additional assistance.
_________________________________________________________
- Prerequisites
- Add Checkr to Ceipal
- Enable Checkr setup
- Create a Checkr account
- Account Hierarchy
- Order Background Checks
- Monitoring Background Checks
- Checkr Features
- Use the Checkr Dashboard
- Checkr’s Candidate Experience
- Resources
_________________________________________________________
This guide describes how to set up Checkr to use within Ceipal, such that Ceipal users can initiate and view Checkr background checks from within the Ceipal interface.
Prerequisites
The following items are required to initiate Ceipal / Checkr integration. Please ensure you have the following before proceeding.
- Access to Ceipal, with admin rights
- Access to Checkr, with admin rights
Add Checkr to Ceipal
First, enable Checkr from within Ceipal. You must have admin access to both Checkr and Ceipal to complete this process.
Enable Checkr setup
To initiate the Checkr integration, go to your Ceipal home page.
- From the Ceipal home page, click on the user icon on the top right-hand corner.
- Within the menu dropdown, click “View Profile”.
- Within the user profile, select “User Preferences”.
- Within user preferences, scroll down to the “Checkr BGV” option.
- While viewing “Checkr BGV”, you can select the blue arrow icon to authorize and enable your connection with Checkr.
Create a Checkr account
If your company does not yet have a Checkr account, one must be created before integration with Ceipal.
- By selecting the arrow icon, you will be redirected to the Checkr Sign Up / Sign In flow.
- If you are already a Checkr customer, select Sign In to connect your current Checkr account to Ceipal.
- If you are not a current Checkr customer, select Sign Up to create a Checkr account and follow the instructions below.
To create an account for use with Ceipal:
- Click Sign Up when prompted.
- Enter your name and company contact information, and click Continue.
- Enter payment information. Invoices for background checks will come directly from Checkr, and not from Ceipal]. (Payment information may be edited on the Checkr dashboard after the account has been created.)
-
Provide the requested credentialing information. This information is required by law to ensure that only legitimate companies, with legitimate business needs, can run background checks.
- Note: Select Purpose: Pre-employment to use Checkr to run background checks for hiring/employment purposes.
- Click Continue to submit your information to Checkr for review. Once the credentialing process is complete, Checkr will notify both Ceipal and you, and you may begin ordering background checks through the Ceipal platform.
- Credentialing typically takes 1-2 business days. If Checkr needs additional information, they will reach out to you directly by email.
Account Hierarchy
The integration allows users to set up different "nodes" inside of their Checkr account to have displayed in the background check ordering workflow. Nodes can be used to designate different locations, teams, or groups that order background checks within your organization. Checkr requires you to assign packages to nodes once they are created, and will then display which node ordered which package on your Checkr invoice.
Each time you order a background check, you will be asked which node to order the check from, and then select from a pre-populated list of packages available to that node. Invoices will show the background checks ordered by each node within 2 billing cycles after setup.
To order a background check with Account Hierarchy and nodes:
- Fill in the work location of the candidate as you normally would for any background check.
- Select which Hierarchy node you would like to order from.
The list of available Packages will automatically generate based on the node you select. Select the background check package you want to run. If you do not see any packages populating, you will need to assign the appropriate packages to that node in your Checkr dashboard before proceeding.
For more information on Account Hierarchy, nodes, and how to configure your account, see Checkr's Payment & Billing, Adverse Actions, and Manage Account Settings Help Articles.
Order Background Checks
- From the top menu bar within the Ceipal application, navigate to the Applicants tab.
- The Applicants tab shows all of the applicants and the jobs they have applied for.
- By clicking into an applicant and then section Submission Record, you will be brought to the applicant’s job submission.
-
On the submission page, the top menu bar will have an array of options. By Selecting the icon highlighted in the image below, you will be able to select Initiate Background Check.
- Once selected, you will next select “Initiate Checkr Background Check” from the dropdown.
- A window will light-frame titled “Checkr Background Screening”
- Within the window, please fill out the applicable candidate information.
- Once the information is complete, you will select “Initiate” to initiate the background check order for the candidate.
- If initiated successfully, you will see a window popup with the message “Candidate initiated for background verification through Checkr Background Screening”.
Monitoring Background Checks
- To review and monitor an applicant’s background check status, you can either navigate to the Applicants Tab or the Job Posting Tab and click on both the applicant and their specific job submission.
- Within an applicant’s submission overview, you can select “Background Checks” from the top menu bar.
- Here the applicant will have a “Background Check Results” section which will reflect the Background Check Requested, Processing Status, Result, Last Updated, ETA as well as a link to the Checkr dashboard to review the report within Checkr.
- Please note, “Background Check Results” can show multiple background checks requested for the applicant.
- Underneath “Background Check Results”, the user will see an “Activities” section, which details the recent activity log for the requested BGC.
For monitoring purposes, Ceipal also offers a Background check status consolidated report where the user can see the status of all the orders in a single place and can open the report of the respective order from the screen below.
Once Complete, click on it to open the report in the Checkr Dashboard, and review details. (For more information on reports and report statuses, see How do I interpret a background report in the Checkr Help Center.)
Most background checks will be completed within 24 hours, but the time to complete can range from a few minutes to a few weeks, depending on the type of check ordered, the geographic location of the candidate, and/or county courthouse operations.
Checkr Features
Use the Checkr Dashboard
While the integration allows users to order background checks and view their status, the following features are available only within Checkr:
- Background check invitation links
- Full background check report results
- Adverse Action initiation and processing tools
- Checkr settings
For a quick overview of the Checkr Dashboard, please see Getting started with Checkr
Checkr’s Candidate Experience
The checkr candidate experience overview describes the Checkr candidate experience of the background check process. It includes information about the Checkr Candidate Portal and Help Center where candidates can self-serve and address common issues that can stall or delay their background checks. The overview also includes common reasons candidates contact Checkr and how to address these issues.
The overview includes:
- An overview of the candidate process
- General information about the background check process, including exceptions and disputes
- An overview of the Checkr Candidate Portal
- An introduction to the Candidate Experience team
- A list of some of the most common candidate questions
- Links to the most frequently used pages in the Checkr Help Center
Resources
For a quick overview of the Checkr Dashboard, please see Getting started with Checkr
-
Advanced Enterprise Technologies, Inc. (AETI) / Checkr Integration Guide
Read MoreThis guide will walk you through the Checkr / AETI integration process:
- How to integrate Checkr with AETI to request and view background checks
- How to use the Checkr dashboard for the background check process
The Checkr Help Center is a great resource when getting started for any questions that may not be covered in this user guide. If you have any questions not covered in the help center, submit a request.
_________________________________________________________
- Prerequisites
- AETI User Permissions
- Add Checkr to AETI
- Setup a Checkr Account
- Account Hierarchy
- Order A Background Check
- Authorization Types
- Order A Background Check - for a New Driver
- Order A Background Check - for an Existing Driver
- Review Background Check Status
- Resubmit A Background Check
- Checkr Features
- Checkr’s Candidate Experience
- Additional Resources
- International Searches
- International Verifications
_________________________________________________________
Prerequisites
The following items are required to initiate AETI / Checkr integration. Please ensure you have the following before proceeding.
- Access to AETI, with admin rights
- Access to Checkr, with admin rights
AETI Permissions
- Administer Client permissions and access to the driver's module may Connect to Checkr.
- Add Driver and/or Edit Driver permissions may submit background checks once connected.
- Add Driver and/or Edit Driver permissions may view background check statuses.
- Administer Client permissions may view the report link.
The AETI Administration module allows you to connect to Checkr to perform driver background checks.
Add Checkr to AETI
First, enable Checkr from within AETI.
- Access the Administration module
- Select Drivers, then Connect to Checkr
-
Next to Connection Status select Connect to Checkr
Setup a Checkr Account
-
-
- If you already have an account, click Sign In.
- If you don’t have an account, create an account to get started.
-
To create an account:
- Click Setup a Checkr account
- Enter your contact/business information
- Click Continue
- Enter your business payment information
- Click Continue
- Invoices are sent out at the beginning of each month
- Click Submit Account for your account to be authorized
- Checkr will verify your information and notify you in 1-2 business days via email
-
Once setup, you'll receive a message your account has been connected.
- The Connection Status under Drivers will also show Connected.
Account Hierarchy
With Account Hierarchy you can set up Cost Centers (nodes) within the Checkr dashboard for background checks. Nodes can be used to assign different locations, teams, or groups that order background checks within your organization. Assign a package to a node and it will appear on your invoice. Invoices will show the background checks ordered by each node. Once created, when ordering to order a background check:
-
Fill in the work location of the candidate
- Select the node
- Select the Authorization Type
Your list of available packages will automatically generate based on the node you select. Select the background check package you want to run. If you do not see any packages populating, you will need to assign a package to that node in your Checkr dashboard.
Order A Background Check
Authorization Types
Before you can order a background check, authorization types must be set up and linked to Checkr packages. Authorization types are specific to AETI.
How to set up authorization types once connected to Checkr either:
- Click To order background checks, Authorization Types must be linked to Checkr Packages
- Click Authorization Types below Drivers
From Authorization Types, click Add Authorization Type
Then enter the Authorization Type, Tier (nodes), Checkr Package, and the Re-authorization Days. Once complete, Save Authorization Type.
Order A Background Check - for a New Driver
To order a background on a new driver:
- Click Add Driver within the drivers grid.
-
Enter the driver's information:
- Account, Name, Effective Date, Email Address, and Authorization Type
- Click Add Driver to add and order the background check
Order A Background Check - for an Existing Driver
To order a background check on an existing driver:
- Click Edit within the drivers grid.
- Select Authorizations
- Click Add Authorization
-
Select the Authorization Type
The background check status will update to Order Background Check
Click Edit Driver to save the driver and order the background check.
Work location may be specified by entering a zip to get city, state. If a zip code is not provided, AETI will use the city, state on the driver’s account record.
Review Background Check Status
Users may use the “Status” columns on the driver's grid, driver details, or edit driver screens to monitor the status of a background check.
Users may view additional information by clicking on the status and opening the background check detail popup.
Additional information includes Checkr package ordered, invitation dates, and/or report dates/.
If a user has “Administer Client” permission, they may also view the Checkr report link to the Checkr dashboard.
This report link can be clicked on to open the report in the Checkr Dashboard and review additional report details. (For more information on reports and report statuses, see How do I interpret a background report in the Checkr Help Center.)
Most background checks will be completed within 24 hours, but the time to complete can range from a few minutes to a few weeks, depending on the type of check ordered, the geographic location of the candidate, and/or county courthouse operations.
Resubmit A Background Check
To resubmit a background check that encountered an error, choose “Edit” from the actions drop down on the drivers grid.
Once on the “Edit Driver” screen, scroll down to the authorizations grid.
Locate the failed background check with a background check status of “Error”.
Click “Resubmit Background Check”
Finally, click the “Edit Driver” button at the bottom of the screen, any driver changes will be saved, and the background check will be submitted to Checkr.
Checkr Features
Additional Checkr account features available:
-
- Background check invitation links
- Full background check report results
- Cancel an invitation
- Adverse Action initiation and processing tools
- Checkr settings
- Candidate Stories
Checkr’s Candidate Experience
Checkr's candidate experience overview describes the candidate experience of the background check process. It provides information to answer common questions and resolve common issues.
Additional Resources
International Searches
Checkr offers several global searches for organizations hiring outside the United States (US). Depending on the location, Checkr offers a combination of criminal searches, global watchlist searches, education and employment verifications, adverse media searches, and identity document validation.
International Verifications
If your candidate works in the United States but has out-of-country history, for example attended school internationally, request a package that includes an education verification with out-of-country history enabled. The option can be applied for candidates who will perform their work inside the US, but who have an address history outside the US. Screening types that can be run on domestic screenings with out-of-country history include:
-
Sora / Checkr Integration User Guide
Read MoreWelcome to Checkr!
This guide will walk you through the Checkr / Sora integration process, and outline how to use the Checkr dashboard for the background check process.
The Checkr Help Center is a great resource for any questions that may not be covered in this user guide. If you have any questions not covered in this guide that are specific to Sora, please fill out a support request for additional assistance.
_________________________________________________________
- Prerequisites
- Add Checkr to Sora
- Enable Checkr setup
- Disable Checkr setup
- Create a Checkr account
- Order Background Checks
- Background Check Monitoring
- Resubmit a Background Check
- Sora User Permissions
- Use the Checkr Dashboard
_________________________________________________________
This guide describes how to set up Checkr to use within Sora, such that Sora users can initiate and view Checkr background checks from within the Sora interface.
Prerequisites
The following items are required to initiate Sora / Checkr integration. Please ensure you have the following before proceeding.
- Access to Sora, with super administrator rights
Add Checkr to Sora
First, enable Checkr from within Sora. You must have super administrator rights to Sora to complete this process.
Enable Checkr setup
- Log into your Sora account and from Sora’s home dashboard, navigate to settings in the top navigation bar.
- From settings, select the integrations tab.
- From the integrations tab, you can search for Check, located under the “Other” category.
- Once Checkr is selected, you will see “Integration Setup” and below a button labeled “Log in to set up integration”.
- Select “Log in to set up integration”.
-
Once selected, the Checkr hosted Sign Up / Sign In window will appear.
- If you are already a Checkr customer, select Sign In to connect your current Checkr account to Sora.
- If you are not a current Checkr customer, select Sign Up to create a Checkr account, and add your billing and credentialing information
- If you are signing-in, upon successfully signing in, you will return to the Check Integration page and see the following message: “Checkr is configured for use”.
- If you are signing-up, upon successfully signing-up for Checkr, the integration settings page will automatically refresh and display a warning message. The warning message will let you know that your Checkr account has to be credentialed prior to use and may take up to 24-48 hours. Once the credentialing process is complete, Checkr will notify both the customer and Sora, and the customer may begin ordering background checks through the Sora platform.
Disable Checkr setup
You can disconnect your Checkr <> Sora integration at any time. To do so, please contact Checkr to shut off the integration. At that time, Checkr will shut off the integration, and notify Sora and Sora will clear the connection automatically. This will be reflected in the Checkr integration tab within Sora.
Create a Checkr account
If your company does not yet have a Checkr account, one must be created before integration with Sora.
To create an account for use with Sora:
- Click Sign Up when prompted.
- Enter your name and company contact information, and click Continue.
- Enter payment information. Invoices for background checks will come directly from Checkr, and not from Sora. (Payment information may be edited on the Checkr dashboard after the account has been created.)
-
Provide the requested credentialing information. This information is required by law to ensure that only legitimate companies, with legitimate business needs, can run background checks.
- Note: Select Purpose: Pre-employment to use Checkr to run background checks for hiring/employment purposes.
- Click Continue to submit your information to Checkr for review. Once the credentialing process is complete, Checkr will notify both Sora and you, and you may begin ordering background checks through the Sora platform.
- Credentialing typically takes 1-2 business days. If Checkr needs additional information, they will reach out to you directly by email.
Order Background Checks
Once your Sora and Checkr accounts are connected and verified for use, please follow the steps below to begin ordering background checks.
- Navigate to the Workflows page and select the workflow you would like to add a background check to.
- Click “manage workflow” in the top right corner
- Add a new integration step at the direct point in the workflow. A tab will slide out.
- Under the “action” tab, in the drop-down menu select the background screening task.
- Under the “options” tab, select the options for the check.
- Save and publish the new integration task using the “Create (Publish)” button.
- To initiate an actual background check along with the other tasks in the workflow, exit the workflow editor and add an employee by clicking the “add employee” button in the top right-hand corner.
- When the employee reaches the background check step in the workflow, Sora will automatically create the candidate object and order the background check with the pre-configured options.
Background Check Monitoring Process
To monitor the status of a candidate’s background check, please follow the steps below.
- Navigate to the “Employees” tab in the top navigation bar.
- Click on the desired employee.
- In the flyout, select the “Background Checks” tab
- Here each card represents a separate background check that has been run.
The following information is displayed: date of initialization, source (task) of initialization, package name used, estimated completion of the check, status of the report and a link to the report itself.
Once Complete, click on the link to the report to open the report in the Checkr Dashboard, and review details. (For more information on reports and report statuses, see How do I interpret a background report in the Checkr Help Center.)
Most background checks will be completed within 24 hours, but the time to complete can range from a few minutes to a few weeks, depending on the type of check ordered, the geographic location of the candidate, and/or county courthouse operations.
Resubmit a Background Check
- In the selected workflow, click on the desired user and open the details of the enrollment.
- If a background check task encounters an error, it will be flagged indicated by a red flag icon next to the name of the task.
- Hovering over the icon will reveal details about the nature of the error.
- The flag and the error details can also be seen by opening the task and navigating to the “Flags” tab.
- To re-run the background check integration task, open it, navigate to the “Flags” tab and click “Rerun integration” under the error details.
- This will rerun the task with the same configuration.
Sora User Permissions
- To connect/disconnect a customer account to Checkr using OAuth, one must have super administrator access.
- Submitting a background check: A background check is a task in a workflow within Sora, think of it like a step in a list of actions. These steps (tasks) can have various triggers (after the previous task, when the employee enters the workflow, etc.). After a workflow is configured with background checks within it, the submission will be done automatically upon the configured trigger. By default these workflows can be managed by administrators, and workflow administrators so they have the ability to control when a background check is invoked from the workflow configuration.
- Reviewing background check results: The status, ETA, report link, and some additional information is displayed on the profile of the associated employee under a tab called background checks. Sora has an extensive permission system that by default only exposes this tab to administrators. Administrators have the power to control who else can see the results on an individual level.
- With Sora’s permission system, it is possible to grant the rights needed for the above operations to anyone.
Use the Checkr Dashboard
While the Sora integration allows users to order background checks and view their status, the following features are available only within Checkr:
- Background check invitation links
- Full background check report results
- Adverse Action initiation and processing tools
- Checkr settings
For a quick overview of the Checkr Dashboard, please see Getting started with Checkr.
-
PipeHireHRM / Checkr Integration User Guide
Read MoreWelcome to Checkr!
This guide will walk you through the Checkr / PipeHireHRM integration process, and outline how to use the Checkr dashboard for the background check process.
The Checkr Help Center is a great resource for any questions that may not be covered in this user guide. If you have any questions not covered in this guide that are specific to PipeHireHRM, please fill out a support request for additional assistance.
_________________________________________________________
- Prerequisites
- Create a Checkr account
- Order Background Checks
- Monitor Background Checks
- Use the Checkr Dashboard
_________________________________________________________
This guide describes how to set up Checkr to use within PipeHireHRM, such that PipeHireHRM users can initiate and view Checkr background checks from within the PipeHireHRM interface.
Prerequisites
The following items are required to initiate PipeHireHRM / Checkr integration. Please ensure you have the following before proceeding.
- Access to PipeHireHRM, with admin rights
Add Checkr to PipeHireHRM
First, enable Checkr from within PipeHireHRM. You must have admin access to PipeHireHRM to complete this process.
Enable Checkr setup
- Sign in to PipehireHRM.
- Once logged in, navigate to the applicant funnel.
- At the top of the applicant funnel, you will see the message: “To run a background check, please connect your Checkr account”.
- Click on the “Connect your Checkr account” hyperlink.
- Once selected, you will be redirected to the Checkr-hosted sign-up / sign-in flow.
- If you are already a Checkr customer, select Sign In to connect your current Checkr account to PipeHireHRM.
-
If you are not a current Checkr customer, select Sign Up to create a Checkr account, and add your billing and credentialing information
- Once you have successfully signed-in to your Checkr account, you will be redirected to a page that says “The connection with Checkr has been successful”. From here, you can begin running background checks from the candidate’s card, which you can access from the applicant funnel and is outlined in the Order Background Checks section of this guide.
- Once you have successfully signed-up for your Checkr account, you will be redirected to a page that says “The connection with Checkr has been successful” with an additional notice in yellow, informing you that Checkr’s Customer Success team must credential your Checkr account before you will be able to request background checks. This process generally can take up to 24-48 hours. Once credentialed, Checkr will notify both you and the PipehireHRM and you can begin running your background checks.
Disconnect Checkr within PipehireHRM: If a company ever wishes to disconnect the Checkr < > PipehireHRM integration, please contact Checkr support and Checkr support will help disconnect the integration from within your Checkr dashboard. Once disconnected, PipehireHRM will be notified and Checkr data will no longer be available within PipehireHRM.
Create a Checkr account
If your company does not yet have a Checkr account, one must be created before integration with PipeHireHRM.
To create an account for use with PipeHireHRM:
- Click Sign Up when prompted.
- Enter your name and company contact information, and click Continue.
- Enter payment information. Invoices for background checks will come directly from Checkr, and not from PipeHireHRM. (Payment information may be edited on the Checkr dashboard after the account has been created.)
-
Provide the requested credentialing information. This information is required by law to ensure that only legitimate companies, with legitimate business needs, can run background checks.
- Note: Select Purpose: Pre-employment to use Checkr to run background checks for hiring/employment purposes.
- Click Continue to submit your information to Checkr for review. Once the credentialing process is complete, Checkr will notify both PipeHireHRM and you, and you may begin ordering background checks through the PipeHireHRM platform.
- Credentialing typically takes 1-2 business days. If Checkr needs additional information, they will reach out to you directly by email.
Order Background Checks
Once your PipeHireHRM and Checkr accounts are connected, you can begin to run background checks.
- Navigate to the applicant funnel.
- Click on an applicant card to view the applicant profile.
- In the first tab, “Basic Information”, there are two options related to background checks.
- To run a new background check on the applicant, select the button “Run Background Check” button.
-
Once selected, a window will open asking you to populate the following information for the candidate: state, city, background check package, and email.
- For the package field, please note this is not a true drop-down. The user should either begin typing or use the down arrow to see the full package list available.
- For the package field, please note this is not a true drop-down. The user should either begin typing or use the down arrow to see the full package list available.
- Once all the information has been inputted, select “Submit”
- By selecting “submit”, a window will populate letting you know that an Invitation to the background check has been sent to the candidate.
Monitor Background Checks
To monitor background checks that have been initiated, please follow the steps below.
- Navigate to the applicant funnel.
- Click on an applicant card to view the applicant’s profile.
- Select the button “View Background Check Overview”.
- Once selected, you will see a list of one or multiple background checks initiated for the applicant.
- Each background check that has been run will have a tile to display the following: background check package, background check status, background check ETA and a link to the Checkr dashboard.
Once Complete, click on the “View Report” link to open the report in the Checkr Dashboard, and review details. (For more information on reports and report statuses, see How do I interpret a background report in the Checkr Help Center.)
Most background checks will be completed within 24 hours, but the time to complete can range from a few minutes to a few weeks, depending on the type of check ordered, the geographic location of the candidate, and/or county courthouse operations.
Use the Checkr Dashboard
While the PipeHireHRM integration allows users to order background checks and view their status, the following features are available only within Checkr:
- Background check invitation links
- Full background check report results
- Adverse Action initiation and processing tools
- Checkr settings
For a quick overview of the Checkr Dashboard, please see Getting started with Checkr.
-
Discovered ATS / Checkr Integration User Guide
Read MoreWelcome to Checkr!
This guide will walk you through the Checkr | Discovered ATS integration process, and outline how to use the Checkr dashboard for the background check process.
The Checkr Help Center is a great resource for any questions that may not be covered in this user guide. If you have any questions not covered in this guide that are specific to Discovered ATS submit a request to contact us.
______________________________________________________________
- Prerequisites
- Enable Checkr setup
- Create a Checkr account
- Account Hierarchy
- Order Background Checks
- International Packages
- Domestic Package with International Verifications
- Review a Background Check
- Monitoring a Background Check
- Reviewing Completed Results
- Resubmit a Background Check
- Checkr Features
- Use the Checkr Dashboard
- Checkr’s Candidate Experience
- Resources
______________________________________________________________
This guide describes how to set up Checkr to use within Discovered ATS, such that Discovered ATS users can initiate and view Checkr background checks from within the Discovered ATS interface.
Prerequisites
The following items are required to initiate Discovered ATS | Checkr integration. Please ensure you have the following before proceeding.
- Access to Discovered ATS, with admin rights
Enable Checkr
To enable Checkr from within Discovered ATS, please follow the steps below.
Option 1
- Log in to Discovered ATS
- Once logged in, you will be on the Discovered ATS dashboard homepage.
- From the homepage, you can navigate to account settings in the top right hand corner.. From settings, select “Checkr Settings”.
- Within “Checkr Settings”, you can select “Connect or Create Checkr Account”. Selecting this option will begin the sign up / sign in process.
-
- If you are already a Checkr customer, select Sign In to connect your current Checkr account to Discovered ATS.
-
If you are not a current Checkr customer, select Sign Up to create a Checkr account, and add your billing and credentialing information
Option 2
- Log in to Discovered ATS
- Once logged in, you will be on the Discovered ATS dashboard homepage.
- From the homepage, you can view a job posting and the candidates that have applied.
-
Once you’ve selected a specific candidate’s profile, you can navigate to the “Background Check” tile and select “Integration with Checkr”. Selecting this option will begin the sign-up / sign-in process.
- If you are already a Checkr customer, select Sign In to connect your current Checkr account to Discovered ATS.
-
If you are not a current Checkr customer, select Sign Up to create a Checkr account, and add your billing and credentialing information.
- Once you’ve signed in or signed up, the background check portion of a candidate’s profile will now give you access to “Request Background Check”.
Create a Checkr account
If your company does not yet have a Checkr account, one must be created before integration with Discovered ATS.
To create an account for use with Discovered ATS:
- Click Sign Up when prompted.
- Enter your name and company contact information, and click Continue.
- Enter payment information. Invoices for background checks will come directly from Checkr, and not from Discovered ATS. (Payment information may be edited on the Checkr dashboard after the account has been created.)
- Provide the requested credentialing information. This information is required by law to ensure that only legitimate companies, with legitimate business needs, can run background checks.
- Note: Select Purpose: Pre-employment to use Checkr to run background checks for hiring/employment purposes.
- Click Continue to submit your information to Checkr for review. Once the credentialing process is complete, Checkr will notify both Discovered ATS and you, and you may begin ordering background checks through the Discovered ATS platform.
- Credentialing typically takes 1-2 business days. If Checkr needs additional information, they will reach out to you directly by email.
Account Hierarchy
The Discovered ATS integration allows users to set up different "nodes" inside of their Checkr account to have displayed in the Discovered ATS background check ordering workflow. Nodes can be used to designate different locations, teams, or groups that order background checks within your organization. Checkr requires you to assign packages to nodes once they are created, and will then display which node ordered which package on your Checkr invoice.
Each time you order a background check within Discovered ATS, you will be asked which node to order the check from and then select from a pre-populated list of packages available to that node. Invoices will show the background checks ordered by each node within 2 billing cycles after setup.
To order a background check with Account Hierarchy and nodes:
- Fill in the work location of the candidate as you normally would for any background check through Discovered ATS.
- Select which Hierarchy node you would like to order from.
The list of available Packages will automatically generate based on the node you select. Select the background check package you want to run. If you do not see any packages populating, you will need to assign the appropriate packages to that node in your Checkr dashboard before proceeding.
For more information on Account Hierarchy, nodes, and how to configure your account, see Checkr's
Payment & Billing, Adverse Actions, and Manage Account Settings Help Articles.
Order Background Checks
To order a background check from within Discovered ATS, please follow the steps below.
- On a job posting, navigate to the candidate profile of the candidate you wish to request a background check for.
- Once within the candidate profile, navigate to the “Background Check” section and select “Request background check”.
- Once selected, the “Invite Candidate” workflow will begin and the user will be prompted to select: Country, State, City, Background Check Package, and email of the candidate.
- Once complete, select “submit”. By selecting “submit”, the user will receive a confirmation on the screen that an invitation will be sent to the candidate to initiate the background check.
International Packages
Checkr defines international background checks as background checks run on candidate’s living and working outside of the United States. If your candidate works in the United States but has out-of-country history, for example attended school internationally, the user should request a package that includes an education verification with out-of-country history enabled.
Checkr currently offers the following international screenings for candidate’s with work locations outside the United States:
- International Criminal
- Adverse Media Search - may be enabled to automatically run if criminal not available
- Identity Document Verification
- Global Watchlist
- Education Verification
- Employment Verification
Domestic Package with International Verifications
If your candidate works in the United States but has out-of-country history, Checkr currently offers an out-of-country history setting that can be added to any domestic criminal search or verification. The option can be applied for candidates who will perform their work inside the US, but who have an address history outside the US. Screening types that can be run on domestic screenings with out-of-country history include:
- Education Verification
- Employment Verification
Review A Background Check
Monitoring A Background Check
Once a background check has been initiated on a candidate, please follow the steps below to monitor the status and results of the background check.
- On a job posting, navigate to the candidate profile of the candidate you wish to see background check results for.
- Once within the candidate profile, navigate to the “Background Check” section.
- Within the “Background Check” section of the candidate profile, the user is able to see all background checks that have been initiated on the candidate.
-
While in progress, the background check tile will share the following information: the background check package requested, the status of the background check, the ETA for completion, and the option to “View Candidate”.
- By selecting “View Candidate”, the user will be redirected to the Checkr dashboard to review the candidate within Checkr.
- By selecting “View Candidate”, the user will be redirected to the Checkr dashboard to review the candidate within Checkr.
- Once a background check has been completed and the status is returned, the background check status and the result will display within the background check tile. If the status and background check result require additional review, the user can select “View Report” to navigate to the Checkr dashboard and review the background check results.
Reviewing Completed Results
Once the background check has been ordered, the status of the report will be listed in the Discovered ATS candidate profile. Once Complete, click on “View Report” to open the report in the Checkr Dashboard, and review details.
For more information on reports and report statuses, see How do I interpret a background report in the Checkr Help Center which covers:
Most background checks will be completed within 24 hours, but the time to complete can range from a few minutes to a few weeks, depending on the type of check ordered, the geographic location of the candidate, and/or county courthouse operations.
Resubmit A Background Check
If a new background check is required for the same candidate, please follow the steps below.
- A new candidate profile is required. To create a new profile…
- Navigate to the job posting
- Select “Add Candidate”.
- The candidate’s information can all be added, aside from the email address. A new email address is required to be different from the candidate's first profile’s email address.
- This is because Discovered ATS has put measures in place that ensures no two candidates can have the same email address. If two candidates have the same email address, the candidate profiles get combined into one.
- For example, if the candidate uses Gmail, they could do homersimpson@gmail.com and homersimpson1@gmail.com
- Once the candidate has a second profile, the user can navigate to the candidate’s profile >> Background Checks >> Request Background Check.
Checkr Features
Use the Checkr Dashboard
While the Discovered ATS integration allows users to order background checks and view their status, the following features are available only within Checkr:
- Background check invitation links
- Full background check report results
- Adverse Action initiation and processing tools
- Checkr settings
For a quick overview of the Checkr Dashboard, please see Getting started with Checkr
Checkr’s Candidate Experience
The checkr candidate experience overview describes the Checkr candidate's experience of the background check process. It includes information about the Checkr Candidate Portal and Help Center where candidates can self-serve and address common issues that can stall or delay their background checks. The overview also includes common reasons candidates contact Checkr and how to address these issues.
The overview includes:
- An overview of the candidate process
- General information about the background check process, including exceptions and disputes
- An overview of the Checkr Candidate Portal
- An introduction to the Candidate Experience team
- A list of some of the most common candidate questions
- Links to the most frequently used pages in the Checkr Help Center
Resources
For a quick overview of the Checkr Dashboard, please see Getting started with Checkr
-
Able Checkr Integration Guide
Read MoreWelcome to Checkr!
This guide will walk you through the Checkr / Able integration process:
- How to integrate Checkr with Able to request and view background checks
- How to use the Checkr dashboard for the background check process
The Checkr Help Center is a great resource for any questions that may not be covered in this user guide. If you have any questions not covered in the help center, submit a request.
_________________________________________________________
- Prerequisites
- Able Permissions
- Enable Checkr Setup
- Create a Checkr Account
- Order A Background Check
- Review A Background Check
- Checkr Features
- Checkr’s Candidate Experience
_________________________________________________________
Prerequisites
The following items are required to initiate the Able / Checkr integration:
- To enable the integration you must have admin access to both Checkr and Able to complete this process
Able Permissions
An authentication link must be provided by Able Customer Service to configure the Checkr integration.
Enable Checkr Setup
Able will provide you with an authentication link to enable the connection. Note: Integration will not be activated until Able is implemented and live.
Sign In or Sign Up to create a Checkr account. If your company does not yet have a Checkr account, one must be created before utilizing the integration with Able.
Create a Checkr Account
To create a Checkr account:
- Click Set up a Checkr account.
- Enter your contact and business information and click Continue.
- This information is required by law to ensure that only legitimate companies, with legitimate business needs, and can run background checks.
- Enter your payment information.
- Invoices for background checks will come directly from Checkr. (Payment information may be edited on the Checkr dashboard after the account has been created.)
- Click Continue and Submit Account to Checkr for review. Once the credentialing process is complete or if additional information is needed, you'll be notified by email.
- Credentialing typically takes 1-2 business days.
A success message will be displayed when the integration is enabled. You may close the window and begin ordering background check screenings for your candidates directly from Able.
Order A Background Check
After your Able and Checkr accounts are connected, you can order a new background check for a candidate from the Applicants section in the left-hand menu bar.
In the window that opens, select the applicant name, and click + New Onboarding Request.
This will take you to the Order Workflow page. From here, you may select the Checkr Screening Package to order for the candidate from the drop-down menu.
*Note: Only one background check package may be ordered at a time for a candidate.
When you have made your selections, click on Send Workflow. Based on the preferred method of contact, the candidate will either receive an email or text notification to log into Able and complete their onboarding steps.
While you’re waiting for the candidate to complete their steps, the status of the background screening will be Ordered and is visible in Applicants under Background Screening.
The candidate will receive an email from Checkr to provide the required personally identifiable information based on the screenings in the selected package, review their disclosures, and authorize consent for the background check.
Once consent is submitted by the candidate, the background check order will be initiated in Checkr.
*Note: A background check cannot be canceled or changed once a candidate has authorized their consent.
The result of the screening will reflect the status of the Checkr background check. All background checks begin with the result Pending.
Review A Background Check
Report results are returned to Able in the form of Result statuses. These statuses appear in Able as soon as they are available in the Checkr Dashboard.
Packages/Services will display the individual screenings ordered within a background check package and their statuses. Hover over each screening to display the status name, such as green for clear, gray for pending, and red for consider.
Depending on your permissions, when the report is complete, you may view a PDF of the full report by clicking on View. Click on Take Action to review the report in Checkr.
The “date in” corresponds to when Able receives the screening results, the “date out” corresponds to the date those results are shared.
For more information on reports and report statuses, see How do I interpret a background report in the Checkr Help Center.
Most criminal background checks will be completed within 24 hours, but the time to complete can range from a few minutes to a few weeks, depending on the type of check ordered, the geographic location of the candidate, and/or county courthouse operations.
Checkr Features
Additional Checkr account features available:
-
- Background check invitation links
- Full background check report results
- Cancel an invitation
- Adverse Action initiation and processing tools
- Checkr settings
- Candidate Stories
Checkr’s Candidate Experience
Checkr's candidate experience overview describes the candidate experience of the background check process. It provides information to answer common questions and resolve common issues.
-
Fountain / Checkr Integration User Guide
Read MoreWelcome to Checkr!
This guide will walk you through the Fountain/Checkr integration process, and outline how to use the Checkr dashboard for the background check process.
The Checkr Help Center is a great resource for any questions that may not be covered in this user guide. If you have any questions not covered in this guide that are specific to Fountain, please submit a request for additional assistance.
_________________________________________________________
- Prerequisites
- Step 1: Copy Production API Key from Checkr
- Step 2: Add Checkr as an Integration
- Step 3: Add Webhook
- Step 4: Add a Background Check to your Workflow
- Testing your Checkr Integration
- Viewing Results
- Use the Checkr Dashboard
_________________________________________________________
Prerequisites
Before enabling the integration, make sure your Checkr account is approved for production. If you’re not sure, you can confirm this by emailing clients@checkr.com.
Step 1: Copy Production API Key from Checkr
Log in to Checkr, and navigate to Account Settings → Developer Settings.
Click the "Show key" for the Live Secret, then copy the key.
Step 2: Add Checkr as an Integration
Go to Fountain, click on your initials located right top corner to show the dropdown, and navigate to "Company Settings" → "Integrations" → “Screening.”
Click on the “Connect” button next to the Checkr logo in the "Background Checks" integration section and paste the Production API Key from the previous step — then, click "Save Changes".
Step 3: Add Webhook
Within Checkr, under the API keys is a “Webhooks” section. Insert https://callbacks.fountain.com/integrations/checkr into the URL box and click “Add.”
Step 4: Add a Background Check to your Workflow
Navigate to an Opening in Fountain and edit the workflow. Click the “Add stage” button and select “Create New Stage.” Create a new “Background Check with Checkr” stage.
You can drag the Checkr stage to the correct place in the workflow, and select it to configure settings.
The settings that you can configure:
- Report package
- Checkr Geo (optional)
- Run MVR first before the complete package
- Whether to send a consent message automatically
- Action to take when the applicant has consented
- Who to notify when a report status is returned
- The custom SMS and email messages associated with this stage
Testing your Checkr Integration
If you use the test API key from Checkr, you can use the following details to test your Checkr integration. Note that you will be charged for reports if you use these details in a production Checkr account.
Test Social Security Numbers
111-11-2001 Criminal screening will return with status 'clear'
111-11-2002 Criminal screening will return with status 'consider'
Test Driver License Numbers
California: F1112001 MVR report returns with status 'clear'
California: F1112002 MVR report returns with status 'consider'
You can use these test numbers if you open the Checkr stage in the applicant table and click “Create Test Applicant”:
Viewing Results
Check results are viewable in the applicant table and applicant profile.
Use the Checkr Dashboard
The Fountain integration allows you to order background checks and view their status; however, the following features are available within Checkr:
- Background check invitation links
- Full background check report results
- Adverse Action initiation and processing tools
- Create customizable packages and add-ons
- Checkr settings
For a quick overview of the Checkr Dashboard, please see Getting started with Checkr.
-
Trustero | Checkr Integration User Guide
Read MoreWelcome to Checkr!
This guide will walk you through the Checkr / Trustero process, and outline how to use the Checkr dashboard for the background check process.
The Checkr Help Center is a great resource for any questions that may not be covered in this user guide. If you have any questions not covered in this guide that are specific to Trustero, please fill out a support request for additional assistance.
_________________________________________________________
- Prerequisites
- Enable Checkr setup
- Create a Checkr account
- Order Background Checks
- Review A Background Check
- Disconnect Checkr Account
- Checkr Features
- Use the Checkr Dashboard
- Checkr’s Candidate Experience
- Resources
_________________________________________________________
Prerequisites
The following items are required to initiate Trustero | Checkr integration. Please ensure you have the following before proceeding.
- Access to Trustero, with admin rights
Enable Checkr setup
To enable Checkr within your Trustero account, please follow the below steps.
- Login to your Trustero account.
- From the left hand navigation menu, select ‘Services’. This will bring you to the ‘Services and Receptors’ page within Trustero.
- Checkr is part of Trustero's ‘Receptors’. A receptor automated evidence collection for a specific tool.
- Checkr is part of Trustero's ‘Receptors’. A receptor automated evidence collection for a specific tool.
- In the right hand corner, select ‘Add Receptor’. This will lightframe a window of receptors to choose from.
- Select ‘Checkr’. A window, ‘Activate Checkr’ will populate.
- Fill out the ‘Nickname’ field.
- This field is required and is part of the evidence caption to assist the auditor in distinguishing where the data is coming from.
- The customer can use their org name, or whatever naming conventions will help them distinguish between accounts if you are connecting more than one Checkr account.
- Select ‘Activate’. This will redirect you to the Checkr hosted, sign-in / sign-up flow.
- If you are already a Checkr customer, select Sign In to connect your current Checkr account to Trustero.
- If you are not a current Checkr customer, select Sign Up to create a Checkr account, and add your billing and credentialing information
- Once you’ve signed-in / signed-up, you will be redirected back to the Trustero page, ‘Services and Receptors’.
- Checkr will now be listed as a receptor.
Create a Checkr account
If your company does not yet have a Checkr account, one must be created before integration with Trustero.
To create an account for use with Trustero:
- Click Sign Up when prompted.
- Enter your name and company contact information, and click Continue.
- Enter payment information. Invoices for background checks will come directly from Checkr, and not from Trustero. (Payment information may be edited on the Checkr dashboard after the account has been created.)
- Provide the requested credentialing information. This information is required by law to ensure that only legitimate companies, with legitimate business needs, can run background checks.
- Note: Select Purpose: Pre-employment to use Checkr to run background checks for hiring/employment purposes.
- Click Continue to submit your information to Checkr for review. Once the credentialing process is complete, Checkr will notify both Trustero and you, and you may begin ordering background checks through the Trustero platform.
- Credentialing typically takes 1-2 business days. If Checkr needs additional information, they will reach out to you directly by email.
Order Background Checks
To order background checks, a Checkr customer must order a background check directly from their Checkr dashboard. Trustero does not support the ordering process within their platform. Rather, Trustero will receive ‘completed’ and ‘in progress’ background check report information from Checkr Accounts. For ‘in progress’ checks, no date of completion will be listed.
Review A Background Check
To review completed background report information from your Checkr account within Trustero, please follow the steps below.
- Login to your Trustero account and ensure you’ve followed the steps outlined in the ‘Enable Checkr Setup’ section above.
- Go to the ‘Services and Receptors’ page.
- Checkr will be listed as a receptor. Select ‘Checkr’.
- You will see ‘Automatable Controls’. Automatable Controls are what the receptor is related to for audit purposes.
- For Checkr, you will see that the Checkr receptor is related to screenings.
- If you select ‘Screening’, you will be brought to a controls page, titled ‘Screening’.
- Under ‘Procedure’, you will see various tabs. Select ‘Evidence’.
- The ‘Evidence’ tab contains all of the background check scans. A scan is when they retrieve the data from Checkr to generate background check evidence.
- A scan for background checks is added upon connecting your Checkr account.
- A scan is added once a week. This sync occurs every Friday at 2am.
- A scan can occur ad-hoc, whenever a customer requests one.
- By selecting a scan, a window populates titled ‘Automatic Evidence for Screening’ and details the following evidence for all completed background checks, Name of employee, start date and completion date.
- Note: A user will not see the background check status / result.
- To request a new scan of background checks, you can select ‘Add Evidence’
Disconnect your Checkr Account
If you wish to disconnect your Checkr account from within Trustero, please follow the steps below.
- Login to Trustero.
- Navigate to the ‘Services and Receptors’ page.
- Within your list of ‘Receptors’, find Checkr.
- Click the pencil icon to the left of Checkr, ‘Manage Receptor’.
- This will populate the ‘Activate Checkr’ screen.
- Select ‘Deactivate’.
- This will disconnect your Checkr account.
Checkr Features
Use the Checkr Dashboard
While the Trustero integration allows users to view completed background check reports (name of candidate, start date and completion date) the following features are available within Checkr:
- Background check invitation links
- Full background check report results
- Adverse Action initiation and processing tools
- Checkr settings
For a quick overview of the Checkr Dashboard, please see Getting started with Checkr
Checkr’s Candidate Experience
The Checkr candidate experience overview describes the Checkr candidate experience of the background check process. It includes information about the Checkr Candidate Portal and Help Center where candidates can self-serve and address common issues that can stall or delay their background checks. The overview also includes common reasons candidates contact Checkr and how to address these issues.
The overview includes:
- An overview of the candidate process
- General information about the background check process, including exceptions and disputes
- An overview of the Checkr Candidate Portal
- An introduction to the Candidate Experience team
- A list of some of the most common candidate questions
- Links to the most frequently used pages in the Checkr Help Center
Resources
For a quick overview of the Checkr Dashboard, please see Getting started with Checkr
-
GetHired (Onboarding Platform) / Checkr Integration User Guide
Read MoreWelcome to Checkr!
This guide will walk you through the Checkr | GetHired integration process, and outline how to use the Checkr dashboard for the background check process.
The Checkr Help Center is a great resource for any questions that may not be covered in this user guide. If you have any questions not covered in this guide that are specific to GetHired, submit a request to contact us.
______________________________________________________________
Integrated with GetHired but not using Onboarding? Check out the ATS Enterprise or ATS SMB User Guide
______________________________________________________________
- Prerequisites
- Enable Checkr setup (GetHired Onboarding)
- Create a Checkr account
- Account Hierarchy
- Order Background Checks
- International Packages
- Review A Background Check
- Monitoring A Background Check
- Reviewing Completed Results
- Resubmit A Background Check
- Checkr Features
- Use the Checkr Dashboard
- Checkr’s Candidate Experience
- Resources
______________________________________________________________
This guide describes how to set up Checkr to use within GetHired, such that GetHired users can initiate and view Checkr background checks from within the GetHired interface.
Prerequisites
The following items are required to initiate GetHired | Checkr integration. Please ensure you have the following before proceeding.
- Access to GetHired, with appropriate rights
GetHired shows the Checkr integration in both the ATS (hiring) and Onboarding module of their platform. The background check integration is available in both modules, with slightly different behavior.
GetHired uses Checkr embeds for initiation, monitoring and review. The differences between the ATS and Onboarding are in:
- Finding the Sign-In / Sign-Up (OAuth) link
- Initiating the Background Check
Enable Checkr setup (GetHired Onboarding)
- Login to the GetHired Onboarding Platform and navigate to the dashboard homepage.
- Once on the dashboard, select “View Employees” from the left navigation menu which will bring you to a page detailing all employees going through the onboarding process.
- Once you’re viewing an employee ‘card’, you can select ‘Run Background Check’.
- After selecting ‘Run Background Check’, a module will appear informing you to ‘Connect your Checkr Account’.
- Select ‘Connect’, which will launch the OAugh Sign-In / Sign-Up process.
- If you are already a Checkr customer, select Sign In to connect your current Checkr account to GetHired.
- If you are not a current Checkr customer, select Sign Up to create a Checkr account, and add your billing and credentialing information
- After completing the flow, you will be redirected back to the Employee Card within the Onboarding platform.
- If you had to create a new account via Sign Up flow, then you will see the following message as your account will need to be credentialed by Checkr.
- If you Signed In to Checkr, you will be able to re-select ‘Run Background Check’ and begin ordering background checks.
Create a Checkr account
If your company does not yet have a Checkr account, one must be created before integration with GetHired.
To create an account for use with GetHired:
- Click Sign Up when prompted.
- Enter your name and company contact information, and click Continue.
- Enter payment information. Invoices for background checks will come directly from Checkr, and not from GetHired. (Payment information may be edited on the Checkr dashboard after the account has been created.)
- Provide the requested credentialing information. This information is required by law to ensure that only legitimate companies, with legitimate business needs, can run background checks.
- Note: Select Purpose: Pre-employment to use Checkr to run background checks for hiring/employment purposes.
- Click Continue to submit your information to Checkr for review. Once the credentialing process is complete, Checkr will notify both GetHired and you, and you may begin ordering background checks through the GetHired platform.
- Credentialing typically takes 1-2 business days. If Checkr needs additional information, they will reach out to you directly by email.
Account Hierarchy
The GetHired integration allows users to set up different "nodes" inside of their Checkr account to have displayed in the GetHired background check ordering workflow. Nodes can be used to designate different locations, teams, or groups that order background checks within your organization. Checkr requires you to assign packages to nodes once they are created, and will then display which node ordered which package on your Checkr invoice.
Each time you order a background check within GetHired, you will be asked which node to order the check from, and then select from a pre-populated list of packages available to that node. Invoices will show the background checks ordered by each node within 2 billing cycles after setup.
To order a background check with Account Hierarchy and nodes:
- Fill in the work location of the candidate as you normally would for any background check through GetHired.
- Select which Hierarchy node you would like to order from.
The list of available Packages will automatically generate based on the node you select. Select the background check package you want to run. If you do not see any packages populating, you will need to assign the appropriate packages to that node in your Checkr dashboard before proceeding.
For more information on Account Hierarchy, nodes, and how to configure your account, see Checkr's
Payment & Billing, Adverse Actions, and Manage Account Settings Help Articles.
Order Background Checks
- Login to the GetHired Onboarding Platform and navigate to the dashboard homepage.
- Once on the dashboard, select “View Employees” from the left navigation menu which will bring you to a page detailing all employees going through the onboarding process.
- Select an employee.
- Once you’re viewing an employee ‘card’, you can select ‘Run Background Check’.
- Once selected, the new invitation will populate.
- Please fill out the “Invite Candidate” prompts:
- Select a country
- Select a state
- Select a city (optional)
- Select a package
- Enter email (pre-populates by candidate)
- Click ‘Submit’.
- Once submitted, you will receive confirmation that the candidate was invited to the background check.
International Packages
Checkr defines international background checks as background checks run on candidate’s living and working outside of the United States. If your candidate works in the United States but has out-of-country history, for example attended school internationally, request a package that includes an education verification with out-of-country history enabled.
Checkr currently offers the following international screenings for candidate’s with work locations outside the United States:
- International Criminal
- Adverse Media Search - may be enabled to automatically run if criminal not available
- Identity Document Verification
- Global Watchlist
- Education Verification
- Employment Verification
Domestic Package with International Verifications
If your candidate works in the United States but has out-of-country history, for example attended school internationally, request a package that includes an education verification with out-of-country history enabled. Checkr currently offers an out-of-country history setting that can be added to any domestic criminal search or verification.
The option can be applied for candidates who will perform their work inside the US, but who have an address history outside the US. Screening types that can be run on domestic screenings with out-of-country history include:
- Education Verification
- Employment Verification
Review A Background Check
Monitoring A Background Check
To monitor a background check, the employee must have started the onboarding process. Once the onboarding process is started, you will have access to “View Details” as noted below.
- Login to the GetHired Onboarding Platform and navigate to the dashboard homepage.
- Once on the dashboard, select “View Employees” from the left navigation menu which will bring you to a page detailing all employees going through the onboarding process.
- Select an employee.
- Once you’re viewing an employee ‘card’, you can select ‘View Details’.
- By selecting ‘View Details’, a module will appear titled ‘Employee Onboarding Data’.
- WIthin the Onboarding Employee Profile Card, you can scroll down to the bottom and find ‘Background Check’.
- Within ‘Background Check’, you can view all ‘Available Reports’ and / or run a new check.
- Within “Available Reports’ you are able to view all background checks that have been run for the candidate. The following details will be displayed:
- the name of the package ordered,
- the status of the invitation to the candidate,
- the status of the report's progress and its ETA, and
- the result of the report and its completion timestamp.
- A link to the candidate in the Checkr Dashboard if the invitation has not yet been completed, and a link to the report once it has been initiated.
Reviewing Completed Results
Once the background check has been ordered, the status of the report will be listed in the GetHired employee profile. This profile expands and you’re able to see all reports at the bottom of the employee profile and the report status. Once Complete, click on it to open the report in the Checkr Dashboard, and review details.
For more information on reports and report statuses, see How do I interpret a background report in the Checkr Help Center which covers:
Most background checks will be completed within 24 hours, but the time to complete can range from a few minutes to a few weeks, depending on the type of check ordered, the geographic location of the candidate, and/or county courthouse operations.
Resubmit A Background Check
More than one background check can be ordered for a single candidate. To order multiple background checks, please follow the steps outlined in the “Order Background Checks” section above.
Checkr Features
Use the Checkr Dashboard
While the GetHired integration allows users to order background checks and view their status, the following features are available only within Checkr:
- Background check invitation links
- Full background check report results
- Adverse Action initiation and processing tools
- Checkr settings
For a quick overview of the Checkr Dashboard, please see Getting started with Checkr
Checkr’s Candidate Experience
The checkr candidate experience overview describes the Checkr candidate experience of the background check process. It includes information about the Checkr Candidate Portal and Help Center where candidates can self-serve and address common issues that can stall or delay their background checks. The overview also includes common reasons candidates contact Checkr and how to address these issues.
The overview includes:
- An overview of the candidate process
- General information about the background check process, including exceptions and disputes
- An overview of the Checkr Candidate Portal
- An introduction to the Candidate Experience team
- A list of some of the most common candidate questions
- Links to the most frequently used pages in the Checkr Help Center
Resources
For a quick overview of the Checkr Dashboard, please see Getting started with Checkr.
-
GetHired (ATS Platform, SMB) | Checkr Integration User Guide
Read MoreWelcome to Checkr!
This guide will walk you through the Checkr | GetHired integration process, and outline how to use the Checkr dashboard for the background check process.
The Checkr Help Center is a great resource for any questions that may not be covered in this user guide. If you have any questions not covered in this guide that are specific to GetHired, submit a request to contact us.
______________________________________________________________
Integrated with GetHired but not using ATS SMB? Check out the Onboarding or ATS Enterprise User Guide
______________________________________________________________
- Prerequisites
- Enable Checkr Setup - Two Options (GetHired ATS, SMB)
- Create a Checkr account
- Account Hierarchy
- Order Background Checks
- International Packages
- Domestic Package with International Verifications
- Review A Background Check
- Monitoring A Background Check
- Reviewing Completed Results
- Resubmit A Background Check
- Checkr Features
- Use the Checkr Dashboard
- Checkr’s Candidate Experience
- Resources
______________________________________________________________
This guide describes how to set up Checkr to use within GetHired, such that GetHired users can initiate and view Checkr background checks from within the GetHired interface.
Prerequisites
The following items are required to initiate GetHired | Checkr integration. Please ensure you have the following before proceeding.
- Access to GetHired, with appropriate rights
GetHired shows the Checkr integration in both the ATS (hiring) and Onboarding module of their platform. The background check integration is available in both modules, with slightly different behavior.
GetHired uses Checkr embeds for initiation, monitoring and review. The differences between the ATS and Onboarding are in:
- Finding the Sign-In / Sign-Up (OAuth) link
- Initiating the Background Check
Enable Checkr Setup - Two Options (GetHired ATS, SMB)
Option 1
- Login to the GetHired ATS and navigate to the dashboard homepage.
- Once on the dashboard, select “Integrations” from the left navigation menu which will bring you to the designated Integrations page within GetHired.
- From the Integrations page, select ‘Checkr’.
- Once ‘Checkr’ is selected, click ‘Connect’.
- Clicking ‘Connect” will launch the OAugh Sign-In / Sign-Up process.
- If you are already a Checkr customer, select Sign In to connect your current Checkr account to GetHired.
- If you are not a current Checkr customer, select Sign Up to create a Checkr account, and add your billing and credentialing information
- After completing the flow, you will be redirected back to GetHired.
- If you had to create a new account via Sign Up flow, then you will see the following message as your account will need to be credentialed by Checkr.
- If you Signed In to Checkr, you will see the following message and can begin ordering background checks on candidates.
Option 2
- Login to the GetHired ATS and navigate to the dashboard homepage.
- Once on the dashboard, select ‘Jobs’ from the left navigation menu which will bring you to the job details page, which hosts an ‘Applicant Tracker’.
- Select a candidate from within the ‘Applicant Tracker’.
- Once selected, the candidate's profile card will populate.
- From within the card, you can select the checkmark labeled ‘Background Checks’ to connect your account / run background checks once connected.
- If your account is already connected to Checkr, the new invitation embed will appear.
- If your account is not already connected to Checkr, you will be prompted to go through the OAugh Sign-In / Sign-Up process by clicking ‘get started’. You will be brought to the GetHired integrations page.
- Click ‘Connect” will launch the OAugh Sign-In / Sign-Up process.
- If you are already a Checkr customer, select Sign In to connect your current Checkr account to GetHired.
- If you are not a current Checkr customer, select Sign Up to create a Checkr account, and add your billing and credentialing information
- After completing the flow, you will be redirected back to GetHired.
- If you had to create a new account via Sign Up flow, then you will see the following message as your account will need to be credentialed by Checkr.
- If you Signed In to Checkr, you will see the following message and can begin ordering background checks on candidates.
Create a Checkr account
If your company does not yet have a Checkr account, one must be created before integration with GetHired.
To create an account for use with GetHired:
- Click Sign Up when prompted.
- Enter your name and company contact information, and click Continue.
- Enter payment information. Invoices for background checks will come directly from Checkr, and not from GetHired. (Payment information may be edited on the Checkr dashboard after the account has been created.)
- Provide the requested credentialing information. This information is required by law to ensure that only legitimate companies, with legitimate business needs, can run background checks.
- Note: Select Purpose: Pre-employment to use Checkr to run background checks for hiring/employment purposes.
- Click Continue to submit your information to Checkr for review. Once the credentialing process is complete, Checkr will notify both GetHired and you, and you may begin ordering background checks through the GetHired platform.
- Credentialing typically takes 1-2 business days. If Checkr needs additional information, they will reach out to you directly by email.
Account Hierarchy
The GetHired integration allows users to set up different "nodes" inside of their Checkr account to have displayed in the GetHired background check ordering workflow. Nodes can be used to designate different locations, teams, or groups that order background checks within your organization. Checkr requires you to assign packages to nodes once they are created, and will then display which node ordered which package on your Checkr invoice.
Each time you order a background check within GetHired, you will be asked which node to order the check from, and then select from a pre-populated list of packages available to that node. Invoices will show the background checks ordered by each node within 2 billing cycles after setup.
To order a background check with Account Hierarchy and nodes:
- Fill in the work location of the candidate as you normally would for any background check through GetHired.
- Select which Hierarchy node you would like to order from.
The list of available Packages will automatically generate based on the node you select. Select the background check package you want to run. If you do not see any packages populating, you will need to assign the appropriate packages to that node in your Checkr dashboard before proceeding.
For more information on Account Hierarchy, nodes, and how to configure your account, see Checkr's
Payment & Billing, Adverse Actions, and Manage Account Settings Help Articles.
Order Background Checks
- Login to the GetHired ATS and navigate to the dashboard homepage.
- Once on the dashboard, select ‘Jobs’ from the left navigation menu which will bring you to the job details page, which hosts an ‘Applicant Tracker’.
- Select a candidate from within the ‘Applicant Tracker’.
- Once selected, the candidate's profile card will populate.
- From within the card, you can select the checkmark labeled ‘Background Checks’ to run background checks once connected.
- Once selected, the new invitation will populate.
- Please fill out the “Invite Candidate” prompts:
- Select a country
- Select a state
- Select a city (optional)
- Select a package
- Enter email (pre-populates by candidate)
- Click ‘Submit’.
- Once submitted, you will receive confirmation that the candidate was invited to the background check.
International Packages
Checkr defines international background checks as background checks run on candidate’s living and working outside of the United States. If your candidate works in the United States but has out-of-country history, for example attended school internationally, request a package that includes an education verification with out-of-country history enabled.
Checkr currently offers the following international screenings for candidate’s with work locations outside the United States:
- International Criminal
- Adverse Media Search - may be enabled to automatically run if criminal not available
- Identity Document Verification
- Global Watchlist
- Education Verification
- Employment Verification
Domestic Package with International Verifications
If your candidate works in the United States but has out-of-country history, for example attended school internationally, request a package that includes an education verification with out-of-country history enabled. Checkr currently offers an out-of-country history setting that can be added to any domestic criminal search or verification.
The option can be applied for candidates who will perform their work inside the US, but who have an address history outside the US. Screening types that can be run on domestic screenings with out-of-country history include:
- Education Verification
- Employment Verification
Review A Background Check
Monitoring A Background Check
- Login to the GetHired ATS and navigate to the dashboard homepage.
- Once on the dashboard, select ‘Jobs’ from the left navigation menu which will bring you to the job details page, which hosts an ‘Applicant Tracker’.
- Select a candidate from within the ‘Applicant Tracker’.
- Once selected, the candidate's profile card will populate.
- In the toolbar, previously run Background Checks are available until the profile tab > ‘Background Check’.
- Under ‘Background Checks’ >> ‘Available Reports’, you are able to view all background checks that have been run for the candidate. The following details will be displayed:
- the name of the package ordered,
- the status of the invitation to the candidate,
- the status of the report's progress and its ETA, and
- the result of the report and its completion timestamp.
- A link to the candidate in the Checkr Dashboard if the invitation has not yet been completed, and a link to the report once it has been initiated.
Reviewing Completed Results
Once the background check has been ordered, the status of the report will be listed in the GetHired candidate profile. Once Complete, click on it to open the report in the Checkr Dashboard, and review details.
For more information on reports and report statuses, see How do I interpret a background report in the Checkr Help Center which covers:
Most background checks will be completed within 24 hours, but the time to complete can range from a few minutes to a few weeks, depending on the type of check ordered, the geographic location of the candidate, and/or county courthouse operations.
Resubmit A Background Check
More than one background check can be ordered for a single candidate. To order multiple background checks, please follow the steps outlined in the “Order Background Checks” section above.
Checkr Features
Use the Checkr Dashboard
While the GetHired integration allows users to order background checks and view their status, the following features are available only within Checkr:
- Background check invitation links
- Full background check report results
- Adverse Action initiation and processing tools
- Checkr settings
For a quick overview of the Checkr Dashboard, please see Getting started with Checkr
Checkr’s Candidate Experience
The checkr candidate experience overview describes the Checkr candidate experience of the background check process. It includes information about the Checkr Candidate Portal and Help Center where candidates can self-serve and address common issues that can stall or delay their background checks. The overview also includes common reasons candidates contact Checkr and how to address these issues.
The overview includes:
- An overview of the candidate process
- General information about the background check process, including exceptions and disputes
- An overview of the Checkr Candidate Portal
- An introduction to the Candidate Experience team
- A list of some of the most common candidate questions
- Links to the most frequently used pages in the Checkr Help Center
Resources
For a quick overview of the Checkr Dashboard, please see Getting started with Checkr
-
GetHired (ATS Platform, Enterprise) | Checkr Integration User Guide
Read MoreWelcome to Checkr!
This guide will walk you through the Checkr | GetHired integration process, and outline how to use the Checkr dashboard for the background check process.
The Checkr Help Center is a great resource for any questions that may not be covered in this user guide. If you have any questions not covered in this guide that are specific to GetHired, submit a request to contact us.
______________________________________________________________
Integrated with GetHired but not using ATS Enterprise? Check out the Onboarding or ATS SMB User Guide
______________________________________________________________
- Prerequisites
- Enable Checkr Setup - Two Options (GetHired ATS, Enterprise)
- Create a Checkr account
- Account Hierarchy
- Order Background Checks
- International Packages
- Domestic Package with International Verifications
- Review A Background Check
- Monitoring A Background Check
- Reviewing Completed Results
- Resubmit A Background Check
- Checkr Features
- Use the Checkr Dashboard
- Checkr’s Candidate Experience
- Resources
______________________________________________________________
This guide describes how to set up Checkr to use within GetHired, such that GetHired users can initiate and view Checkr background checks from within the GetHired interface.Prerequisites
The following items are required to initiate GetHired | Checkr integration. Please ensure you have the following before proceeding.
- Access to GetHired, with appropriate rights
GetHired shows the Checkr integration in both the ATS (hiring) and Onboarding module of their platform. The background check integration is available in both modules, with slightly different behavior.
GetHired uses Checkr embeds for initiation, monitoring and review. The differences between the ATS and Onboarding are in:
- Finding the Sign-In / Sign-Up (OAuth) link
- Initiating the Background Check
Enable Checkr Setup - Two Options (GetHired ATS, Enterprise)
Option 1
- Login to the GetHired ATS and navigate to the dashboard homepage.
- Once on the dashboard, select “Integrations” from the left navigation menu which will bring you to the designated Integrations page within GetHired.
- From the Integrations page, select ‘Checkr’.
- Once ‘Checkr’ is selected, click ‘Connect’.
- Clicking ‘Connect” will launch the OAuth Sign-In / Sign-Up process.
- If you are already a Checkr customer, select Sign In to connect your current Checkr account to GetHired.
- If you are not a current Checkr customer, select Sign Up to create a Checkr account, and add your billing and credentialing information
- After completing the flow, you will be redirected back to GetHired.
- If you had to create a new account via Sign Up flow, then you will see the following message as your account will need to be credentialed by Checkr.
- If you Signed In to Checkr, you will see the following message and can begin ordering background checks on candidates.
Option 2
- Login to the GetHired ATS and navigate to the dashboard homepage.
- Once on the dashboard, select “Jobs” from the left navigation menu which will bring you to the job details page.
- Once you’ve selected the job, you will be brought to a page detailing the job as well as all of the applicants.
- Select an applicant.
- Once on the applicant, you will see an action toolbar.
- In the toolbar, click on ‘check mark’. Background Checks are also available until the profile tab > ‘Background Check’.
- If your account is already connected to Checkr, the new invitation embed will appear.
- If your account is not already connected to Checkr, you will be prompted to go through the OAuth Sign-In / Sign-Up process by clicking ‘get started’. You will be brought to the GetHired integrations page.
- Clicking ‘Connect” will launch the OAuth Sign-In / Sign-Up process.
- If you are already a Checkr customer, select Sign In to connect your current Checkr account to GetHired.
- If you are not a current Checkr customer, select Sign Up to create a Checkr account, and add your billing and credentialing information
- After completing the flow, you will be redirected back to GetHired.
- If you had to create a new account via Sign Up flow, then you will see the following message as your account will need to be credentialed by Checkr.
- If you Signed In to Checkr, you will see the following message and can begin ordering background checks on candidates.
Create a Checkr account
If your company does not yet have a Checkr account, one must be created before integration with GetHired.
To create an account for use with GetHired:
- Click Sign Up when prompted.
- Enter your name and company contact information, and click Continue.
- Enter payment information. Invoices for background checks will come directly from Checkr, and not from GetHired. (Payment information may be edited on the Checkr dashboard after the account has been created.)
- Provide the requested credentialing information. This information is required by law to ensure that only legitimate companies, with legitimate business needs, can run background checks.
- Note: Select Purpose: Pre-employment to use Checkr to run background checks for hiring/employment purposes.
- Click Continue to submit your information to Checkr for review. Once the credentialing process is complete, Checkr will notify both GetHired and you, and you may begin ordering background checks through the GetHired platform.
- Credentialing typically takes 1-2 business days. If Checkr needs additional information, they will reach out to you directly by email.
Account Hierarchy
The GetHired integration allows users to set up different "nodes" inside of their Checkr account to have displayed in the GetHired background check ordering workflow. Nodes can be used to designate different locations, teams, or groups that order background checks within your organization. Checkr requires you to assign packages to nodes once they are created, and will then display which node ordered which package on your Checkr invoice.
Each time you order a background check within GetHired, you will be asked which node to order the check from, and then select from a pre-populated list of packages available to that node. Invoices will show the background checks ordered by each node within 2 billing cycles after setup.
To order a background check with Account Hierarchy and nodes:
- Fill in the work location of the candidate as you normally would for any background check through GetHired.
- Select which Hierarchy node you would like to order from.
The list of available Packages will automatically generate based on the node you select. Select the background check package you want to run. If you do not see any packages populating, you will need to assign the appropriate packages to that node in your Checkr dashboard before proceeding.
For more information on Account Hierarchy, nodes, and how to configure your account, see Checkr's
Payment & Billing, Adverse Actions, and Manage Account Settings Help Articles.
Order Background Checks
- Login to the GetHired ATS and navigate to the dashboard homepage.
- Once on the dashboard, select “Jobs” from the left navigation menu which will bring you to the job details page.
- Once you’ve selected the job, you will be brought to a page detailing the job as well as all of the applicants.
- Select an applicant.
- Once on the applicant, you will see an action toolbar.
- In the toolbar, click on ‘check mark’. Background Checks are also available until the profile tab > ‘Background Check’.
- Once selected, the new invitation will populate.
- Please fill out the “Invite Candidate” prompts:
- Select a country
- Select a state
- Select a city (optional)
- Select a package
- Enter email (pre-populates by candidate)
- Click ‘Submit’.
- Once submitted, you will receive confirmation that the candidate was invited to the background check.
International Packages
Checkr defines international background checks as background checks run on candidate’s living and working outside of the United States. If your candidate works in the United States but has out-of-country history, for example attended school internationally, request a package that includes an education verification with out-of-country history enabled.
Checkr currently offers the following international screenings for candidate’s with work locations outside the United States:
- International Criminal
- Adverse Media Search - may be enabled to automatically run if criminal not available
- Identity Document Verification
- Global Watchlist
- Education Verification
- Employment Verification
Domestic Package with International Verifications
If your candidate works in the United States but has out-of-country history, for example attended school internationally, request a package that includes an education verification with out-of-country history enabled. Checkr currently offers an out-of-country history setting that can be added to any domestic criminal search or verification.
The option can be applied for candidates who will perform their work inside the US, but who have an address history outside the US. Screening types that can be run on domestic screenings with out-of-country history include:
- Education Verification
- Employment Verification
Review A Background Check
Monitoring A Background Check
- Login to the GetHired ATS and navigate to the dashboard homepage.
- Once on the dashboard, select “Jobs” from the left navigation menu which will bring you to the job details page.
- Once you’ve selected the job, you will be brought to a page detailing the job as well as all of the applicants.
- Select an applicant.
- Once on the applicant, you will see an action toolbar.
- In the toolbar, previously run Background Checks are available until the profile tab > ‘Background Check’.
- Under ‘Available Reports’, you are able to view all background checks that have been run for the candidate. The following details will be displayed:
- the name of the package ordered,
- the status of the invitation to the candidate,
- the status of the report's progress and its ETA, and
- the result of the report and its completion timestamp.
- A link to the candidate in the Checkr Dashboard if the invitation has not yet been completed, and a link to the report once it has been initiated.
Reviewing Completed Results
Once the background check has been ordered, the status of the report will be listed in the GetHired candidate profile. Once Complete, click on it to open the report in the Checkr Dashboard, and review details.
For more information on reports and report statuses, see How do I interpret a background report in the Checkr Help Center which covers:
Most background checks will be completed within 24 hours, but the time to complete can range from a few minutes to a few weeks, depending on the type of check ordered, the geographic location of the candidate, and/or county courthouse operations.
Resubmit A Background Check
More than one background check can be ordered for a single candidate. To order multiple background checks, please follow the steps outlined in the “Order Background Checks” section above.
Checkr Features
Use the Checkr Dashboard
While the GetHired integration allows users to order background checks and view their status, the following features are available only within Checkr:
- Background check invitation links
- Full background check report results
- Adverse Action initiation and processing tools
- Checkr settings
For a quick overview of the Checkr Dashboard, please see Getting started with Checkr
Checkr’s Candidate Experience
The checkr candidate experience overview describes the Checkr candidate experience of the background check process. It includes information about the Checkr Candidate Portal and Help Center where candidates can self-serve and address common issues that can stall or delay their background checks. The overview also includes common reasons candidates contact Checkr and how to address these issues.
The overview includes:
- An overview of the candidate process
- General information about the background check process, including exceptions and disputes
- An overview of the Checkr Candidate Portal
- An introduction to the Candidate Experience team
- A list of some of the most common candidate questions
- Links to the most frequently used pages in the Checkr Help Center
Resources
For a quick overview of the Checkr Dashboard, please see Getting started with Checkr
-
Jobma / Checkr Integration User Guide
Read MoreWelcome to checkr!
This guide will walk you through the Checkr | Jobma integration process, and outline how to use the Checkr dashboard for the background check process.
The Checkr Help Center is a great resource for any questions that may not be covered in this user guide. If you have any questions not covered in this guide that are specific to Jobma, submit a request to contact us.
______________________________________________________________
- Prerequisites
- Enable Checkr setup
- Create a Checkr account
- Account Hierarchy
- Order Background Checks
- Defining A Location
- Manual Ordering
- International Packages
- Review A Background Check
- Monitoring A Background Check
- Reviewing Completed Results
- Resubmit A Background Check
- Checkr Features
- Use the Checkr Dashboard
- Checkr’s Candidate Experience
- Resources
______________________________________________________________
This guide describes how to set up Checkr to use within Jobma, such that Jobma users can initiate and view Checkr background checks from within the Jobma interface.
Prerequisites
The following items are required to initiate Jobma | Checkr integration. Please ensure you have the following before proceeding.
- Access to Jobma, with admin rights
Enable Checkr setup
To enable Checkr from within the Jobma platform, please follow the steps below.
- Login to your Jobma account.
- From your Jobma dashboard, select the ‘Integrations’ dropdown from the right hand navigation bar. Select ‘Integrations’ from the dropdown.
- From the Integrations page, scroll down to ‘Background Check’. Here you will see Checkr.
- From within the Checkr tile, select either Sign In or Sign Up. By clicking either option, you will be redirected to the Checkr Hosted Sign In / Sign Up Flow.
- If you are already a Checkr customer, select Sign In to connect your current Checkr account to Jobma.
- If you are not a current Checkr customer, select Sign Up to create a Checkr account, and add your billing and credentialing information
- If you signed-in to Checkr, you will be redirected back to the ‘Integrations’ page and on the Checkr tile, you will see ‘Connected’.
- If you signed-up for Checkr, you will be redirected back to the ‘Integrations’ page and on the Checkr tile, you will see ‘Refresh’. There will also be info. Icon in the top right corner of the tile, letting you know that your Checkr account has to be created which can take up to 24 to 48 hours.
Create a Checkr account
If your company does not yet have a Checkr account, one must be created before integration with Jobma.
To create an account for use with Jobma
- Click Sign Up when prompted.
- Enter your name and company contact information, and click Continue.
- Enter payment information. Invoices for background checks will come directly from Checkr, and not from Jobma. (Payment information may be edited on the Checkr dashboard after the account has been created.)
- Provide the requested credentialing information. This information is required by law to ensure that only legitimate companies, with legitimate business needs, can run background checks.
- Note: Select Purpose: Pre-employment to use Checkr to run background checks for hiring/employment purposes.
- Click Continue to submit your information to Checkr for review. Once the credentialing process is complete, Checkr will notify both Jobma and you, and you may begin ordering background checks through the Jobma platform.
- Credentialing typically takes 1-2 business days. If Checkr needs additional information, they will reach out to you directly by email.
Account Hierarchy
The Jobma integration allows users to set up different "nodes" inside of their Checkr account to have displayed in the Jobma background check ordering workflow. Nodes can be used to designate different locations, teams, or groups that order background checks within your organization. Checkr requires you to assign packages to nodes once they are created, and will then display which node ordered which package on your Checkr invoice.
Each time you order a background check within Jobma, you will be asked which node to order the check from, and then select from a pre-populated list of packages available to that node. Invoices will show the background checks ordered by each node within 2 billing cycles after setup.
To order a background check with Account Hierarchy and nodes:
- Fill in the work location of the candidate as you normally would for any background check through Jobma.
- Select which Hierarchy node you would like to order from.
The list of available Packages will automatically generate based on the node you select. Select the background check package you want to run. If you do not see any packages populating, you will need to assign the appropriate packages to that node in your Checkr dashboard before proceeding.
For more information on Account Hierarchy, nodes, and how to configure your account, see Checkr's
Payment & Billing, Adverse Actions, and Manage Account Settings Help Articles.
Order Background Checks
Defining A Location
Checkr background checks rely on Job location information to determine which disclosures and authorizations to use in pre-employment screenings. The user will be asked to fill in the candidate’s work location at the time of ordering a background check. Please see the steps below.
Manual Ordering
Once your Jobma and Checkr accounts are connected, you can begin ordering background checks by following the steps below.
- Go to the left side navigation menu and select ‘Applicants’. From the ‘Applicants’ dropdown, select ‘Evaluate’.
- On the ‘Evaluate’ page, you will see various candidate cards. Choose an applicant and select ‘Evaluate’ from their tile. You will be brought to an applicant specific page.
- From the applicant page, you will see a tab titled, ‘Background Check’. Select ‘Background Check’.
- Within ‘Background Check’, select Checkr drop the dropdown menu and select the green button, ‘Add Background Check’. This opens a modal window on the right side of the dashboard.
- Within the modal, please fill in email, node, package, country, state and city.
- Select ‘Save’. This begins the invitation process for the candidate to begin the background check process.
International Packages
Checkr defines international background checks as background checks run on candidate’s living and working outside of the United States. If your candidate works in the United States but has out-of-country history, for example attended school internationally, you should request a package that includes an education verification with out-of-country history enabled.
Checkr currently offers the following international screenings for candidate’s with work locations outside the United States:
- International Criminal
- Adverse Media Search - may be enabled to automatically run if criminal not available
- Identity Document Verification
- Global Watchlist
- Education Verification
- Employment Verification
Domestic Package with International Verifications
If your candidate works in the United States but has out-of-country history, for example attended school internationally, request a package that includes an education verification with out-of-country history enabled. Checkr currently offers an out-of-country history setting that can be added to any domestic criminal search or verification.
The option can be applied for candidates who will perform their work inside the US, but who have an address history outside the US. Screening types that can be run on domestic screenings with out-of-country history include:
- Education Verification
- Employment Verification
Review A Background Check
Monitoring A Background Check
To review background checks run on an applicant, please follow the steps below.
- Go to the left side navigation menu and select ‘Applicants’. From the ‘Applicants’ dropdown, select ‘Evaluate’.
- On the ‘Evaluate’ page, you will see various candidate cards. Choose an applicant and select ‘Evaluate’ from their tile. You will be brought to an applicant specific page.
- From the applicant page, you will see a tab titled, ‘Background Check’. Select ‘Background Check’.
- Within ‘Background Check’, you will see a display of all the background checks run on the applicant. The following fields will display: Package Name, Invitation Status, Date, Invitation Link.
- Additionally, you will see Report Status, Report Result, ETA for completion or Completed On Timestamp, View Report Link (link back to Checkr dashboard to view report).
Reviewing Completed Results
Once the background check has been ordered, the status of the report will be listed in the Jobma candidate dashboard. Once Complete, click on it to open the report in the Checkr Dashboard, and review details.
For more information on reports and report statuses, see How do I interpret a background report in the Checkr Help Center which covers:
Most background checks will be completed within 24 hours, but the time to complete can range from a few minutes to a few weeks, depending on the type of check ordered, the geographic location of the candidate, and/or county courthouse operations.
Resubmit A Background Check
More than one background check can be submitted for an applicant. To resubmit a background check for an applicant, navigate to the Applicants Tab, Select Evaluate, Choose Evaluate for the Desired Candidate and select ‘Background Check’. This is all explained in more detail in the section titled, ‘Order Background Checks’.
Checkr Features
Use the Checkr Dashboard
While the Jobma integration allows users to order background checks and view their status, the following features are available only within Checkr:
- Background check invitation links
- Full background check report results
- Adverse Action initiation and processing tools
- Checkr settings
For a quick overview of the Checkr Dashboard, please see Getting started with Checkr
Checkr’s Candidate Experience
The checkr candidate experience overview describes the Checkr candidate experience of the background check process. It includes information about the Checkr Candidate Portal and Help Center where candidates can self-serve and address common issues that can stall or delay their background checks. The overview also includes common reasons candidates contact Checkr and how to address these issues.
The overview includes:
- An overview of the candidate process
- General information about the background check process, including exceptions and disputes
- An overview of the Checkr Candidate Portal
- An introduction to the Candidate Experience team
- A list of some of the most common candidate questions
- Links to the most frequently used pages in the Checkr Help Center
Resources
For a quick overview of the Checkr Dashboard, please see Getting started with Checkr
-
ClayHR / Checkr Integration User Guide
Read MoreWelcome to Checkr!
This guide will walk you through the Checkr | ClayHR integration process, and outline how to use the Checkr dashboard for the background check process.
The Checkr Help Center is a great resource for any questions that may not be covered in this user guide. If you have any questions not covered in this guide that are specific to ClayHR, submit a request to contact us.
______________________________________________________________
- Prerequisites
- Enable Checkr setup
- Create a Checkr account
- Account Hierarchy
- Order Background Checks
- International Packages
- Domestic Package with International Verifications
- Review A Background Check
- Monitoring A Background Check
- Reviewing Completed Results
- Checkr Features
- Use the Checkr Dashboard
- Checkr’s Candidate Experience
- Resources
______________________________________________________________
This guide describes how to set up Checkr to use within ClayHR, such that ClayHR users can initiate and view Checkr background checks from within the ClayHR interface.
Prerequisites
The following items are required to initiate ClayHR | Checkr integration. Please ensure you have the following before proceeding.
- Access to ClayHR, with admin rights
- Or have the following permissions: Candidate Home View, Candidate View
- Each user will have access to different integrations
Enable Checkr setup
- Please login to the ClayHR Platform.
- Select the ‘Settings’ dial in the top right hand corner. This menu will be a dropdown and you should select ‘Third Party Integrations’.
- Once selected, you will be brought to the ‘Third Party Integrations’ page. From this page, select the ‘New Integration’ button.
- Select Integration Type > ‘Background Check’ > ‘Checkr’
- Once selected, you can customize the name of the integration.
- Select ‘Save Integration’.
- Once saved, click your user profile in the top right hand corner. This will populate a dropdown menu. Select ‘My Integrations’.
- On the ‘My Integrations’ page opens, you must click ‘Connect to Checkr’. This will redirect you to the Checkr hosted Sign Up / Sign In flow
- If you are already a Checkr customer, select Sign In to connect your current Checkr account to ClayHR.
- If you are not a current Checkr customer, select Sign Up to create a Checkr account, and add your billing and credentialing information
- Once you’ve signed-in or signed-up, you will be redirected back to the ‘My Integrations’ page in ClayHR.
- If you’ve successfully signed-in, you will see that you’re connected with a green ‘Connected’ icon and the connection button will display ‘Disconnect from Checkr’.
Create a Checkr account
If your company does not yet have a Checkr account, one must be created before integration with ClayHR.
To create an account for use with ClayHR:
- Click Sign Up when prompted.
- Enter your name and company contact information, and click Continue.
- Enter payment information. Invoices for background checks will come directly from Checkr, and not from ClayHR. (Payment information may be edited on the Checkr dashboard after the account has been created.)
- Provide the requested credentialing information. This information is required by law to ensure that only legitimate companies, with legitimate business needs, can run background checks.
- Note: Select Purpose: Pre-employment to use Checkr to run background checks for hiring/employment purposes.
- Click Continue to submit your information to Checkr for review. Once the credentialing process is complete, Checkr will notify both ClayHR and you, and you may begin ordering background checks through the ClayHR platform.
- Credentialing typically takes 1-2 business days. If Checkr needs additional information, they will reach out to you directly by email.
Account Hierarchy
The ClayHR integration allows users to set up different "nodes" inside of their Checkr account to have displayed in the ClayHR background check ordering workflow. Nodes can be used to designate different locations, teams, or groups that order background checks within your organization. Checkr requires you to assign packages to nodes once they are created, and will then display which node ordered which package on your Checkr invoice.
Each time you order a background check within ClayHR, you will be asked which node to order the check from, and then select from a pre-populated list of packages available to that node. Invoices will show the background checks ordered by each node within 2 billing cycles after setup.
To order a background check with Account Hierarchy and nodes, follow the steps outlined in the section below, ‘Order Background Checks’.
The list of available Packages will automatically generate based on the node you select. Select the background check package you want to run. If you do not see any packages populating, you will need to assign the appropriate packages to that node in your Checkr dashboard before proceeding.
For more information on Account Hierarchy, nodes, and how to configure your account, see Checkr's
Payment & Billing, Adverse Actions, and Manage Account Settings Help Articles.
Order Background Checks
To order a Background Check from within ClayHR, please follow the steps below.
- Once logged into ClayHR and you’ve confirmed your integration with Checkr has been enabled, from within the Hiring Module (top navigation bar, select ‘Hiring’), go to ‘Candidates’ and open a candidate’s profile. This will open a candidate specific profile and you will see all of the information related to the candidate.
- From the left panel, on the candidate view page, go to the ‘Admin’ section.
- From within the ‘Admin’ section, select ‘Start Background Check’. A module will appear and ask you to complete the following: Nodes, Package, Country, State and City.
- Nodes, Package, Country and State are required fields. Checkr background checks rely on job location information to determine which disclosures and authorizations to use in pre-employment screenings.
- City is optional and can be typed in to populate
- Once complete, select ‘Start Background Check’. This initiates the invitation process with the candidate and will be tracked accordingly (see ‘Monitoring a Background Check’ below).
International Packages
Checkr defines international background checks as background checks run on candidate’s living and working outside of the United States. If your candidate works in the United States but has out-of-country history, for example attended school internationally, request a package that includes an education verification with out-of-country history enabled.
Checkr currently offers the following international screenings for candidate’s with work locations outside the United States:
- International Criminal
- Adverse Media Search - may be enabled to automatically run if criminal not available
- Identity Document Verification
- Global Watchlist
- Education Verification
- Employment Verification
Domestic Package with International Verifications
If your candidate works in the United States but has out-of-country history, Checkr currently offers an out-of-country history setting that can be added to any domestic criminal search or verification. The option can be applied for candidates who will perform their work inside the US, but who have an address history outside the US. Screening types that can be run on domestic screenings with out-of-country history include:
- Education Verification
- Employment Verification
Review A Background Check
To monitor background checks from within ClayHR, please follow the steps below.
- Once logged into ClayHR and you’ve confirmed your integration with Checkr has been enabled, from within the Hiring Module (top navigation bar, select ‘Hiring’), go to ‘Candidates’ and open a candidate’s profile. This will open a candidate specific profile and you will see all of the information related to the candidate.
- From the left panel, on the candidate view page, go to the ‘Admin’ section.
- On the Admin page, you will see the ‘Start Background Check’ button and a dropdown arrow. Selecting the dropdown arrow will populate a list of all of the initiated background checks.
- Select the background check that you would like to see the status of and you will be brought to a progress page detailing the background check and its status.
- Once a check has been marked Complete, click on it to open the report in the Checkr Dashboard, and review details.
Reviewing Statuses and Completed Results
Once the background check has been ordered, the status of the report will be listed in the ClayHR candidate specific progress page. Once Complete, click on it to open the report in the Checkr Dashboard, and review details.
For more information on reports and report statuses, see How do I interpret a background report in the Checkr Help Center which covers:
Most background checks will be completed within 24 hours, but the time to complete can range from a few minutes to a few weeks, depending on the type of check ordered, the geographic location of the candidate, and/or county courthouse operations.
Checkr Features
Use the Checkr Dashboard
While the ClayHR integration allows users to order background checks and view their status, the following features are available only within Checkr:
- Background check invitation links
- Full background check report results
- Adverse Action initiation and processing tools
- Checkr settings
For a quick overview of the Checkr Dashboard, please see Getting started with Checkr
Checkr’s Candidate Experience
The checkr candidate experience overview describes the Checkr candidate experience of the background check process. It includes information about the Checkr Candidate Portal and Help Center where candidates can self-serve and address common issues that can stall or delay their background checks. The overview also includes common reasons candidates contact Checkr and how to address these issues.
The overview includes:
- An overview of the candidate process
- General information about the background check process, including exceptions and disputes
- An overview of the Checkr Candidate Portal
- An introduction to the Candidate Experience team
- A list of some of the most common candidate questions
- Links to the most frequently used pages in the Checkr Help Center
Resources
For a quick overview of the Checkr Dashboard, please see Getting started with Checkr
-
TalentEi / Checkr Integration User Guide
Read MoreWelcome to checkr!
This guide will walk you through the Checkr / TalentEi integration process, and outline how to use the Checkr dashboard for the background check process.
The Checkr Help Center is a great resource for any questions that may not be covered in this user guide. If you have any questions not covered in this guide that are specific to TalentEi, submit a request to contact us.
______________________________________________________________
- Prerequisites
- Enable Checkr setup
- Account Hierarchy
- Order Background Checks
- Manual Ordering
- International Packages
- Domestic Package with International Verifications
- Review A Background Check
- Checkr Features
- Use the Checkr Dashboard
- Checkr’s Candidate Experience
- Resources
______________________________________________________________
This guide describes how to set up Checkr to use within TalentEi such that TalentEi users can initiate and view Checkr background checks from within the TalentEi interface.
Prerequisites
The following items are required to initiate TalentEi / Checkr integration.- The integration of a customer’s Checkr account with TalentEi is managed by TalentEi staff through their internal client management system.
- If a client would like to integrate with Checkr, the customer should get in contact with TalentEi staff directly, either via speaking with their customer relationship manager or emailing support@talentei.com, and TalentEi can begin the connection process.
- TAT: Once a customer has contacted TalentEi, customers can expect to get a response by the next business day at the latest.
Enable Checkr setup
If a customer would like to integrate with Checkr, the customer should get in contact with TalentEi staff directly, either via speaking with their customer relationship manager or emailing support@talentei.com, and TalentEi can begin the connection process. The connection process follows the following steps:
- Customer contacts TalentEi and informs TalentEi they would like to connect to Checkr.
- In TalentEi’s internal client management application, TalentEi staff will go into the internal application and the application will display a list of client and workplace records.
- All records will have been previously created by TalentEi staff in order for the customer to use the TalentEi platform.
- To begin the integration authorization process, TalentEI staff navigates to the customer’s record and clicks the ‘Authorize’ button.
- A formatted invitation message is generated, including a unique invitation link.
- The invitation link is formatted purposely to allow either ‘Sign In’ or Sign Up’ flow.
- The generated message is emailed to the appropriate customer contact to authorize the integration.
- If you are already a Checkr customer, select Sign In to connect your current Checkr account to TalentEi.
- If you are not a current Checkr customer, select Sign Up to create a Checkr account, and add your billing and credentialing information
- The redirect URI supplied in the invitation link is a TalentEI services that completes the sign in / sign up process by retrieving a long-lived access token for the customer, which is saved in TalentEi’s application database.
- Once the invitation process is started in TalentEi’s client management application, the connection status of the client / workplace is shown as ‘Pending’, until the access token is detected in the TalentEi configuration database, at which point the status will be displayed as ‘Connected’.
- The client management application is also used to manage the preconfigured selection of background check Package per client / workplace as appropriate, as well as the correlation of a workplace to a specific node when a client’s account has account hierarchy enabled.
Note to customers: As described above, the majority of the connection process between TalentEi and Checkr is facilitated by TalentEi admins. As a customer, please get in touch with TalentEi to kick off this process. A customer’s primary role is to complete the sign in / sign up process via the email invitation you receive from TalentEi. TalentEi takes care of the rest!
Create a Checkr account
If your company does not yet have a Checkr account, one must be created before integration with TalentEi.
To create an account for use with TalentEi:
- Click Sign Up when prompted.
- Enter your name and company contact information, and click Continue.
- Enter payment information. Invoices for background checks will come directly from Checkr, and not from TalentEi. (Payment information may be edited on the Checkr dashboard after the account has been created.)
- Provide the requested credentialing information. This information is required by law to ensure that only legitimate companies, with legitimate business needs, can run background checks.
- Note: Select Purpose: Pre-employment to use Checkr to run background checks for hiring/employment purposes.
- Click Continue to submit your information to Checkr for review. Once the credentialing process is complete, Checkr will notify both TalentEi and you, and you may begin ordering background checks through the TalentEi platform.
- Credentialing typically takes 1-2 business days. If Checkr needs additional information, they will reach out to you directly by email.
Account Hierarchy
The TalentEi integration allows users to set up different "nodes” inside of their Checkr account to have displayed in the TalentEi background check ordering workflow. Nodes can be used to designate different locations, teams, or groups that order background checks within your organization. Checkr requires you to assign packages to nodes once they are created, and will then display which node ordered which package on your Checkr invoice.
Each time you order a background check within TalentEi, Talent EI will have pre-populated which node to order the check from, as well as the package that was available within that node. Invoices will show the background checks ordered by each node within 2 billing cycles after setup.
The list of available Packages will automatically generate based on the node you select. Select the background check package you want to run. If you do not see any packages populating, you will need to assign the appropriate packages to that node in your Checkr dashboard before proceeding.
For more information on Account Hierarchy, nodes, and how to configure your account, see Checkr's
Payment & Billing, Adverse Actions, and Manage Account Settings Help Articles.Order Background Checks
Manual Ordering
The background check ordering process is initiated by an employer user making an offer of employment to a candidate, and that candidate accepting the offer.
Steps to initiate an offer:
- On the ‘Open Orders’ page, click ‘View Matches’ on the order you would like to extend offers on.
- From here, click ‘Extend Offers’ and select the candidates you would like to offer.
- Enter in the offer data such as rate and start date and hit confirm.
- The candidate is then contacted regarding the offer.
- Once the employer user makes an offer of employment to a candidate; the candidate is texted and emailed this offer, and after they log into the candidate portal, they can accept the offer.
- The extension of the offer is the last step that an employer user will take to initiate a background check, and in extending the offer they are inherently initiating a background check for all candidates that accept.
- For all candidates with accepted offers, once the background check is initiated, the candidate is texted and emailed the link to Checkr and asked to begin the background check process.
International Packages
Checkr defines international background checks as background checks run on candidate’s living and working outside of the United States. If your candidate works in the United States but has out-of-country history, for example attended school internationally, a customer should request a package that includes an education verification with out-of-country history enabled.
Checkr currently offers the following international screenings for candidate’s with work locations outside the United States:
- International Criminal
- Adverse Media Search - may be enabled to automatically run if criminal not available
- Identity Document Verification
- Global Watchlist
- Education Verification
- Employment Verification
Domestic Package with International Verifications
If your candidate works in the United States but has out-of-country history, Checkr currently offers an out-of-country history setting that can be added to any domestic criminal search or verification. The option can be applied for candidates who will perform their work inside the US, but who have an address history outside the US. Screening types that can be run on domestic screenings with out-of-country history include:
- Education Verification
- Employment Verification
Review A Background Check
Once the background check has been ordered, you can follow the steps below to monitor.
- To monitor the background check process, login as an employer division admin and click ‘Offer Manager” on the left sidebar.
- Then sort, filter or search for the candidate you would like to monitor.
- In the DD Status column, there is an “info” button which will show the candidate’s background check status and link to their report.
- Once TalentEi receives notification that the invitation has been created, the candidate is put into an ‘In Progress” status that is visible to the employer user on the Offer Manager Page where they review and manage active offers.
- From there, the status will update depending on what TalentEi receives from Checkr.
Viewing the candidate’s assessment: Talent Ei uses five statuses to define the candidate’s progress:
- In progress: Means the background check came back in one of the following statuses: "Invitation Created", "Invitation Completed", "report resumed", "report disputed"
- Done - Pass: means the background check came back in one of the following statuses: "Complete -Canceled = False - Clear"," Complete - Canceled = true - Clear", "Complete - engaged"
- Requires Review: means the background check came back in one of the following statuses: "Complete - Consider", "Complete - Consider - Pre Adverse Action"
- Done - Fail: means after review the background check came back in one of the following statuses: "Complete - Consider - Post Adverse Action", "Suspended"
- Incomplete - Fail: means the background check came back "Complete - canceled = true - nu result", "Invitation Expired" or "Invitation Deleted" The employer user can view the full report in Checkr by clicking the "report" link next to the status - you must have the correct Checkr User permissions to access.
For more information on reports and report statuses, see How do I interpret a background report in the Checkr Help Center which covers:
Most background checks will be completed within 24 hours, but the time to complete can range from a few minutes to a few weeks, depending on the type of check ordered, the geographic location of the candidate, and/or county courthouse operations.
Checkr Features
Use the Checkr Dashboard
While the TalentEi integration allows users to order background checks and view their status, the following features are available only within Checkr:
- Background check invitation links
- Full background check report results
- Adverse Action initiation and processing tools
- Checkr settings
For a quick overview of the Checkr Dashboard, please see Getting started with Checkr
Checkr’s Candidate Experience
The checkr candidate experience overview describes the Checkr candidate experience of the background check process. It includes information about the Checkr Candidate Portal and Help Center where candidates can self-serve and address common issues that can stall or delay their background checks. The overview also includes common reasons candidates contact Checkr and how to address these issues.
The overview includes:
- An overview of the candidate process
- General information about the background check process, including exceptions and disputes
- An overview of the Checkr Candidate Portal
- An introduction to the Candidate Experience team
- A list of some of the most common candidate questions
- Links to the most frequently used pages in the Checkr Help Center
Resources
For a quick overview of the Checkr Dashboard, please see Getting started with Checkr
-
ControlMap / Checkr Integration User Guide
Read MoreWelcome to Checkr!
This guide will walk you through the Checkr | ControlMap integration process, and outline how to use the Checkr dashboard for the background check process.
The Checkr Help Center is a great resource for any questions that may not be covered in this user guide. If you have any questions not covered in this guide that are specific to ControlMap, submit a request to contact us.
______________________________________________________________
- Prerequisites
- Enable Checkr setup
- Create a Checkr account
- Order Background Checks
- Review A Background Check
- Checkr Features
- Use the Checkr Dashboard
- Checkr’s Candidate Experience
- Resources
______________________________________________________________
This guide describes how to set up Checkr to use within ControlMap, such that ControlMap users can initiate and view Checkr background checks from within the ControlMap interface.
Prerequisites
The following items are required to initiate the ControlMap | Checkr integration. Please ensure you have the following before proceeding:
- Access to ControlMap, with admin rights
Enable Checkr setup
To enable Checkr from within the ControlMap platform, please follow the steps below:
- Login to the ControlMap platform.
- From your homepage, use the navigation bar on the left side of the page to select ‘Integrations’.
- From the ‘Integrations’ page, select the ‘+ Integration’ purple icon in the top right corner. This will bring you to a page of available integrations.
- Scroll to the bottom of the page. Under ‘Background Checks’ you will see Checkr. Select ‘Connect’.
- Clicking ‘Connect’ will bring you to a new page with detailed information on the Checkr integration.
- Click on ‘Connect to Checkr’.
- You will be redirected to the Checkr hosted, sign-in / sign-up flow to connect an existing or new Checkr account.
- If you are already a Checkr customer, select Sign In to connect your current Checkr account to ControlMap.
- If you are not a current Checkr customer, select Sign Up to create a Checkr account.
- Once you are connected and signed-in, you will be brought back to ControlMap. You will be redirected to the ‘Integrations’ page for Checkr where you can select your preferred schedule for weekly or daily syncs.
- Based on the schedule, ControlMap will scan your Checkr account and update ControlMap with relevant information.
- Upon account setup, ControlMap will do an initial scan.
- Customers can also manually sync BGC reports to ControlMap.
Create a Checkr account
If your organization does not yet have a Checkr account, one must be created before integration with ControlMap.
To create an account for use with ControlMap:
- Click Sign Up when prompted.
- Enter your name and company contact information, and click Continue.
- Enter payment information. Invoices for background checks will come directly from Checkr, and not from ControlMap. (Payment information may be edited on the Checkr dashboard after the account has been created.)
- Provide the requested credentials. This information is required by law to ensure that only legitimate companies, with legitimate business needs, can run background checks.
- Note: Select Purpose: Pre-employment to use Checkr to run background checks for hiring/employment purposes.
- Click Continue to submit your information to Checkr for review. Once the credentialing process is complete, Checkr will notify both ControlMap and you, and you may begin ordering background checks through the ControlMap platform.
- Credentialing typically takes 1-2 business days. If Checkr needs additional information, they will reach out to you directly by email.
Order Background Checks
To order background checks, a Checkr customer must order a background check directly from their Checkr dashboard. ControlMap does not support the ordering process within their platform. ControlMap will receive completed background check report information from Checkr Accounts.
Review A Background Check
ControlMap only receives completed report information from Checkr accounts. To view completed report information within ControlMap, please follow the steps below:
- From the ControlMap dashboard, navigate to ‘Integrations’ and select ‘Checkr’.
-
From within ‘Checkr’, you will see the following options:
- Compliance Checks
- Background Checks
- Connection
- Schedule
- Logs
- Help
-
Select ‘Background Checks’ to display a list of all completed background check reports.
- This page details: Account, Employee, Background Check Complete, Background Check Status, Link to Checkr dashboard for the report, First Seen and Last Checked.
- Select ‘Schedule’ to modify the scan schedule. You can schedule this scan to run daily or weekly.
Checkr Features
Use the Checkr Dashboard
While the ControlMap integration allows users to order background checks and view their status, the following features are available only within Checkr:
- Background check invitation links
- Full background check report results
- Adverse Action initiation and processing tools
- Checkr settings
For a quick overview of the Checkr Dashboard, please see Getting started with Checkr
Checkr’s Candidate Experience
The checkr candidate experience overview describes the Checkr candidate experience of the background check process. It includes information about the Checkr Candidate Portal and Help Center where candidates can self-serve and address common issues that can stall or delay their background checks. The overview also includes common reasons candidates contact Checkr and how to address these issues.
The overview includes:
- An overview of the candidate process
- General information about the background check process, including exceptions and disputes
- An overview of the Checkr Candidate Portal
- An introduction to the Candidate Experience team
- A list of some of the most common candidate questions
- Links to the most frequently used pages in the Checkr Help Center
Resources
For a quick overview of the Checkr Dashboard, please see Getting started with Checkr
-
Medallion / Checkr Integration User Guide
Read MoreWelcome to Checkr!
This guide will walk you through the Checkr | Medallion integration process, and outline how to use the Checkr dashboard for the background check process.
The Checkr Help Center is a great resource for any questions that may not be covered in this user guide. If you have any questions not covered in this guide that are specific to Medallion, submit a request to contact us.
______________________________________________________________
Domestic Package with International Verifications
______________________________________________________________
Medallion | Checkr User Guide
This guide describes how to set up Checkr to use within Medallion, such that Medallion users can initiate and view Checkr background checks from within the Medallion interface.
Prerequisites
The following items are required to initiate Medallion | Checkr integration. Please ensure you have the following before proceeding.
- Access to Medallion, with HR Privileged admin permission (please reach out to your Medallion CSM to request)
- Checkr login credentials
Enable Checkr setup
To enable Checkr from within Medallion, please follow the steps below.
- Login to your Medallion account.
- From the left hand navigation bar, select ‘Providers’. This will bring you to a list of providers. Select a provider.
- Within the provider profile, select ‘Verifications’.
- On the Verifications Tab, you will see an ‘Actions’ tile on the right hand side. With ‘Actions’, there is an option for ‘Background Check’ and ‘Connect to Checkr’.
- When hovering over ‘Connect to Check’, if you do not have an account connected you will see the tool tip, “To begin running Checkr background checks you must sign on or sign up with Checkr”.
- Click ‘Connect to Checkr’.
- You will be brought to a new tab that initiates the Checkr Sign Up or Sign In Flow.
- If you are already a Checkr customer, select Sign In to connect your current Checkr account to Medallion.
- If you are not a current Checkr customer, select Sign Up to create a Checkr account, and add your billing and credentialing information
- If you choose to Sign Up for Checkr, you will be redirected back to Medallion and the provider profile.
- A tooltip will populate at the top of the page saying ‘Checkr integration successful!’ but there will be a new button with the ‘Actions’ tile.
- The ‘Actions’ tile will show a grayed out, ‘Run Check’ button with the following tooltip, “Checkr must first credential your account in order to run background checks. Credentialing can take up to 1-3 days.”
- This button will be activated when your account has been credentialed.
- If you choose to Sign In to an existing Check account, you will be redirected back to Medallion and the provider profile.
- A tooltip will populate at the top of the page saying ‘Checkr integration successful!’ but there will be a new button with the ‘Actions’ tile.
- The ‘Actions’ tile will show an active ‘Run Check’ button with the ability to begin ordering background checks.
Create a Checkr account
If your company does not yet have a Checkr account, one must be created before integration with Medallion.
To create an account for use with Medallion:
- Click Sign Up when prompted.
- Enter your name and company contact information, and click Continue.
- Enter payment information. Invoices for background checks will come directly from Checkr, and not from Medallion. (Payment information may be edited on the Checkr dashboard after the account has been created.)
- Provide the requested credentialing information. This information is required by law to ensure that only legitimate companies, with legitimate business needs, can run background checks.
- Note: Select Purpose: Pre-employment to use Checkr to run background checks for hiring/employment purposes.
- Click Continue to submit your information to Checkr for review. Once the credentialing process is complete, Checkr will notify both Medallion and you, and you may begin ordering background checks through the Medallion platform.
- Credentialing typically takes 1-2 business days. If Checkr needs additional information, they will reach out to you directly by email.
Account Hierarchy
The Medallion integration allows users to set up different "nodes" inside of their Checkr account to have displayed in the Medallion background check ordering workflow. Nodes can be used to designate different locations, teams, or groups that order background checks within your organization. Checkr requires you to assign packages to nodes once they are created, and will then display which node ordered which package on your Checkr invoice.
Each time you order a background check within Medallion, you will be asked which node to order the check from, and then select from a pre-populated list of packages available to that node. Invoices will show the background checks ordered by each node within 2 billing cycles after setup.
To order a background check with Account Hierarchy and nodes, please follow the steps below in the ‘Order Background Checks’ section. Note step #5, the ordering modal will ask the user to select the node you would like to order from, as well as ‘Select the background check package you’d like to run’.
The list of available Packages will automatically generate based on the node you select. Select the background check package you want to run.
If you select a node that doesn’t have any assigned packages, you will see all packages in the dropdown. If you do not see any packages populating, and you want to assign a package to that node before proceeding, navigate to your Checkr dashboard.
For more information on Account Hierarchy, nodes, and how to configure your account, see Checkr's Payment & Billing, Adverse Actions, and Manage Account Settings Help Articles.
Order Background Checks
Manual Ordering
Once your Medallion and Checkr accounts are connected, return to a provider profile and follow the steps below.
- From the provider profile, navigate to the ‘Verifications' tab.
- On the Verifications Tab, you will see an ‘Actions’ tile on the right-hand side. With ‘Actions’, there is an option for ‘Background Check’ and ‘Run Check’.
- Select ‘Run Check’.
- An ‘Initiate Background Check’ modal will open.
- The modal will ask the user to select the node you would like to order from, as well as ‘Select the background check package you’d like to run’.
- Select a package from the dropdown.
- Select ‘Initiate Background Check’. This initiates the background check process with the provider.
Please note, if you have not set a permanent address within the provider’s profile, you will receive the following error: ‘Data required by Checkr is missing: “Unable to request a background check without a state address”. Permanent addresses are required for profile completion so this error should be uncommon but if surfaced, please follow the steps below to correct the issue.
To correct this issue:
- Navigate to the provider’s profile and add a permanent address.
- This permanent address will populate in the Checkr invitation flow for all background checks requested on the provider moving forward.
- Select “Save & Next” to save the data.
- Navigate back to the ‘Verifications’ tab and re-initiate the ‘Run Check’ flow.
International Packages
Checkr defines international background checks as background checks run on candidate’s living and working outside of the United States. If your candidate works in the United States but has out-of-country history, for example attended school internationally, you should request a package that includes an education verification with out-of-country history enabled.
Checkr currently offers the following international screenings for candidate’s with work locations outside the United States:
- International Criminal
- Adverse Media Search - may be enabled to automatically run if criminal not available
- Identity Document Verification
- Global Watchlist
- Education Verification
- Employment Verification
Domestic Package with International Verifications
If your candidate works in the United States but has out-of-country history, Checkr currently offers an out-of-country history setting that can be added to any domestic criminal search or verification. The option can be applied for candidates who will perform their work inside the US, but who have an address history outside the US. Screening types that can be run on domestic screenings with out-of-country history include:
- Education Verification
- Employment Verification
Review A Background Check
Once the background check has been ordered, please follow the steps below to monitor the background check from within Medallion.
- From the provider profile, navigate to the ‘Vertifications’ tab.
- On the Verifications Tab, scroll down to ‘Checkr Background Checks’.
- Here you will see all background checks that have been initiated for this provider.
- In the invitation initiated phase, you will be able to see the following details once a background check has been initiated:
- Package
- Status
- Created DAte
- ETA
- Link to the Checkr Dashboard as N/A (no report has been generated yet)
- In the invitation initiated phase, you will also see a clock icon with a tooltip that provides additional information on the background check. An example of the message you will see is the following, “An invitation was successfully initiated with Checkr”. You can click the icon and open the tooltip for the following details:
- ‘Background Check Status’
- When the invitation expires
- If this invitation has an expired status, Medallion will allow you to resubmit the background check by selecting the button within the tooltip to refresh and resubmit the invitation to the provider.
- When the invitation was sent
- When the invitation expires
- ‘Background Check Status’
- Once the invitation has been completed, you will be able to see the following details within the ‘Check Background Checks’ tile:
- Package
- Status
- Created Date
- ETA
- Link to the Checkr dashboard - Click on this link to open the report in the Checkr dashboard, and review details.
- Once the invitation has been completed, you will also see a ‘Checkmark’ icon with a tooltip that provides additional information on the background check.
For more information on reports and report statuses, see How do I interpret a background report in the Checkr Help Center which covers:
Most background checks will be completed within 24 hours, but the time to complete can range from a few minutes to a few weeks, depending on the type of check ordered, the geographic location of the candidate, and/or county courthouse operations.
Checkr Features
Use the Checkr Dashboard
While the Medallion integration allows users to order background checks and view their status, the following features are available only within Checkr:
- Background check invitation links
- Full background check report results
- Adverse Action initiation and processing tools
- Checkr settings
For a quick overview of the Checkr Dashboard, please see Getting started with Checkr
Checkr’s Candidate Experience
The checkr candidate experience overview describes the Checkr candidate experience of the background check process. It includes information about the Checkr Candidate Portal and Help Center where candidates can self-serve and address common issues that can stall or delay their background checks. The overview also includes common reasons candidates contact Checkr and how to address these issues.
The overview includes:
- An overview of the candidate process
- General information about the background check process, including exceptions and disputes
- An overview of the Checkr Candidate Portal
- An introduction to the Candidate Experience team
- A list of some of the most common candidate questions
- Links to the most frequently used pages in the Checkr Help Center
Resources
For a quick overview of the Checkr Dashboard, please see Getting started with Checkr
-
Top Echelon / Checkr Integration User Guide
Read MoreWelcome to Checkr!
This guide will walk you through the Checkr | Top Echelon integration process, and outline how to use the integration as well as the Checkr dashboard for the background check process.
The Checkr Help Center is a great resource for any questions that may not be covered in this user guide. If you have any questions not covered in this guide that are specific to Top Echelon, submit a request to contact us.
______________________________________________________________
- Prerequisites
- Enable Checkr setup
- Create a Checkr account
- Account Hierarchy
- Order Background Checks
- International Packages
- Domestic Package with International Verifications
- Review A Background Check
- Resubmit a Background Check
- Checkr Features
- Use the Checkr Dashboard
- Checkr’s Candidate Experience
- Resources
______________________________________________________________
This guide describes how to set up Checkr to use within Top Echelon, such that Top Echelon users can initiate and view Checkr background checks from within the Top Echelon interface.
Prerequisites
The following items are required to initiate Top Echelon | Checkr integration. Please ensure you have the following before proceeding.
To enable the Checkr Integration:
- Access to Top Echelon with admin rights turned on for “Manage System-Wide Integrations”
To use the Checkr Integration to run / review background checks:
- Access to Top Echelon with admin rights turned on for “Use Checkr Integration”
Enable Checkr setup
To integrate your Checkr account within Top Echelon Recruiting Software, please follow the steps below.
- Login to your Top Echelon account.
- Expand the Sidebar in the top right corner of the page and click on the Settings icon.
- Click to expand the Addons & Integrations section and then select Checkr.
- On the settings page, click the integrate with Checkr button. This will open a pop-up window.
- The pop-up window will open and ask you to Sign Up or Sign In.
- If you are already a Checkr customer, select Sign In to connect your current Checkr account to Top Echelon.
- If you are not a current Checkr customer, select Sign Up to create a Checkr account, and add your billing and credentialing information
- Once the Sign Up or Sign In process is complete, the window will disappear and you will remain on the Checkr Integration page.
- If you Signed Up for a new Checkr account, you will receive a notification in the bottom right hand corner of your screen saying: “Your information has been submitted to Checkr. We’ll notify you when the account has been verified and ready to use”. The Checkr Integration Tile will also reflect the following, “Connection pending. Please wait until your Checkr account is credentialed”.
- You will get a notification in the software via the ‘bell’ icon when your account is ready to use.
- If you Signed In to an existing Checkr Account, you will be able to use your account right away and you will see “You are currently integrated with Checkr” within the Checkr Integration Tile.
Create a Checkr account
If your company does not yet have a Checkr account, one must be created before integration with Top Echelon.
To create an account for use with Top Echelon:
- Click Sign Up when prompted.
- Enter your name and company contact information, and click Continue.
- Enter payment information. Invoices for background checks will come directly from Checkr, and not from Top Echelon. (Payment information may be edited on the Checkr dashboard after the account has been created.)
- Provide the requested credentialing information. This information is required by law to ensure that only legitimate companies, with legitimate business needs, can run background checks.
- Note: Select Purpose: Pre-employment to use Checkr to run background checks for hiring/employment purposes.
- Click Continue to submit your information to Checkr for review. Once the credentialing process is complete, Checkr will notify both Top Echelon and you, and you may begin ordering background checks through the Top Echelon platform.
- Credentialing typically takes 1-2 business days. If Checkr needs additional information, they will reach out to you directly by email.
Account Hierarchy
The Top Echelon integration allows users to set up different "nodes" inside of their Checkr account to have displayed in the Top Echelon background check ordering workflow. Nodes can be used to designate different locations, teams, or groups that order background checks within your organization. Checkr requires you to assign packages to nodes once they are created, and will then display which node ordered which package on your Checkr invoice.
Each time you order a background check within Top Echelon, you will be asked which node to order the check from, and then select from a pre-populated list of packages available to that node. Invoices will show the background checks ordered by each node within 2 billing cycles after setup.
To order a background check with Account Hierarchy and nodes:
- Fill in the work location of the candidate as you normally would for any background check through Top Echelon.
- Select which Hierarchy node you would like to order from.
The list of available Packages will automatically generate based on the node you select. Select the background check package you want to run. If you do not see any packages populating, you will need to assign the appropriate packages to that node in your Checkr dashboard before proceeding.
For more information on Account Hierarchy, nodes, and how to configure your account, see Checkr's Payment & Billing, Adverse Actions, and Manage Account Settings Help Articles.
Order Background Checks
Once your Top Echelon and Checkr accounts are connected, a new Checkr card will be present in all People records. From here, you’ll be able to order checks and view results.
To order a check:
- From your Top Echelon dashboard, open any Person record.
- In the newly available Checkr card, you will see the following options:
- “Run Background Check”
- “View Background Results” - Please note, you will see the “View Background Results” option regardless of whether background checks have been run on the candidate.
- Select “Run Background Check”.
- The Invite Candidate window that appears, select the type of check you would like to request in the Select a package drop-down menu.
- Enter the candidate’s email address (this is automatically pulled if present in the record)
- Enter the candidate’s state (this is also automatically included if present in the record)
- Click Submit.
Completing this step will email the candidate to initiate the background check process. The candidate will then provide the other necessary details directly to Checkr, with no additional steps required on your end!
Once the candidate provides their information, Checkr will begin to process the background check. Most background checks typically take 3-5 business days to complete. You'll receive a notification once your report is ready.
International Packages
Checkr defines international background checks as background checks run on candidate’s living and working outside of the United States. If your candidate works in the United States but has out-of-country history, for example attended school internationally, you should request a package that includes an education verification with out-of-country history enabled.
Checkr currently offers the following international screenings for candidate’s with work locations outside the United States:
- International Criminal
- Adverse Media Search - may be enabled to automatically run if criminal not available
- Identity Document Verification
- Global Watchlist
- Education Verification
- Employment Verification
Domestic Package with International Verifications
If your candidate works in the United States but has out-of-country history, Checkr currently offers an out-of-country history setting that can be added to any domestic criminal search or verification. The option can be applied for candidates who will perform their work inside the US, but who have an address history outside the US. Screening types that can be run on domestic screenings with out-of-country history include:
- Education Verification
- Employment Verification
Review A Background Check
If a check has been completed, you can click View Background Results in the candidate’s record to open the report details.
- This will open a new window where all checks run on this candidate will be listed.
- A window will open to show the progress and result of a background check for a candidate.
- The window displays:
- The name of the package ordered the status of the invitation to the candidate,
- The window displays:
- the status of the report's progress and its ETA, and
- the result of the report and its completion timestamp
- A link to the candidate in the Checkr Dashboard if the invitation has not yet been completed, and a link to the report once it has been initiated.
If the check is completed, click view report to access the full details. This will open the Checkr dashboard. Here you’ll be able to view detailed check results as well as manage your Checkr account.
For more information on reports and report statuses, see How do I interpret a background report in the Checkr Help Center which covers:
Most background checks will be completed within 24 hours, but the time to complete can range from a few minutes to a few weeks, depending on the type of check ordered, the geographic location of the candidate, and/or county courthouse operations.
Resubmit a Background Check
To resubmit a background check for a candidate, the steps of ordering a background check are reiterated below.
- From your Top Echelon dashboard, navigate to ‘People’ and select the candidate that you would like to request a background check for. This will open the candidate’s profile.
- Within the candidate profile, there are various cards. Navigate to the Checkr card.
- Within the Checkr card, you will see the following options:
- “Run Background Check”
- “View Background Results” - Please note, you will see the “View Background Results” option regardless of whether background checks have been run on the candidate.
- Select “Run Background Check”.
- The Invite Candidate modal will open and you will be asked to input the following:
- Select a country
- Select a state
- Select a city (option)
- Select a package
- Enter Email
- Click ‘Submit’. By clicking ‘Submit” you have formally invited the candidate to begin the background check process.
- To close, you will receive a confirmation screen “Invitation Sent - The candidate was invited to the background check” and you can select “Close”.
Checkr Features
Use the Checkr Dashboard
While the Top Echelon integration allows users to order background checks and view their status, the following features are available only within Checkr:
- Background check invitation links
- Full background check report results
- Adverse Action initiation and processing tools
- Checkr settings
For a quick overview of the Checkr Dashboard, please see Getting started with Checkr
Checkr’s Candidate Experience
The Checkr candidate experience overview describes the Checkr candidate experience of the background check process. It includes information about the Checkr Candidate Portal and Help Center where candidates can self-serve and address common issues that can stall or delay their background checks. The overview also includes common reasons candidates contact Checkr and how to address these issues.
The overview includes:
- An overview of the candidate process
- General information about the background check process, including exceptions and disputes
- An overview of the Checkr Candidate Portal
- An introduction to the Candidate Experience team
- A list of some of the most common candidate questions
- Links to the most frequently used pages in the Checkr Help Center
Resources
For a quick overview of the Checkr Dashboard, please see Getting started with Checkr
-
VidCruiter / Checkr Integration User Guide
Read MoreWelcome to checkr!
This guide will walk you through the Checkr | VidCruiter integration process, and outline how to use the Checkr dashboard for the background check process.
The Checkr Help Center is a great resource for any questions that may not be covered in this user guide. If you have any questions not covered in this guide that are specific to VidCruiter, submit a request.
_________________________________________________________
- Prerequisites
- Enable Checkr Setup
- Create A Checkr Account
- Setting up your Checkr Account
- Order Background Checks
- Step 1 – Name the Position
- Step 2 – Team Members
- Step 3 – Applicant Steps
- Step 4 – Recruiter Tasks
- Step 5 – Settings
- Invite Applicant to Complete Background Check
- Review A Background Check
- Checkr Features
- Use the Checkr Dashboard
- Checkr’s Candidate Experience
- Resources
_________________________________________________________
This guide describes how to integrate Checkr with VidCruiter such that users can request and view Checkr background checks from within the VidCruiter interface.
Prerequisites
- Access to Checkr, with admin rights
- Access to VidCruiter, with admin rights
Enable Checkr Setup
- Click on (1) Admin, then (2) Integrations, (3) Checkr, and then (4) Connect to Checkr
Clicking Start Background Check will open a window asking you to Sign Up or Sign In.
- If you are already a Checkr customer, select Sign In to connect your current Checkr account to VidCruiter.
If you are not a current Checkr customer, select Sign Up to create a Checkr account, and add your billing and credentialing information
Note: There is one feature that needs to be enabled by Checkr support so that you see background check status in VidCruiter, reach out to Checkr Support and let them know you have connected your account to VidCruiter and need Account Level Webhooks enabled.
Create A Checkr Account
- Click Sign Up when prompted.
- Enter your name and company contact information, and click Continue.
- Enter payment information. Invoices for background checks will come directly from Checkr.
- Provide the requested credentialing information. This information is required by law to ensure that only legitimate companies, with legitimate business needs, can run background checks.
- Note: Select Purpose: Pre-employment to use Checkr to run background checks for hiring/employment purposes.
- Click Continue to submit your information to Checkr for review. Once the credentialing process is complete, Checkr will notify you, and you may begin ordering background checks through the VidCruiter.
- Credentialing typically takes 1-2 business days. If Checkr needs additional information, they will reach out to you directly by email.
If you have any questions while completing the sign-up form or after you have submitted, please reach out to Checkr support.
Checkr Welcome Email
Setting up your Checkr Account
You will manage all your users, notifications, and packages from the Checkr Dashboard. Here are some helpful links to set-up and customize your Checkr account.
- Adding Users and User Roles
- Notifications
- Report Status and Adjudication
- Package and Screening Details
To add, remove or customize your Checkr packages please submit a ticket here and Checkr support will help ensure you have exactly the packages you need. The following are the three default packages your account will be automatically set-up with. Prices below do not include court fees or other pass-through fees that can occur, a full list of additional fees by state and county can be found here.
Order Background Checks
- In VidCruiter, click on Positions and then on Add
Step 1 – Name the Position
This step is the initial position level settings page. Here, you can name the position, add a job reference number, request it to show in job boards, whether you would like to use an interview product or a template. For the purpose of this guide, you will only need a position name. The rest can be updated later.
In the overview step, you can also choose which division you would like this position to be in. This will allow you to choose which users have access to this position depending on the division they are assigned to.
- Name the position, choose the appropriate settings. You can also choose to use a position template on this options page.
- Click Step 2 – Team Members
Step 2 – Team Members
Choose which users will be added to this position. You can choose any user who is assigned to the same division you assigned the position. Admin and Super Admin will always be available no matter the division.
- Add all team members for this position. You can always update this later.
- Click Step 3 – Applicant Step
Step 3 – Applicant Steps
Set up the application forms that all applicants will fill out. This is highly customizable. You can add, remove, edit any type of field. You can also choose to create Applicant Steps using a template that you have saved in the past.
- Click on Create new Applicant Step
- Name the Applicant Step
- Choose the appropriate settings for this step and click Save these Applicant Step Settings
- Add all the Question Pages required for this step.
- Once you have entered all Question pages for this Applicant step, scroll to the bottom of the page and click I’m done editing this applicant step, add or edit another
- To add a Checkr Background check to your workflow, you will need to create a new Applicant Step for the background check. Click on Create a new Applicant Step
- Name the Applicant step Background Check (this is customizable) and click Save
- On the Settings tab, scroll to the bottom and click Checkr. You will then have the option to choose from a list of all background checks available in your Checkr Account.
- Click Save these applicant step settings.
- Add any documentation or disclaimers you would like the applicant to read through as a question page and click I’m done editing this applicant step, add or edit another.
- Once you have completed all Applicant Steps, click on Step 4 – Recruiter tasks.
Step 4 – Recruiter Tasks
Configure recruiter tasks, automating the recruiting process with options such as when emails will be sent, when applicants are moved to a different step, etc. When done, scroll to the bottom of the page and click Step 5 – Settings.
Step 5 – Settings
While settings are customizable, for this integration no additional configurations are required.
- Click Step 6 – Position Status.
- Once you are done with the setup of your position, and you are comfortable with it going live, click Make this position live.
- Your position is now live and you can start requesting applicants to complete a background check.
Invite Applicant toComplete Background Check
Now that the Checkr integration has been added to your VidCruiter position, we will go through the steps of inviting an applicant to complete the Checkr Background Check.
- Click on the list of applicants for the VidCruiter Position you created in previous steps.
- Click on the name of the applicant that is ready to move on to the Background Check
- Once on their profile, click on Change Status.
- Choose the Background Check step in the “What Status?” selector and click Change Status.
Once you have ordered the background check in VidCruiter, Checkr will manage all communication with the candidate. They will receive an email to start the process and provide their information. Checkr manages all data collection, disclosure and acknowledgement forms and candidate communication. If your candidate has any questions they can contact Checkr’s Candidate support team at support@checkr.com
Candidate Invitation Email:
Candidate Background Check Forms:
Reviewing a background check
You will be able to check the status of the applicant’s background check from their profile in VidCruiter.
- Within the applicant’s profile, click on the Integrations tab.
Complete Reports, you will be able to click-into the full report in Checkr and decide how to move forward. All Adjudication and Adverse Action is managed in the Checkr Dashboard. Checkr will manage the sending of all Adverse Action communication.
Checkr Features
Use the Checkr Dashboard
While the VidCruiter integration allows users to order background checks and view their status, the following features are available only within Checkr:
- Background check invitation links
- Full background check report results
- Adverse Action initiation and processing tools
- Checkr settings
For a quick overview of the Checkr Dashboard, please see Getting started with Checkr
Checkr’s Candidate Experience
The checkr candidate experience overview describes the Checkr candidate experience of the background check process. It includes information about the Checkr Candidate Portal and Help Center where candidates can self-serve and address common issues that can stall or delay their background checks. The overview also includes common reasons candidates contact Checkr and how to address these issues.
The overview includes:
- An overview of the candidate process
- General information about the background check process, including exceptions and disputes
- An overview of the Checkr Candidate Portal
- An introduction to the Candidate Experience team
- A list of some of the most common candidate questions
- Links to the most frequently used pages in the Checkr Help Center
Resources
For a quick overview of the Checkr Dashboard, please see Getting started with Checkr
-
Welcome In App / Checkr Integration User Guide
Read MoreWelcome to checkr!
This guide will walk you through the Checkr / Welcome In App integration process, and outline how to use the Checkr dashboard for the background check process.
The Checkr Help Center is a great resource for any questions that may not be covered in this user guide. If you have any questions not covered in this guide that are specific to Welcome In App, submit a request to contact us.
__________________________________________________
- Prerequisites
- Enable Checkr setup
- Create a Checkr account
- Account Hierarchy
- Order Background Checks
- Manual Ordering
- International Packages
- Domestic Package with International Verifications
- Review A Background Check
- Checkr Features
- Use the Checkr Dashboard
- Checkr’s Candidate Experience
- Resources
__________________________________________________
This guide describes how to set up Checkr to use within Welcome In App, such that Welcome In App users can initiate and view Checkr background checks from within the Welcome In App interface.
Prerequisites
The following items are required to initiate Welcome In App | Checkr integration. Please ensure you have the following before proceeding.
- Access to Welcome In App, as a Property Owner
Property Owners are requesting background checks on Property Managers.
Property Owner will receive a notification that someone has applied to the property
Enable Checkr setup
First, enable Checkr from within Welcome In App. You must have admin access to Welcome In App, as a property owner, to complete this process.
- Login to your Welcome In App account, as a property owner.
- From your ‘Profile”, select ‘Background Check’.
- Once on the “Background Check’ screen, select ‘Authorize Background Checks’.
- You will be redirected to the Check hosted Sign In / Sign Up flow.
- If you are already a Checkr customer, select Sign In to connect your current Checkr account to Welcome In App.
- Upon a successful Sign In, you will be redirected back to Welcome In App and can begin running background checks.
- You will have the option to deauthorize your account at any time.
- If you are not a current Checkr customer, select Sign Up to create a Checkr account, and add your billing and credentialing information.
- If you choose Sign Up, you will be redirected back to WelcomeIn but will have to wait for your Checkr account to be credentialed before requesting any background checks.
- If you attempt to order a background check before your account has been credentialed, you will see the following message: “Info: Please come back in 24 hours to 48 hours. We are currently validating your background check account”.
Create a Checkr account
If your company does not yet have a Checkr account, one must be created before integration with Welcome In App.
To create an account for use with Welcome In App:
- Click Sign Up when prompted.
- Enter your name and company contact information, and click Continue.
- Enter payment information. Invoices for background checks will come directly from Checkr, and not from Welcome In App. (Payment information may be edited on the Checkr dashboard after the account has been created.)
- Provide the requested credentialing information. This information is required by law to ensure that only legitimate companies, with legitimate business needs, can run background checks.
- Note: Select Purpose: Pre-employment to use Checkr to run background checks for hiring/employment purposes.
- Click Continue to submit your information to Checkr for review. Once the credentialing process is complete, Checkr will notify both Welcome In App and you, and you may begin ordering background checks through the Welcome In App platform.
- Credentialing typically takes 1-2 business days. If Checkr needs additional information, they will reach out to you directly by email.
Account Hierarchy
The integration allows users to set up different "nodes" inside of their Checkr account to have displayed in the background check ordering workflow. Nodes can be used to designate different locations, teams, or groups that order background checks within your organization. Checkr will ask you to assign packages to nodes once they are created, and will then display which node ordered which package on your Checkr invoice.
Each time you order a background check, you will be asked which node to order the check from, and then select from a pre-populated list of packages available to that node. Invoices will show the background checks ordered by each node within 2 billing cycles after setup.
To order a background check with Account Hierarchy and nodes, please follow the steps outlined below in, ‘Order Background Checks’.
- Fill in the work location of the candidate as you normally would for any background check.
- Select which Hierarchy node you would like to order from.
The list of available Packages will automatically generate based on the node you select. Select the background check package you want to run. If you do not see any packages populating, you will need to assign the appropriate packages to that node in your Checkr dashboard before proceeding.
For more information on Account Hierarchy, nodes, and how to configure your account, see Checkr's Payment & Billing, Adverse Actions, and Manage Account Settings Help Articles.
Order Background Checks
Manual Ordering
Once your Welcome In App and Checkr accounts are connected, return to ‘My Properties’ and select ‘Applicant’s’.
- From within ‘Applicants’, select the ‘three dot selection’ on the property you would like to view. Select ‘Edit Property’. This will bring you to a property overview screen.
- Scroll down to ‘Applicants’ and select the Applicant you would like to run a background check on.
- Once on the applicant’s profile,, select the option for, ‘Background Check’.
- Once selected, select ‘Request for background check’.
- This will open a module to invite your applicant to the background check. You will be asked for the following information:
- Select a county
- Select a state
- Select a city (optional)
- Select a package
- Enter email
- Once the information is complete, select ‘Submit’.
- Once submitted, the invitation has been sent to your applicant to initiate their background check.
International Packages
Checkr defines international background checks as background checks run on candidate’s living and working outside of the United States.
Checkr currently offers the following international screenings for candidate’s with work locations outside the United States:
- International Criminal
- Adverse Media Search - may be enabled to automatically run if criminal not available
- Identity Document Verification
- Global Watchlist
- Education Verification
- Employment Verification
Domestic Package with International Verifications
If your candidate works in the United States but has out-of-country history, for example attended school internationally, request a package that includes an education verification with out-of-country history enabled. Checkr currently offers an out-of-country history setting that can be added to any domestic criminal search or verification.
The option can be applied for candidates who will perform their work inside the US, but who have an address history outside the US. Screening types that can be run on domestic screenings with out-of-country history include:
- Education Verification
- Employment Verification
Review A Background Check
Once the background check has been ordered, please follow the instructions below for how to monitor an applicant’s background check.
Once your Welcome In App and Checkr accounts are connected, return to ‘My Properties’ and select ‘Applicant’s’.
- From within ‘Applicants’, select the ‘three dot selection’ on the property you would like to view. Select ‘Edit Property’. This will bring you to a property overview screen.
- Scroll down to ‘Applicants’ and select the Applicant you would like to run a background check on.
- Once on the applicant’s profile,, select the option for, ‘Background Check’.
- Once selected, select ‘Background Check Reports’.
- This will open a module, which will show all of the background check reports run on the applicant. The following information will be available:
- The name of the package ordered,
- The status of the invitation to the candidate,
- The status of the report’s progress and its ETA, and
- The result of the report and its completion timestamp.
- The module also provides a link to the candidate in the Checkr dashboard if the invitation has not yet been completed, and a link to the report once it has been initiated.
An additional way to view a background check’s status is on the applicant’s profile. Under ‘Background Check’ you will see the current background check reports ‘status’. For more details, click into the ‘Background Check’ module and select ‘Background Check Reports’ as instructed above.
For more information on reports and report statuses, see How do I interpret a background report in the Checkr Help Center which covers:
Most background checks will be completed within 24 hours, but the time to complete can range from a few minutes to a few weeks, depending on the type of check ordered, the geographic location of the candidate, and/or county courthouse operations.
Checkr Features
Use the Checkr Dashboard
While the integration allows users to order background checks and view their status, the following features are available only within Checkr:
- Background check invitation links
- Full background check report results
- Adverse Action initiation and processing tools
- Checkr settings
For a quick overview of the Checkr Dashboard, please see Getting started with Checkr
Checkr’s Candidate Experience
The checkr candidate experience overview describes the Checkr candidate experience of the background check process. It includes information about the Checkr Candidate Portal and Help Center where candidates can self-serve and address common issues that can stall or delay their background checks. The overview also includes common reasons candidates contact Checkr and how to address these issues.
The overview includes:
- An overview of the candidate process
- General information about the background check process, including exceptions and disputes
- An overview of the Checkr Candidate Portal
- An introduction to the Candidate Experience team
- A list of some of the most common candidate questions
- Links to the most frequently used pages in the Checkr Help Center
Resources
For a quick overview of the Checkr Dashboard, please see Getting started with Checkr
-
Launch Mobility / Checkr Integration User Guide
Read MoreWelcome to Checkr!
This guide will walk you through the Checkr | Launch Mobility integration process, and outline how to use the Checkr dashboard for the background check process.
The Checkr Help Center is a great resource for any questions that may not be covered in this user guide. If you have any questions not covered in this guide that are specific to Launch Mobility, submit a request to contact us.
______________________________________________________________
- Prerequisites
- Enable Checkr setup
- International Packages
- Domestic Package with International Verifications
- Order Background Checks
- Background Check Resubmission
- Review A Background Check
- Checkr Features
- Use the Checkr Dashboard
- Checkr’s Candidate Experience
- Resources
______________________________________________________________
This guide describes how the Launch Mobility platform integrates with Checkr. This process is not fully automated and requires prior configuration and commissioning between the client organization and Launch Mobility.
Prerequisites
The following items are required to initiate Launch Mobility | Checkr integration. Please ensure you have the following before proceeding.
- Creation and configuration of the client organization in the Launch Mobility Platform.
- The client organization must have an active Checkr account and the user must have admin rights within Checkr before proceeding with the activation of the integration on the Launch Mobility side.
- The client organization must work with Launch Mobility to pre-configure the integration with Checkr. This will require setting fixed configurations for Account Hierarchy and Package selection. The integration will remain inactive until the credential authorization process is completed by the client organization. See ‘Enable Checkr Setup’ below.
Enable Checkr setup
- If your company does not yet have a Checkr account, one must be created before enabling Checkr within Launch Mobility. To set-up a Checkr account, please visit https://checkr.com/ and select either, ‘Start for Free’ or ‘Talk to Sales’, to begin your account setup.
- Once your Checkr account has been created, you should start by sending a message to operations@launchmobility.com. Launch Mobility will direct you from there to the proper support channels.
- Once you’re speaking with a representative at Launch Mobility, Launch Mobility will work with you to send you an authorization link via email. Once you receive this email, as an existing Checkr customer, you must click “Sign-In”.
- By clicking “Sign-In”, you will validate your Checkr access credentials and authorize Launch Mobility to make report requests on your behalf.
- Additionally, you will work with the Launch Mobility Team to pre-configure the integration with Checkr and set fixed configurations for Account Hierarchy and Package Selection.
Account Hierarchy: For more information on Account Hierarchy, nodes, and how to configure your Checkr account, see Checkr's Payment & Billing, Adverse Actions, and Manage Account Settings Help Articles.
International Packages
Checkr defines international background checks as background checks run on candidate’s living and working outside of the United States. If your candidate works in the United States but has out-of-country history, for example attended school internationally, the customer user should request a package that includes an education verification with out-of-country history enabled.
Checkr currently offers the following international screenings for candidate’s with work locations outside the United States:
- International Criminal
- Adverse Media Search - may be enabled to automatically run if criminal not available
- Identity Document Verification
- Global Watchlist
- Education Verification
- Employment Verification
Domestic Package with International Verifications
If your candidate works in the United States but has out-of-country history, Checkr currently offers an out-of-country history setting that can be added to any domestic criminal search or verification. The option can be applied for candidates who will perform their work inside the US, but who have an address history outside the US. Screening types that can be run on domestic screenings with out-of-country history include:
- Education Verification
- Employment Verification
Order Background Checks
Once your Launch Mobility and Checkr accounts are connected…
- The background check request is made during the user registration process in the Launch Mobility client application. The package that is served to the user / driver should already be pre-configured for their service.
- This means that a candidate can only complete their registration process in the Launch Mobility client application if they complete the background check process with Checkr with the package previously configured for the service.
- Once Launch Mobility receives the result from Checkr, Launch Mobility will update the status on Launch Mobility’s side and allow or deny the drive to complete the registration process.
Background Check Resubmission
Launch Mobility does not currently support the functionality to re submit a background check in the Launch Mobility platform. We ask that you manage all resubmissions through the Checkr dashboard.
Review A Background Check
The Launch Mobility mobile app provides a screen to validate the pending requirements to complete the registration flow. The candidate can check if there are changes in the status of the requirements by refreshing the screen.
Once Launch Mobility receives report status updates the report is updated on the Launch Mobility side and the user can finish their registration process.
To view the full report, the customer must navigate to the Checkr dashboard.
For a quick overview of the Checkr Dashboard, please see Getting started with Checkr.
- Background check invitation links
- Full background check report results
- Adverse Action initiation and processing tools
- Checkr settings
For more information on reports and report statuses, see How do I interpret a background report in the Checkr Help Center which covers:
Most background checks will be completed within 24 hours, but the time to complete can range from a few minutes to a few weeks, depending on the type of check ordered, the geographic location of the candidate, and/or county courthouse operations.
Checkr Features
Use the Checkr Dashboard
For a quick overview of the Checkr Dashboard, please see Getting started with Checkr.
- Background check invitation links
- Full background check report results
- Adverse Action initiation and processing tools
- Checkr settings
Checkr’s Candidate Experience
The checkr candidate experience overview describes the Checkr candidate experience of the background check process. It includes information about the Checkr Candidate Portal and Help Center where candidates can self-serve and address common issues that can stall or delay their background checks. The overview also includes common reasons candidates contact Checkr and how to address these issues.
The overview includes:
- An overview of the candidate process
- General information about the background check process, including exceptions and disputes
- An overview of the Checkr Candidate Portal
- An introduction to the Candidate Experience team
- A list of some of the most common candidate questions
- Links to the most frequently used pages in the Checkr Help Center
Resources
For a quick overview of the Checkr Dashboard, please see Getting started with Checkr.
-
POINT / Checkr Integration User Guide
Read MoreWelcome to Checkr!
This guide will walk you through the Checkr | POINT integration process, and outline how to use the Checkr dashboard for the background check process.
The Checkr Help Center is a great resource for any questions that may not be covered in this user guide. If you have any questions not covered in this guide that are specific to POINT, submit a request to contact us.
______________________________________________________________
- Prerequisites
- Enable Checkr setup
- Create a Checkr account
- Account Hierarchy
- Order Background Checks
- Review A Background Check
- Checkr Features
- Use the Checkr Dashboard
- Checkr’s Candidate Experience
- Checkr Resources
- POINT Resources
______________________________________________________________
This guide describes how to set up Checkr to use within POINT, such that POINT users can initiate and view Checkr background checks from within the POINT interface.Prerequisites
The following items are required to initiate POINT | Checkr integration. Please ensure you have the following before proceeding.
- Access to POINT (Pro Subscription), with admin or owner rights
Enable Checkr setup
To enable Checkr from within POINT, please follow the steps below.
Step 1: In your nonprofit admin dashboard, select "Organization" in the left hand side menu
Step 2: Select "Integrations" in the drop down menu
Step 3: Select the Checkr Integration option on the Integrations page
Step 4: Next, you have the option to "Create a new Checkr Account" or "Connect an existing Checkr Account"
- If you are already a Checkr customer, select “Connect an existing Checkr Account” >> “Sign In” to connect your current Checkr account to POINT.
- If you are not a current Checkr customer, select “Create a new Checkr Account” >> “Sign Up” to create a Checkr account, and add your billing and credentialing information.
Step 5: After successfully signing up or signing in to Checkr, you will be redirected back to POINT to configure the integration.
Create a Checkr account
If your company does not yet have a Checkr account, one must be created before integration with POINT.
To create an account for use with POINT:
- Click Sign Up when prompted.
- Enter your name and company contact information, and click Continue.
- Enter payment information. Invoices for background checks will come directly from Checkr, and not from POINT. (Payment information may be edited on the Checkr dashboard after the account has been created.)
- Provide the requested credentialing information. This information is required by law to ensure that only legitimate companies, with legitimate business needs, can run background checks.
- Note: Select Purpose: Pre-employment to use Checkr to run background checks for hiring/employment purposes.
- Click Continue to submit your information to Checkr for review. Once the credentialing process is complete, Checkr will notify both POINT and you, and you may begin ordering background checks through the POINT platform.
- Credentialing typically takes 1-2 business days. If Checkr needs additional information, they will reach out to you directly by email.
Account Hierarchy
The integration allows users to set up different "nodes" inside of their Checkr account to have displayed in the background check ordering workflow. Nodes can be used to designate different locations, teams, or groups that order background checks within your organization. Checkr allows you to assign packages to nodes once they are created, and will then display which node ordered which package on your Checkr invoice.
Each time you set up an event and configure the event’s background check settings, you will be asked to select a node to order the check from, and then select from a pre-populated list of packages available to that node. The list of available Packages will automatically generate based on the node you select. Select the background check package you want to run.
Or, you can set up a default node and background check package for all checks run through POINT. See how here!
Invoices will show the background checks ordered by each node within 2 billing cycles after setup. For more information on Account Hierarchy, nodes, and how to configure your account, see Checkr's Payment & Billing, Adverse Actions, and Manage Account Settings Help Articles.
Order Background Checks
Currently, background checks are tied to event registration. As an admin, you’re able to require a screening for a volunteer before they volunteer and then approve that volunteer’s event registration after the background has been completed.
Step 1: Make sure you have created a Checkr account and connected it to your POINT account.Step 2: If you're planning on requiring background checks for most of your volunteer opportunities, save admin time by setting a default background check requirement for future events you create. Step 3: Set an auto-expiration for your organization's background checks, if applicable for your organization. Each nonprofit has their own decision making process for background check reviews. Each nonprofit can decide what it means to "Pass" a background check and how long that background check is good for.
Step 4: Now you're all set up. To start running background checks, create an event you want to require a screening for. Select "Volunteer" in the admin left hand side menu. Next, select "Manage Events" from the submenu. Then, once on the Manage Events page select "Create Event" in the upper right hand corner of the screen.
Step 5: Since background checks can differ at the shift level (giving the most flexibility to nonprofits) you'll find the toggle to turn on the background check requirement in the "When" section of the Create Event page. Turn the Toggle next to "Background Check Required" on.Step 6: Next, make sure that the background check package you wish to require is correct. If you have a default package selected, it will automatically populate though you are able to change the selection here if needed.
- Note: Currently, an admin is unable to request a background check for a specific volunteer outside of event or shift registration. However, our team is working on this feature.
- Tip: If you wish to block event registration a few days before an event starts, so that there is time for all of the background checks to be completed, follow the steps to set a deadline to register.
- Tip: If you wish to require background checks on some shifts rather than others, or even to check two different background check requirements for different shifts, this is possible. Just select "Add Shift" and you'll be able to require and select the background check package at the shift level.
Step 7: Once your event is published, volunteers are required to start the background check process. You can check the status of your volunteers background checks in several locations including the Event Details Volunteer List, shown below:
- Note: Volunteers' background check reports are not stored in POINT, they are only stored in Checkr. However, POINT stores the status of the screening. If you'd like to view a volunteer candidate's background check you can go directly to your Checkr account and search for the volunteer by name. Or you can find the quick links to a volunteer's Checkr profile and report in POINT.
Step 8: Make sure that once your organization sees there is a completed background check that you complete the adjudication process in Checkr. As an admin, you must manually approve a volunteer's registration by changing their registration from "Pending" to "Signed Up" in the Event Details Volunteer List.
- Note: Completed does not mean a volunteer has "passed" a background check screening. "Completed" simply means that the screening process has been completed. If a check has been completed, the nonprofit admin must approve the volunteer for an opportunity or event. See all the Background Check Status Types below.
- Note: To understand the background check process for volunteers, read this article.
Review A Background Check
Volunteer's background check reports are not stored in POINT, they are only stored in Checkr. However, POINT stores the status of the screening.
If you'd like to view a volunteer candidate's background check you can go directly to your Checkr account and search for the volunteer by name. Or you can find the quick links to a volunteer's Checkr Profile in POINT.
Where to find quick links to a volunteer's background check screening in POINT:
1. Volunteer Profile: Navigate to a volunteers profile from the "People" option in the left hand side menu or click on a volunteers photo thumbnail on pages like "Event CheckIn". In each volunteer profile there is a Tab labeled "Background Checks". There, the statuses of the background checks they have undergone specific to your organization will be listed. If available, a link to their background check will be listed there.2. Background Check Page: Navigate to "People", then select "Background Checks" in the sub menu. This will show a list of all the screenings underway for your organization. If available, a link to a volunteer's background check in Checkr will be listed there for easy access.
3. Checkr Integration Page: Navigate to "Organization", Select "Integrations" in the submenu, then select "Checkr" amongst the integration options. If your Checkr account is setup and connected, you'll see a button labeled "View my Background Checks". This will also take you to the background check page noted above.For more information on reports and report statuses, see How do I interpret a background report in the Checkr Help Center which covers:
Most background checks will be completed within 24 hours, but the time to complete can range from a few minutes to a few weeks, depending on the type of check ordered, the geographic location of the candidate, and/or county courthouse operations.
Checkr Features
Use the Checkr Dashboard
While the integration allows users to order background checks and view their status, the following features are available only within Checkr:
- Background check invitation links
- Full background check report results
- Adverse Action initiation and processing tools
- Checkr settings
For a quick overview of the Checkr Dashboard, please see Getting started with Checkr
Checkr’s Candidate Experience
The checkr candidate experience overview describes the Checkr candidate experience of the background check process. It includes information about the Checkr Candidate Portal and Help Center where candidates can self-serve and address common issues that can stall or delay their background checks. The overview also includes common reasons candidates contact Checkr and how to address these issues.
The overview includes:
- An overview of the candidate process
- General information about the background check process, including exceptions and disputes
- An overview of the Checkr Candidate Portal
- An introduction to the Candidate Experience team
- A list of some of the most common candidate questions
- Links to the most frequently used pages in the Checkr Help Center
Checkr Resources
For a quick overview of the Checkr Dashboard, please see Getting started with Checkr
POINT Resources
Integrations Help Center: Background Checks


